10 Pastel Clay DIY Ideas That Complete Your Easter Baskets
4/4/20265 min read
10 Pastel Clay DIY Ideas That Complete Your Easter Baskets
Looking to make your Easter baskets feel extra special this year? Adding handmade pastel clay creations can instantly elevate the look and make your baskets feel personal and Pinterest-worthy. These DIY ideas are simple, affordable, and perfect for creating a soft, pastel aesthetic for Easter.
Why Pastel Clay for Easter?
Pastel colors and Easter go hand in hand. Soft pinks, baby blues, muted yellows, and sage greens create a calming and elegant look. Using clay, whether air-dry or polymer, allows you to:
Create custom, one-of-a-kind pieces
Match your exact color palette
Add a handmade touch to your baskets
Make items that last beyond the holiday
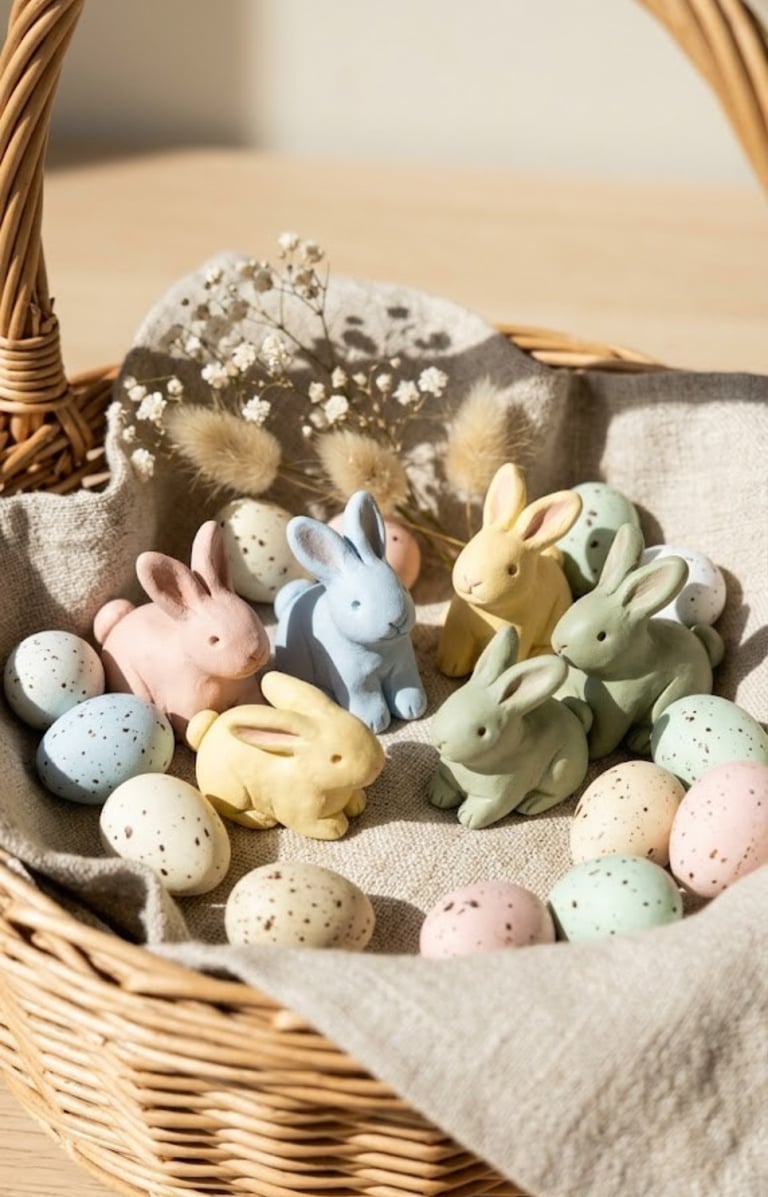
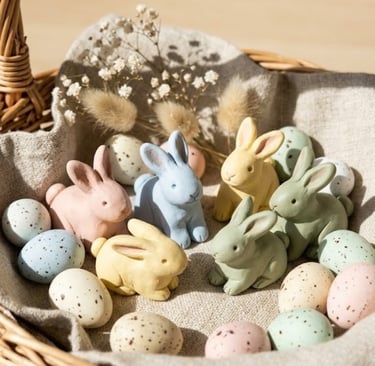
1. Mini Bunny Figurines
These are the kind of tiny details that make an Easter basket feel thoughtfully put together instead of rushed. Mini bunny figurines are simple, soft, and instantly recognizable. You shape a small piece of clay into a rounded body, pinch up two ears, and keep the features minimal. Paint them in muted pastels or leave them matte for a more modern look. They work as basket fillers, table decor, or even small keepsakes that last long after Easter.
What You Need
White air dry clay — easy to shape and beginner-friendly
Acrylic paint in pastel tones — soft pink, baby blue, butter yellow, sage
Fine paintbrush for details
Toothpick or dotting tool for eyes
Clear matte or gloss sealer
How to Make It
Take a small piece of clay and roll it into a smooth oval shape for the bunny’s body.
Pinch or attach two small pieces on top to form the ears. Smooth the edges so they blend naturally into the head.
Use a toothpick or dotting tool to gently mark eyes and a nose, or leave the face blank for a minimal aesthetic.
Let the figurine dry completely — usually 24 hours depending on thickness.
Once dry, paint in soft pastel colors or keep it neutral with just a clear sealer.
Seal the finished piece to protect it and give it a clean finish.
Tip: Keep the shapes slightly imperfect. Overworking the clay can make it look stiff, while soft, rounded edges give that effortless handmade look.
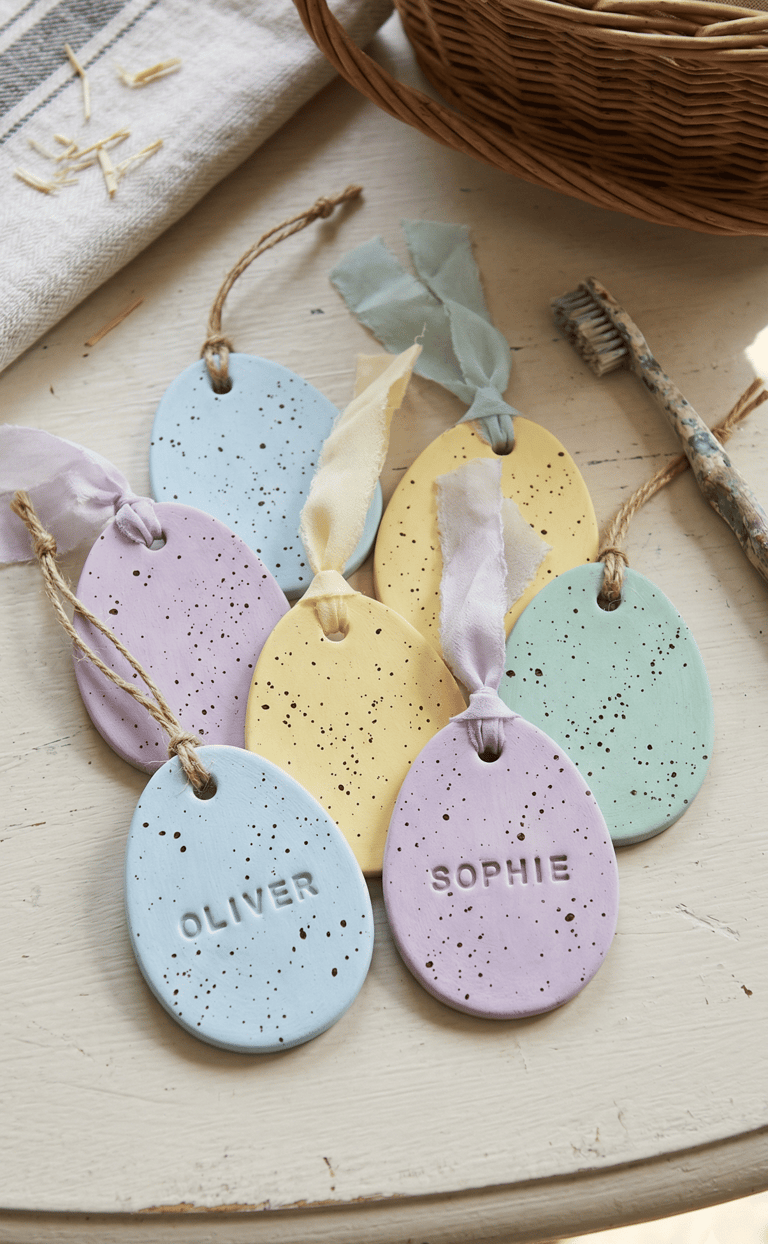
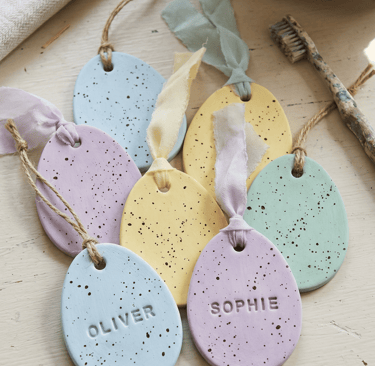
2. Speckled Egg Tags
Personalizing your Easter baskets with custom name tags adds a high-end feel. These clay egg tags are durable, reusable, and look beautiful tied to a basket handle with a piece of twine or chiffon ribbon. The "speckled" look mimics real bird eggs and fits perfectly with a rustic-chic aesthetic.
What You Need
Air-dry or polymer clay
Egg-shaped cookie cutter (or a paper template)
Pastel acrylic paint
Brown or black paint (for speckling)
Old toothbrush
Straw or toothpick (to poke a hole)
Ribbon or twine
How to Make It
Roll out your clay to about 1/4 inch thickness.
Use the cutter to create egg shapes.
Use a straw to poke a small hole at the top of each egg before it dries.
Once dry, paint the eggs in solid pastel colors.
Dip an old toothbrush into watered-down brown paint. Use your thumb to flick the bristles over the eggs to create a "speckled" effect.
Once the speckles are dry, thread your ribbon through the hole.
Tip: Use letter stamps to emboss names into the wet clay for a truly personalized touch.
3. Pastel Clay Carrots
While traditional carrots are bright orange, creating them in "muted apricot" or "dusty peach" makes them feel sophisticated. These are perfect for tucking into the hay of an Easter basket or using as table scatter.
What You Need
Clay in peach, sage green, and cream
Modeling tool or butter knife
Matte sealer
How to Make It
Roll a small piece of peach clay into a cone shape.
Use a knife to press light horizontal indentations along the body of the carrot for texture.
Roll three tiny "snakes" of sage green clay and press them into the top of the carrot to act as the stems.
Smooth the connection points with a drop of water.
Let dry and finish with a matte sealer to keep the "earthy" look.
4. Pressed Flower Coasters
Easter coincides with the start of spring, making floral motifs a natural choice. These coasters are functional and act as a beautiful "base" gift inside a basket for adults.
What You Need
White air-dry clay
Small dried flowers or sturdy fresh leaves
Rolling pin
Circular cutter or a wide-mouth glass
Clear gloss sealer
How to Make It
Roll out a flat disc of clay.
Arrange your dried flowers on top of the clay.
Gently roll over the flowers with a rolling pin to embed them into the surface.
Use your circular cutter to trim the edges into a perfect circle.
Carefully peel away the flowers (or leave them in for a textured look).
Once dry, coat heavily with a waterproof sealer.
5. Bunny Ear Jewelry Dish
This is a functional keepsake that looks adorable on a nightstand. It’s essentially a small pinch pot with two long ears extending from the rim.
What You Need
White or pastel clay
Small bowl of water (for smoothing)
Gold acrylic paint (for the rim)
How to Make It
Roll a ball of clay and press your thumb into the center to create a small bowl shape.
Pinch two long, thin leaf shapes for the ears.
Score the edge of the bowl and the base of the ears, then press them together, using water to blend the seam perfectly.
Curve the ears slightly so they look "floppy."
After drying, paint the tips of the ears or the rim of the dish with metallic gold for a "glam" pastel look.
6. Scalloped Edge Treat Bowls
These tiny bowls are perfect for holding a single chocolate truffle or a handful of jelly beans inside the basket. The scalloped edge gives them a vintage, doily-like feel.
What You Need
Pastel-colored clay
Small round bowl (to use as a mold)
Bottle cap or small circular cutter
How to Make It
Roll out a circle of clay.
Use a bottle cap to cut semi-circles all the way around the edge of the clay to create the scallop.
Gently press the clay into the bottom of a real kitchen bowl so it takes on a curved shape.
Let it dry inside the "mold" so it keeps its form.
7. Braided Napkin Rings
If your Easter basket is part of a brunch setting, these braided rings are a lovely addition. They look like mini sourdough loaves or woven nests.
What You Need
Three different shades of pastel clay (e.g., mint, lavender, and white)
How to Make It
Roll three long, thin "snakes" of clay.
Pinch them together at the top and perform a simple braid.
Loop the braid into a circle and join the ends, smoothing the connection with your fingers.
Once dry, these can be used to hold linen napkins or simply placed as decorative rings around the base of a large chocolate egg.
8. Embossed "Happy Easter" Plaques
Think of these as large, decorative coins. They can be placed at the very front of the basket as a greeting card that won't get bent or tossed away.
What You Need
White clay
Alphabet stamps
Pastel watercolors
How to Make It
Roll a thick, flat disc of clay.
Stamp "Happy Easter" or "Hoppy Spring" into the center.
Use a very wet paintbrush to add a "wash" of pastel color over the letters. The pigment will settle into the indentations, making the words pop.
9. Clay Flower Charms
These tiny blossoms can be glued onto the wicker of the basket itself or tied to the tops of clear treat bags.
What You Need
Yellow and white clay
Toothpick
How to Make It
Roll five tiny white balls (petals) and one yellow ball (center).
Flatten them together into a daisy shape.
Use a toothpick to add tiny dots of texture to the yellow center.
If you want to hang them, remember to poke a hole in one petal before drying.
10. Geometric Pastel Eggs
For a more modern Easter basket, skip the realistic eggs and go for faceted, geometric versions. These look like "gems" and add a cool, contemporary edge to the soft pastel theme.
What You Need
Firm polymer clay
Craft knife or X-Acto knife
How to Make It
Roll a solid ball of clay into a rough egg shape.
Use the craft knife to "shave" off flat planes at different angles all around the egg.
Don't worry about symmetry; the variation in the "facets" is what makes them look like stones.
Bake or dry as usual. These look best in monochromatic sets (three different shades of blue, for example).
Tip: Sand the edges slightly after they dry for a smooth, professional finish.