Freshening your automobile cabin with natural scents is a wonderful way to improve your daily drive. First, commercial car air fresheners often contain harsh chemicals. Next, handmade aromatherapy diffusers look much more stylish on your rearview mirror. Therefore, creating custom DIY Car Charms allows you to mix your favorite botanical oils while adding a cozy look to your vehicle.
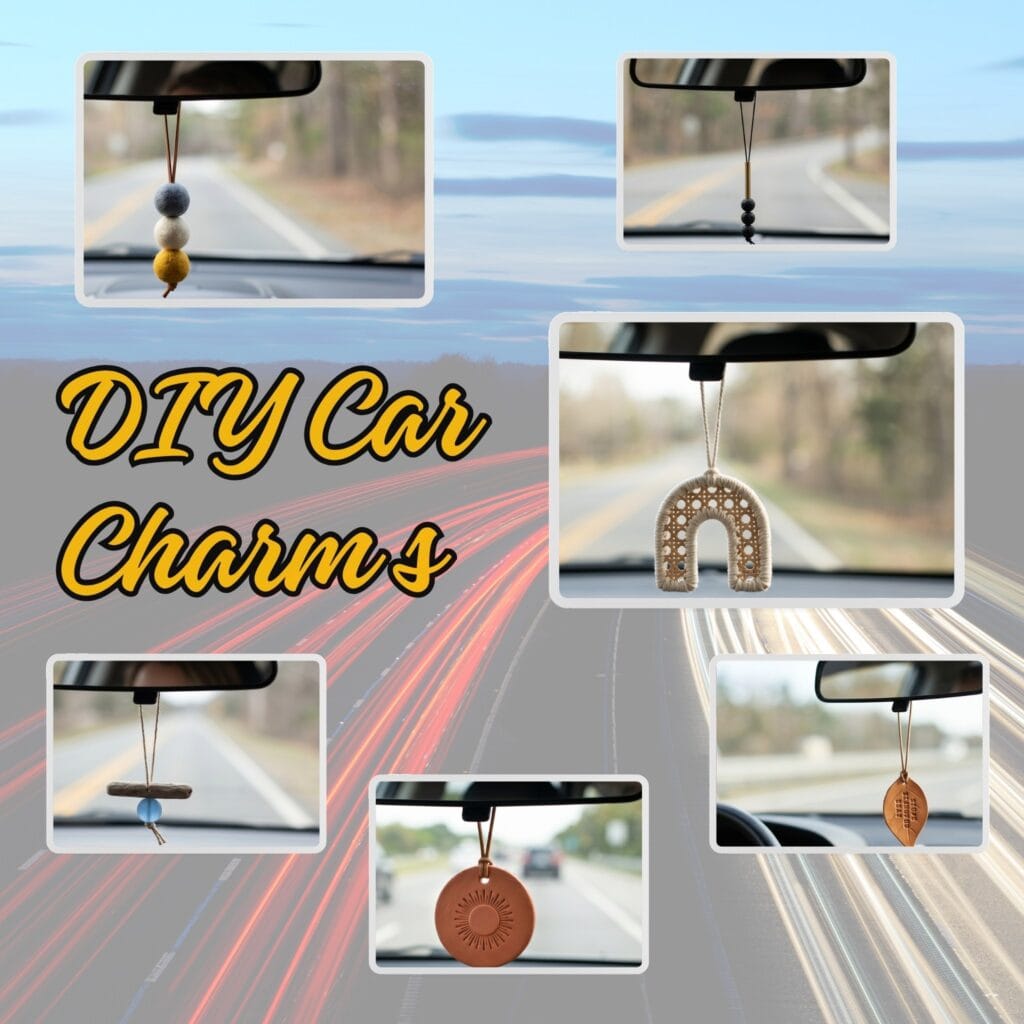
These beautiful accessories are very easy to build at home. Indeed, they make fantastic weekend projects or personalized gifts for friends. In this detailed guide, we share ten creative design options. Finally, we provide complete tool checklists and step-by-step steps for building your own DIY Car Charms.
Essential Supplies for DIY Car Charms
Preparing your workspace is the first step toward a successful craft session. Therefore, gathering your core materials early keeps the production smooth. Specifically, you must select highly porous mediums to hold the liquids well. Thus, your fragrance will last for many days inside the cabin. Here is a list of the basic items you will need for your DIY Car Charms.
- Porous Materials: Thick hobi felt, raw wooden beads, or natural lava stones.
- Hanging Cord: Durable waxed cotton string or slim leather strips.
- Sharp Scissors: To cut fabric borders and yarn tails cleanly.
- Fabric Glue: A strong adhesive to lock separate layers together.
- Pure Essential Oils: Invigorating scents like peppermint, sweet orange, or lavender.
Pro-Tip
When applying aromatherapy liquids to your hanging accessories, always use a tiny dropper. Indeed, adding just two or three drops is plenty for a small cabin. Furthermore, place a small paper towel underneath your DIY Car Charms while applying the oils to protect your table from accidental stains.
10 Detailed Step-by-Step DIY Car Charms Projects
1. The Layered Felt Silhouette
This clever craft uses thick hobi felt to form a gorgeous geometric shape. First, draw a simple outline like a pine tree or a mountain on a piece of paper. Next, cut three matching shapes out of different felt sheets. Then, stack the layers from largest to smallest. Finally, stitch the edges together using a needle and thick embroidery thread to create a neat handmade look.
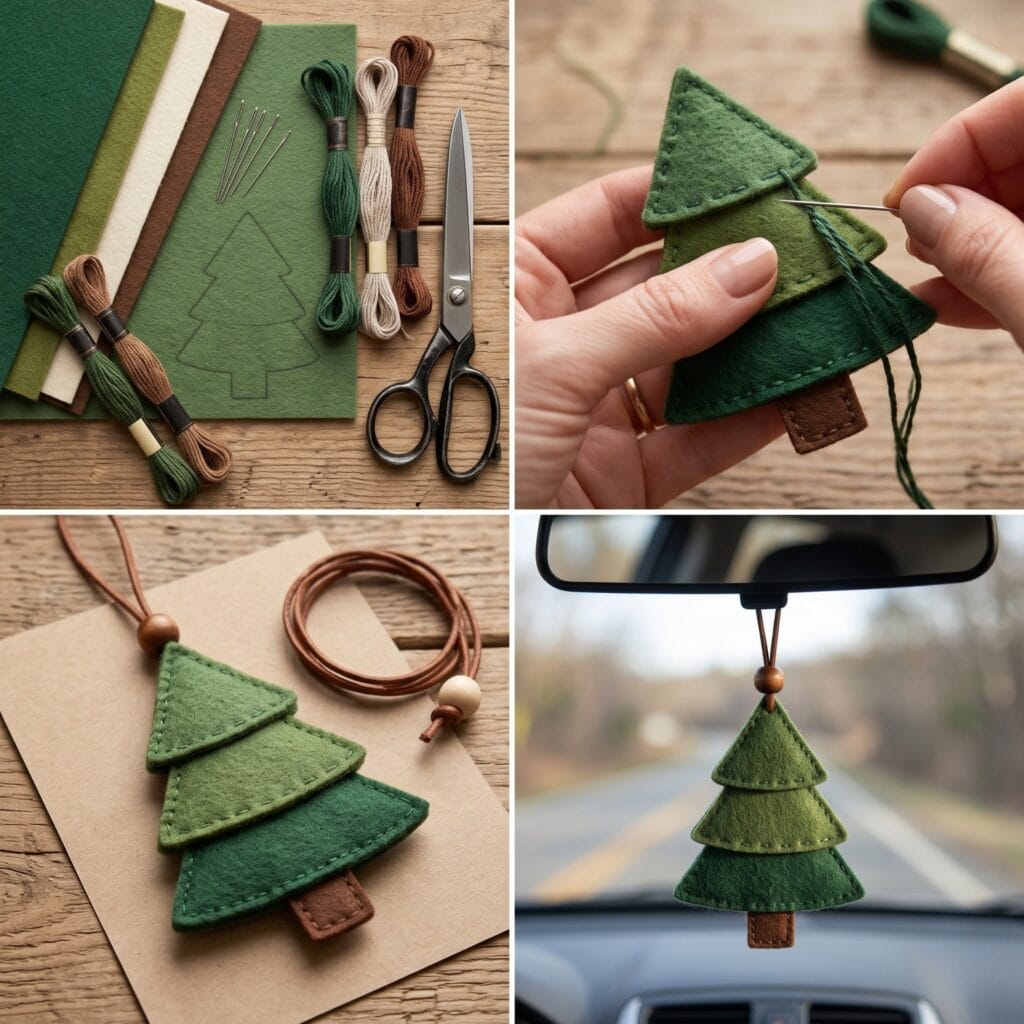
- Special Supplies: 3mm thick colorful felt sheets, embroidery thread, sharp sewing needle.
- How to Make It: First, trace your template onto the felt material. Next, cut the layers out carefully with sharp scissors. Then, stack and stitch the felt pieces together securely along the borders. Finally, attach a small leather cord to the top loop.
- Styling & Design Tip: Pair a dark green pine tree silhouette with a woodsy cedarwood oil. Specifically, hang it at mid-height to catch the natural breeze from your dashboard air vents.
2. The Upcycled Fabric Scrap Tassel
This eco-friendly project turns leftover textiles into a lovely rustic tassel. First, collect scrap pieces of cotton, linen, or denim cloth. Next, rip or cut the fabric into thin strips of equal length. Then, loop the strands over a small raw wooden ring. Finally, tie a separate string tightly around the neck to form a secure fringe bundle.
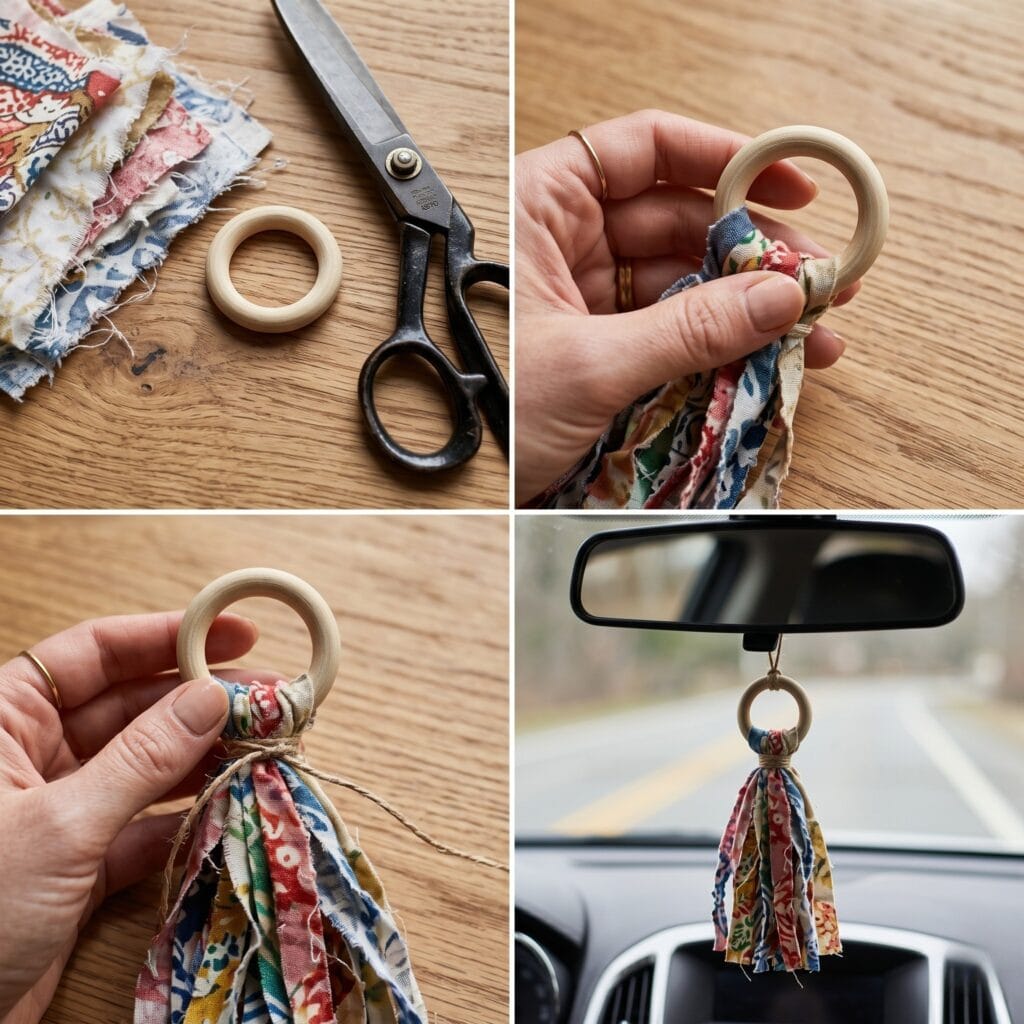
- Special Supplies: Patterned cotton fabric scraps, a 3cm raw wooden ring, fabric shears.
- How to Make It: First, cut ten fabric strips to a length of 20 centimeters. Next, pull the gathered bundle halfway through the wooden ring opening. Then, fold the strips downward evenly. Finally, wrap a coordinating string around the upper neck four times and knot it tight.
- Styling & Design Tip: Mix floral patterns with solid pastel fabrics to build a chic vintage look. Moreover, apply sweet orange oil directly to the inner denim strips for a long-lasting summery aroma.
3. The Stamped Leather Leaf
Real vegetable-tanned leather holds organic scents beautifully over time. First, select a small piece of tan leather scrap. Next, sketch a simple monstera or oak leaf shape on the back side. Then, cut the silhouette out slowly. Do you want to explore more ways to repurpose these materials? Then, check out our guide on 10 Stunning and Easy Ways to Use Your Leather Scraps for fantastic studio inspiration.
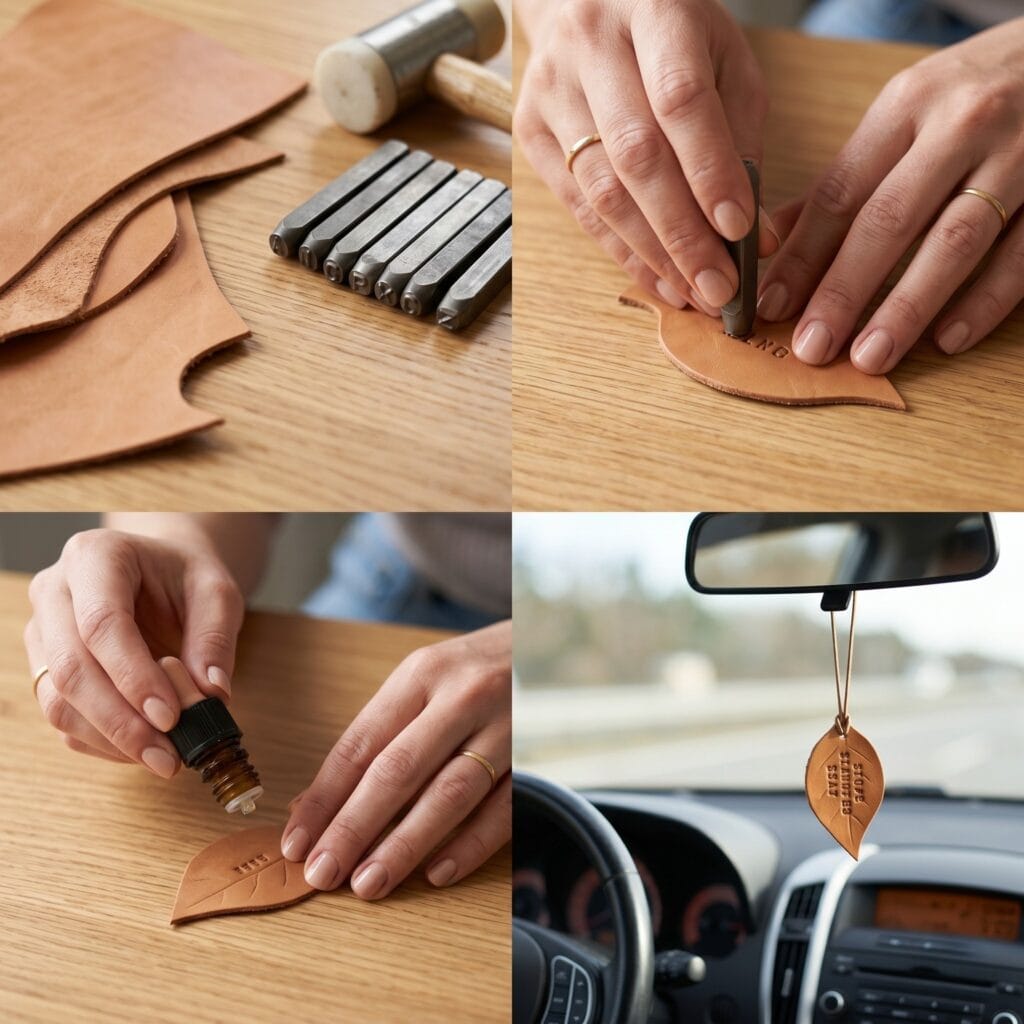
- Special Supplies: Veg-tanned leather scraps, metal letter stamps, leather dye.
- How to Make It: First, cut out your chosen leaf shape using a heavy craft knife. Next, damp the leather surface with a wet sponge. Then, press your metal stamp firmly into the center with a mallet. Finally, punch a top hole and attach a waxed cotton cord.
- Styling & Design Tip: Choose a warm amber or patchouli oil to complement the natural aroma of the leather. Consequently, the material will develop a gorgeous dark patina under sunny window exposure.
4. The Lava Stone & Brass Geometric: DIY Car Charms
Natural lava rocks feature microscopic holes that act as perfect pasif diffusers. First, slide a shiny geometric brass rod onto your main hanging string. Next, thread three black lava beads directly underneath the metal accent. Finally, finish the bottom with a tight double knot to lock the hardware in place.
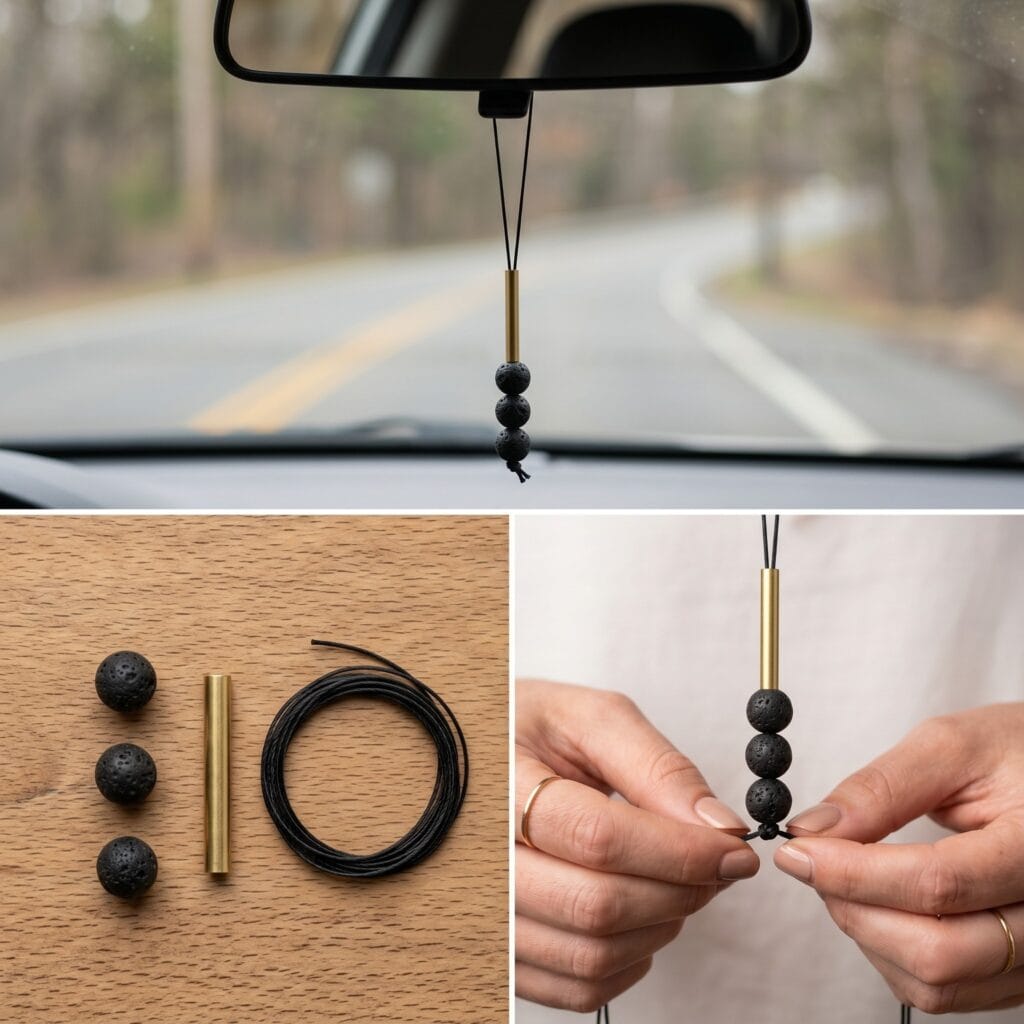
- Special Supplies: 8mm black porous lava beads, a 5cm hollow brass tube piece, nylon thread.
- How to Make It: First, measure and cut 40 centimeters of strong nylon thread. Next, thread the brass tube onto the center of the line. Then, slide three lava beads onto both string ends together. Finally, tie a secure stopper knot directly underneath the last stone.
- Styling & Design Tip: Contrast the rugged dark lava stones with bright white modern dashboard trims. Therefore, place this high-end piece in a vehicle with minimalist interior styling.
5. The Mini Terracotta Sunburst
Air-dry terracotta clay is highly absorbent and keeps a classic earthy look for your DIY Car Charms. First, roll out a small ball of natural red clay to a thickness of 5 millimeters. Next, cut out a small circle using a cookie cutter tool. Then, press a custom sunburst stamp into the center. Do you love working with natural clay? Therefore, explore our Hand Painted Terracotta Pots: 10 Easy Ideas You’ll Love tutorial to upgrade your botanical displays.
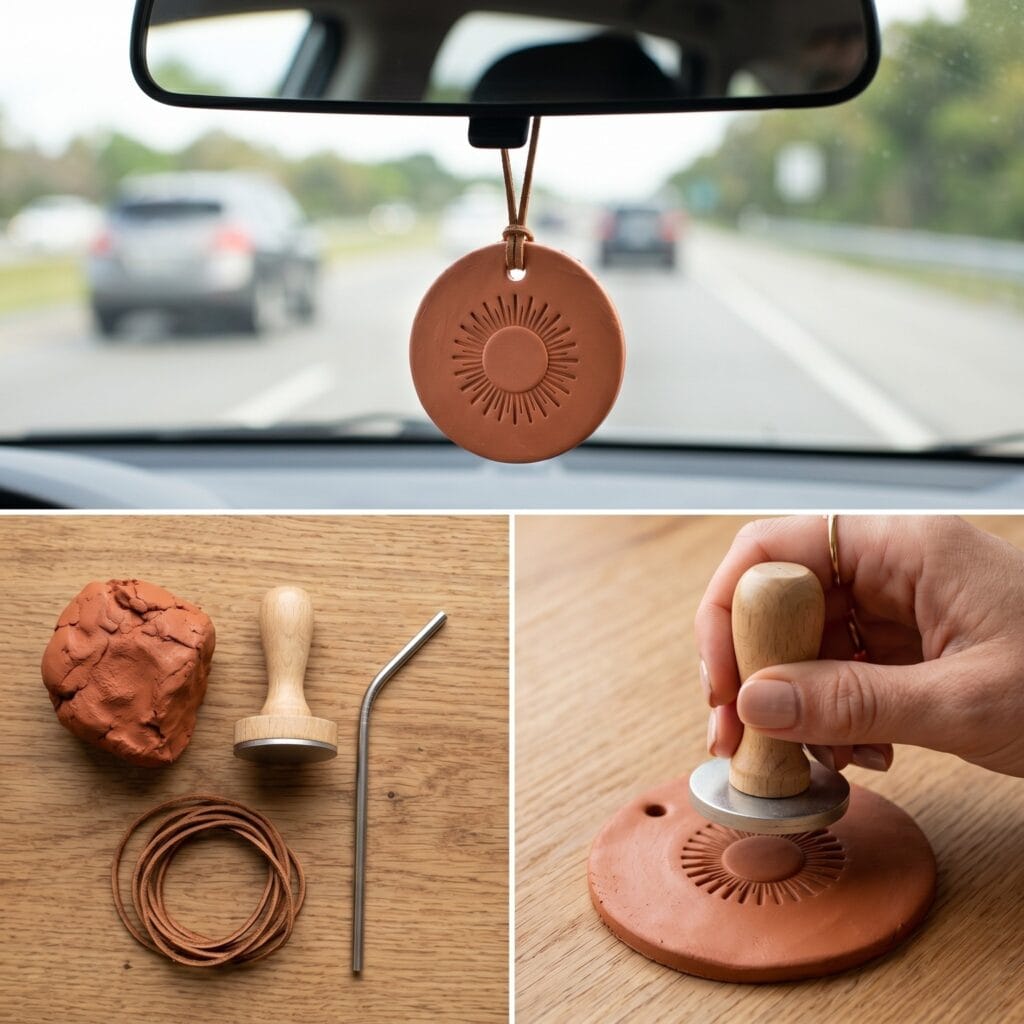
- Special Supplies: Air-dry terracotta clay, a sunburst motif stamp, a drinking straw.
- How to Make It: First, flatten your clay ball using a smooth rolling pin. Next, cut a clean circle and use a straw to punch a hanging hole near the edge. Then, press your decorative design stamp into the wet clay. Finally, let the piece sit flat on parchment paper until it hardens.
- Styling & Design Tip: Use a refreshing eucalyptus oil on the back of the terracotta disc. Thus, the porous clay absorbs the liquid instantly without leaving any visible dark stains on your custom front design.
6. The Chunky Cotton Braid
This simple option relies on raw texture instead of complex knots. First, cut three lengths of thick single-strand cotton rope. Next, secure the top ends together with a simple wrap knot. Then, weave the strands into a classic thick hair braid. Finally, tie the bottom end firmly to form a fluffy, unraveled brush tail.
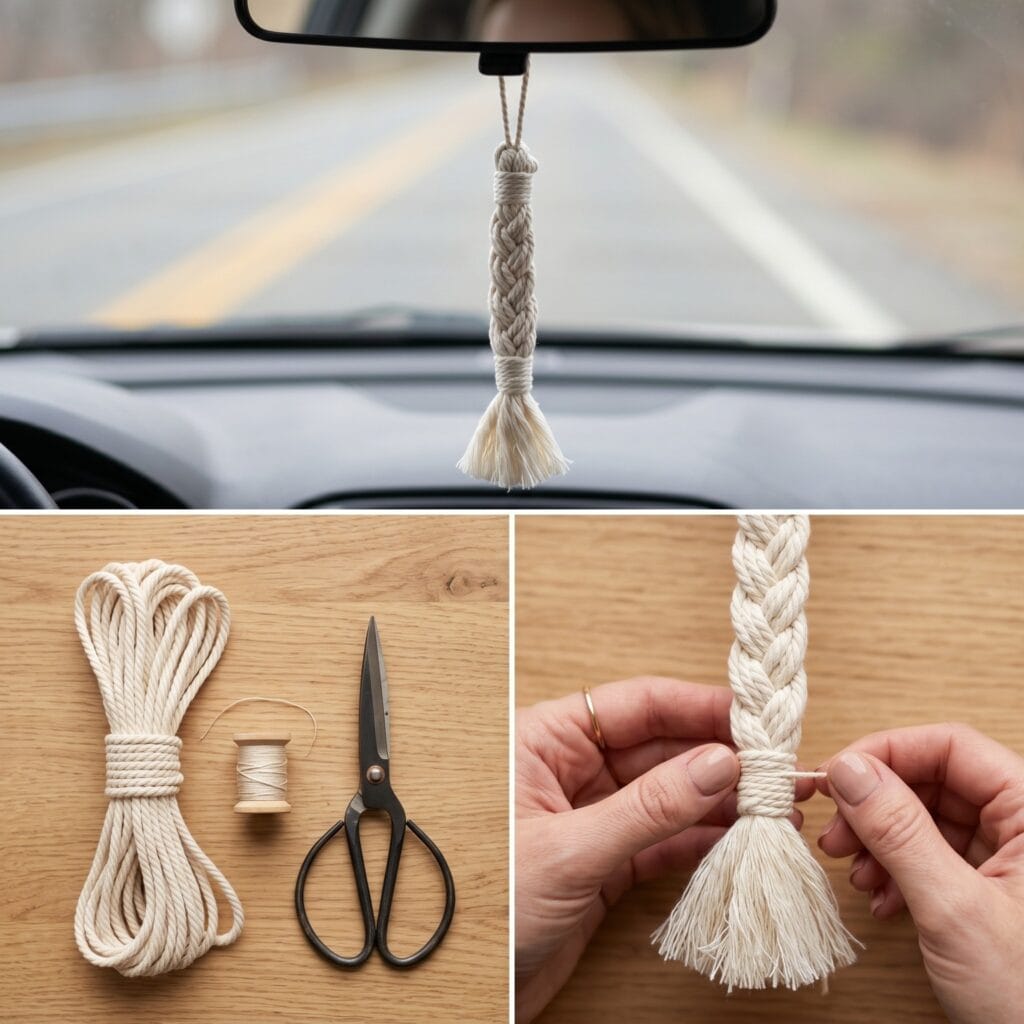
- Special Supplies: 5mm single-strand cream cotton cord, matching embroidery thread.
- How to Make It: First, measure three pieces of cotton cord to 30 centimeters each. Next, tie a wrap knot around the top ends using embroidery thread. Then, braid the body tightly down to the last 5 centimeters. Finally, secure the base with another wrap knot and brush out the tail.
- Styling & Design Tip: This thick cotton fiber offers a very large surface area for oil absorption. Therefore, use it with lighter citrus oils like bergamot or lemongrass for a clean morning drive.
7. The Driftwood & Sea-Glass Stack
This design brings a calming beach vacation aesthetic into your vehicle. First, sort through small pieces of ocean-washed driftwood branch parts. Next, find a matching frosted sea-glass bead with a pre-drilled hole. Are you looking for more coastal crafts? Then, browse our Sea Glass Chimes: 10 Easy DIY Ideas You’ll Love guide for beautiful outdoor decorations.
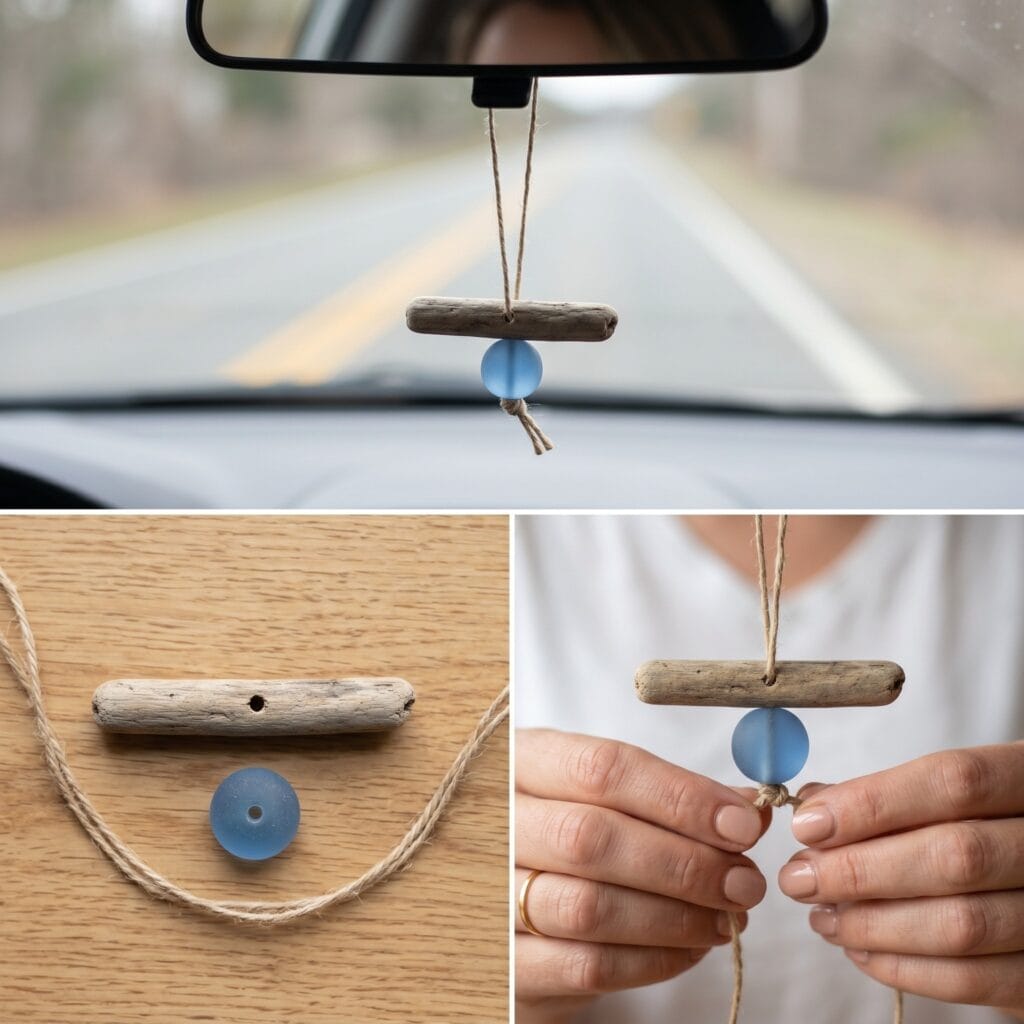
- Special Supplies: Mini driftwood pieces, a frosted blue sea-glass bead, natural hemp twine.
- How to Make It: First, drill a tiny 2mm hole through the center of your driftwood stick. Next, thread the hemp twine through the wood piece first. Then, slide the sea-glass bead directly underneath it. Finally, tie a large overhead knot to support the weight of the coastal stack.
- Styling & Design Tip: Match this ocean look with a crisp peppermint and rosemary oil blend. Consequently, the dry wood absorbs the liquid well and releases a fresh sea-breeze fragrance.
8. The Macrame Crystal Net
This item combines the beauty of raw quartz crystals with fine string work. First, measure four pieces of thin cotton string. Next, connect them using simple alternating knot structures to build a small flexible pouch. Do you enjoy tying intricate cotton webs? Consequently, read our 10 DIY Modern Macrame Plant Hangers You Will Love post to decorate your sunny windows.
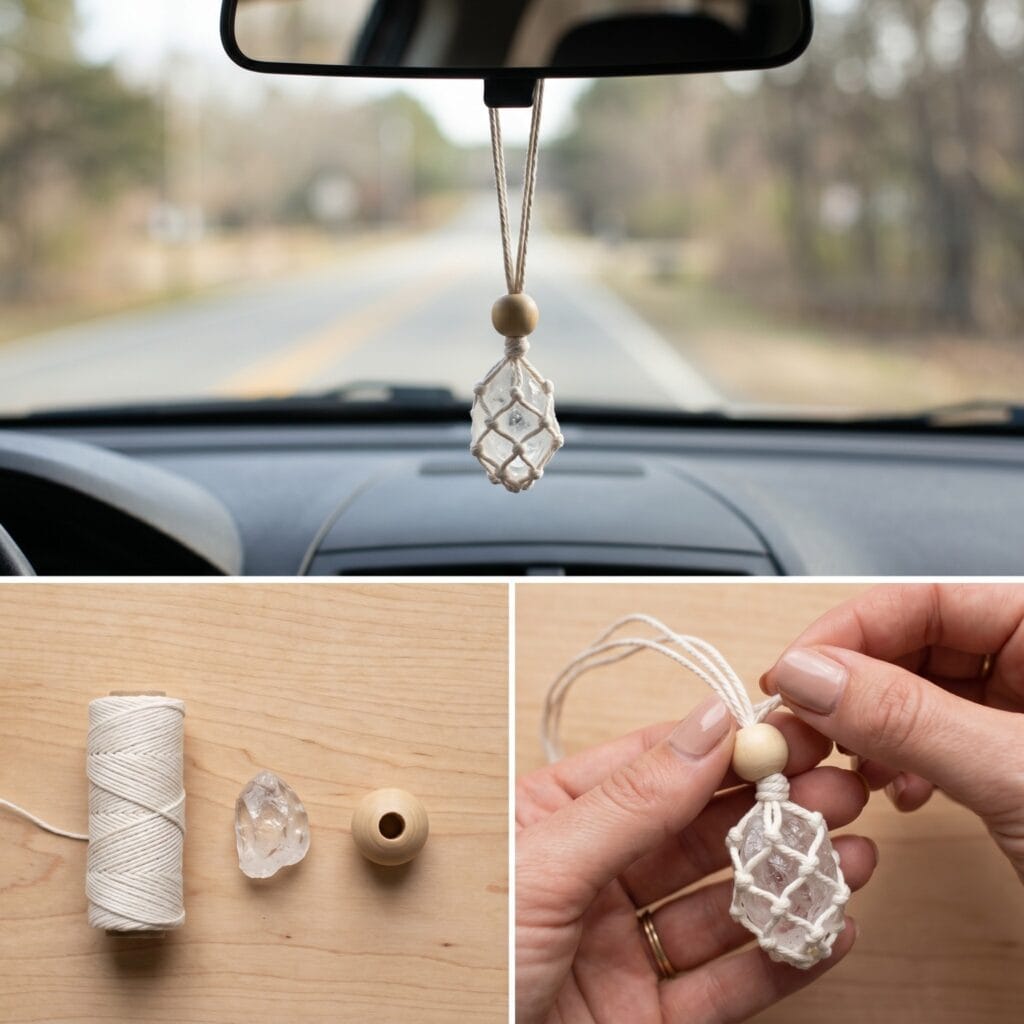
- Special Supplies: 1mm fine white cotton twine, a small raw clear quartz crystal, a large-hole wooden bead.
- How to Make It: First, knot your four lines together at the base. Next, tie adjacent strings using simple square knots to create a grid net. Then, drop your crystal into the pocket snugly. Finally, pull the remaining strings through a wooden bead to lock the closure.
- Styling & Design Tip: Apply a soothing lavender oil directly to the upper wooden closure bead. Thus, the wood holds the scent while the raw crystal point hangs cleanly below to capture the sunlight.
9. The Felted Wool Abstract Sphere
Safely dyed wool felt balls are exceptional at trapping scent molecules inside their dense fibers. First, pick three wool spheres in contrasting modern shades like slate grey, cream, and mustard yellow. Next, thread a large blunt needle with a thin leather strip. Then, pierce the needle straight through the center of each ball.

- Special Supplies: Three 2cm wool felt balls, a thin leather strip, a large tapestry needle.
- How to Make It: First, push your leather strip through the eye of the tapestry needle. Next, push the needle carefully through the center of the three wool spheres. Then, space the balls out slightly or stack them tightly together. Finally, secure the bottom with a knot.
- Styling & Design Tip: Squeeze one drop of oil onto each separate ball to create a custom fragrance mix. For example, combine lemon, lime, and grapefruit oils for a bright, cheerful energy boost.
10. The Rattan Cane Arch
Rattan webbing adds a high-end bohemian boutique feel to your car mirror accessory collection. First, cut a small 6cm arch shape out of natural rattan cane mesh sheets. Next, wrap the outer raw edges with fine cotton yarn to prevent fraying. Finally, loop a decorative string through the top weave gap.
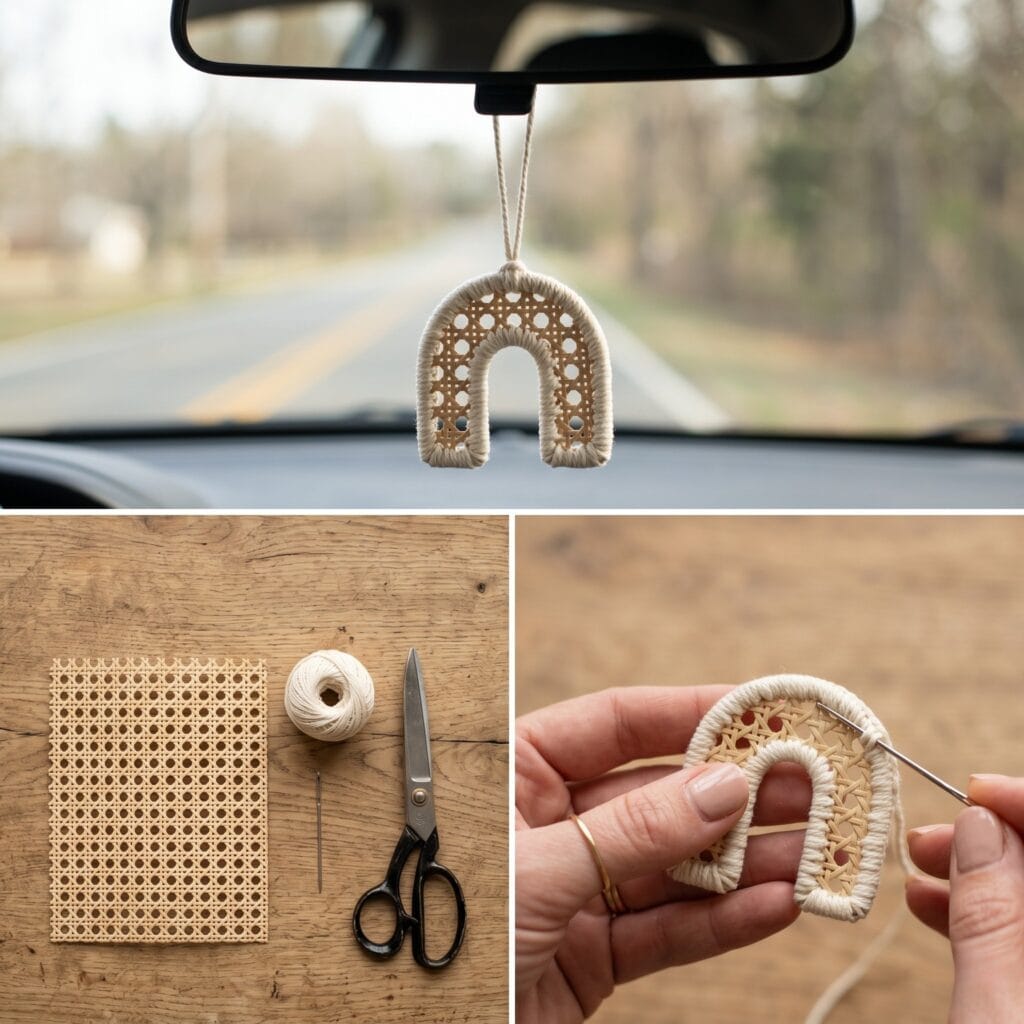
- Special Supplies: Natural rattan cane webbing sheet, cream cotton yarn, darning needle.
- How to Make It: First, cut your small arch pattern out of the rattan mesh carefully. Next, use a darning needle to stitch a clean blanket knot border along the raw outer edges. Then, leave a 15cm loop at the apex. Finally, trim any small stray fiber splinters with your scissors.
- Styling & Design Tip: Rattan has a very delicate grid pattern that releases fragrance slowly. Therefore, pair this architectural arch with a rich jasmine or ylang-ylang oil for an exotic floral atmosphere.
Finalizing Your Clever DIY Car Charms Choice
Curating handmade air fresheners is deeply satisfying. Ultimately, hanging your new DIY Car Charms brings a personal touch to your daily commute. First, spend an hour collecting scrap materials from your craft closet. Do you love these simple aromatherapy projects? Please, leave a helpful comment below. Also, share your favorite design with our growing artisan community!
Important Crafting Safety Note:
Building custom rearview mirror accessories is an enjoyable hobby. Still, driving safety must guide your placement choices. Always check your local transit laws regarding objects hanging from the front windshield area. Because large shapes can block your view of the road, ensure your completed charm is compact and does not swing excessively during sudden turns. Finally, keep pure essential oil bottles safely stored away from the reach of curious pets!