Transitioning to a zero-waste lifestyle often starts right in the kitchen. Therefore, many people want better storage options. You might throw away single-use plastic baggies every single day. Instead, making DIY reusable snack bags is a very practical solution. Indeed, these eco-friendly fabric scrap projects help reduce your daily household waste. They also give you a great way to upcycle leftover cotton prints. Furthermore, if you enjoy quick craft sessions, you will definitely love this tutorial. It is just as fun and relaxing as making our popular Aesthetic Phone Charm Ideas at home.
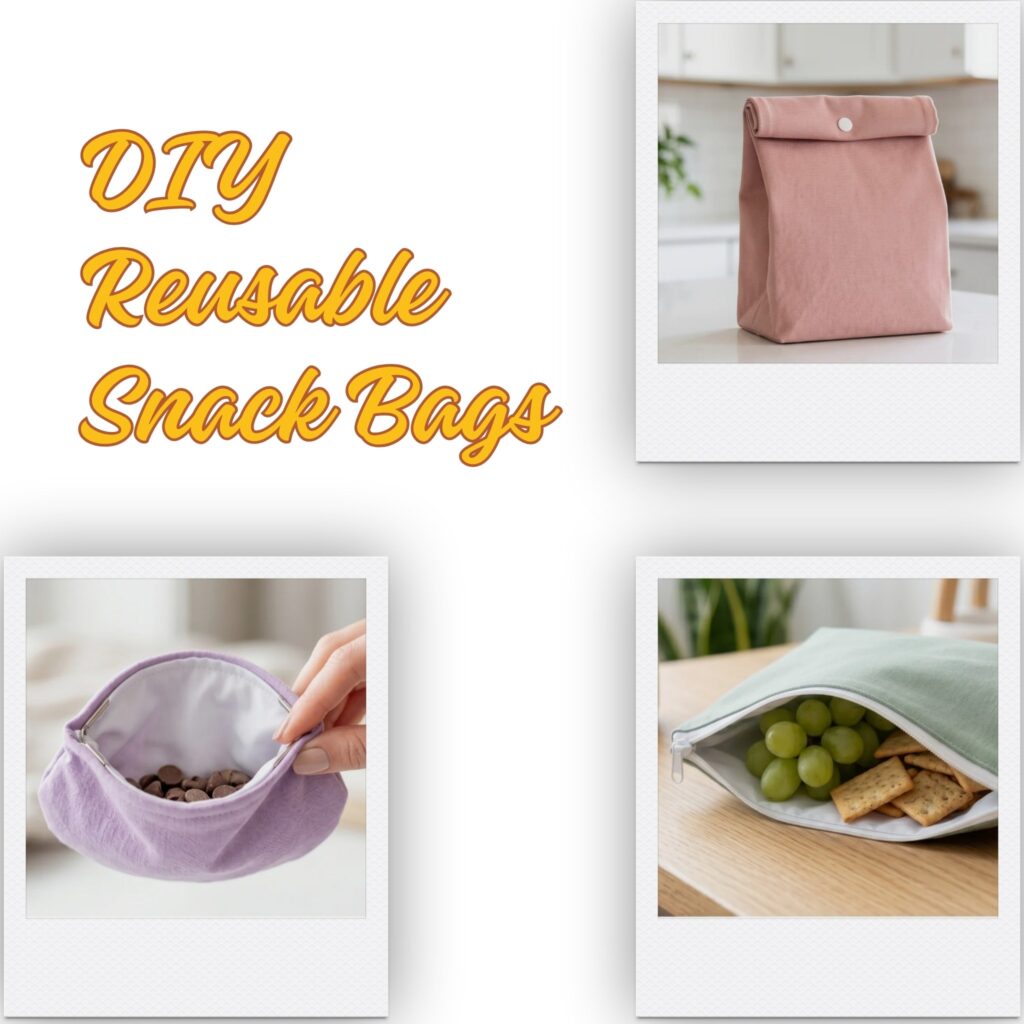
Creating a functional food pouch requires a special approach. First, you can customize the exterior with any breathable cotton fabric. Next, you must line the interior with a safe, water-resistant material. Usually, crafters choose polyurethane laminate (PUL) or natural beeswax. As a result, your food stays perfectly fresh all day long. Moreover, these DIY reusable snack bags are very easy to wipe clean after lunch. Here are 10 distinct DIY reusable snack bags you can sew to elevate your daily routine.
Top 10 DIY Reusable Snack Bags to Sew Today
1. The Window Pouch DIY Reusable Snack Bags
This clever design looks just like a normal plastic bag. However, it has a clear viewing panel on the front. You can easily see the food inside without opening it. Thus, it is perfect for packing different school lunches. This is certainly one of our favorite DIY reusable snack bags.
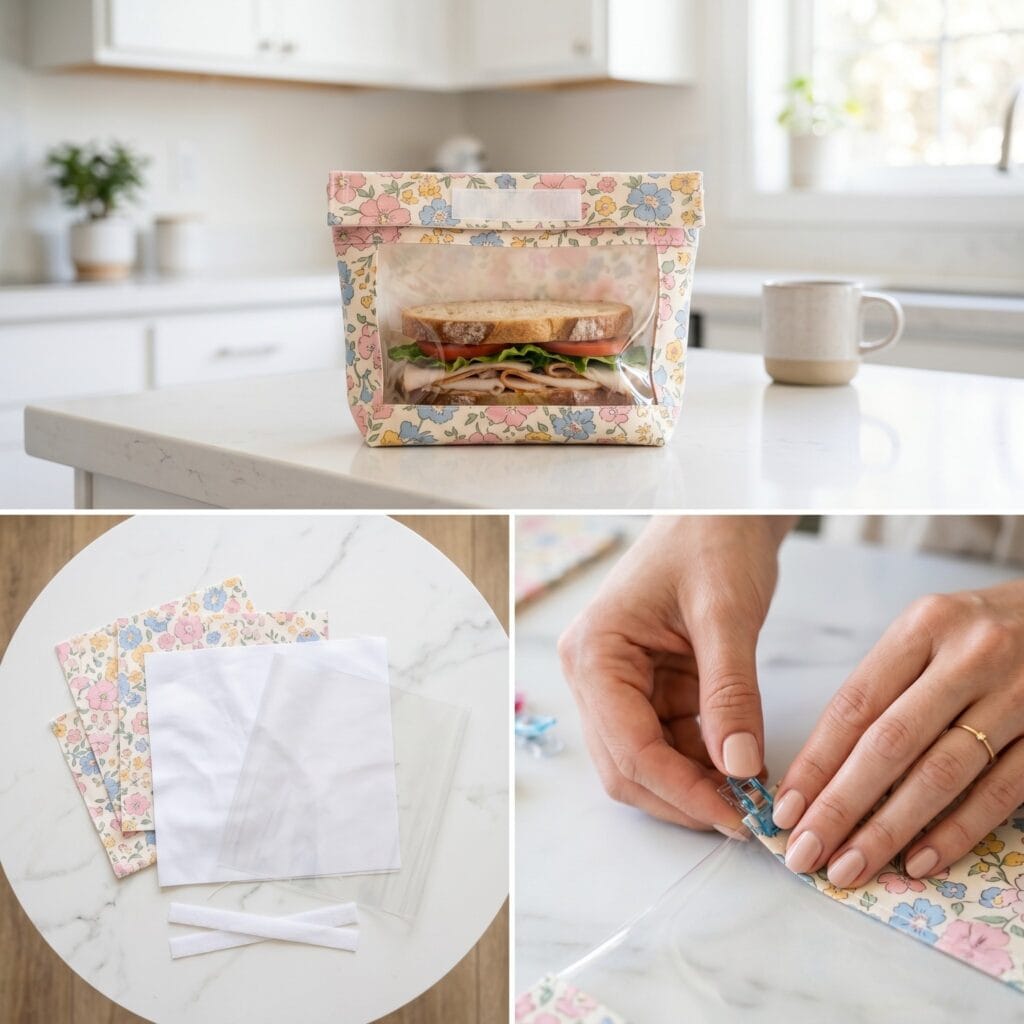
- Special Supplies: Medium cotton fabric scraps, food-safe PUL lining, clear vinyl yardage, and hook and loop strips.
- How to Make It: First, cut a rectangle out of your main cotton piece. Next, pin the clear vinyl behind this opening. Then, sew carefully around the edge to secure the window. After that, place your outer fabric and PUL lining together. Sew around the edges, but leave a small gap. Finally, turn it right side out, fold the bottom up, and sew the sides together.
Pro-Tip: Tissue paper is incredibly helpful when sewing vinyl. Place a layer of tissue paper between your machine foot and the vinyl. This prevents the sticky material from jamming. You can easily tear the paper away later.
2. The Double-Drawstring Snack Pouch
This round pouch sits perfectly upright on a desk or table. Therefore, it is ideal for loose items like nuts or popcorn. The dual string keeps the bag securely closed during travel.
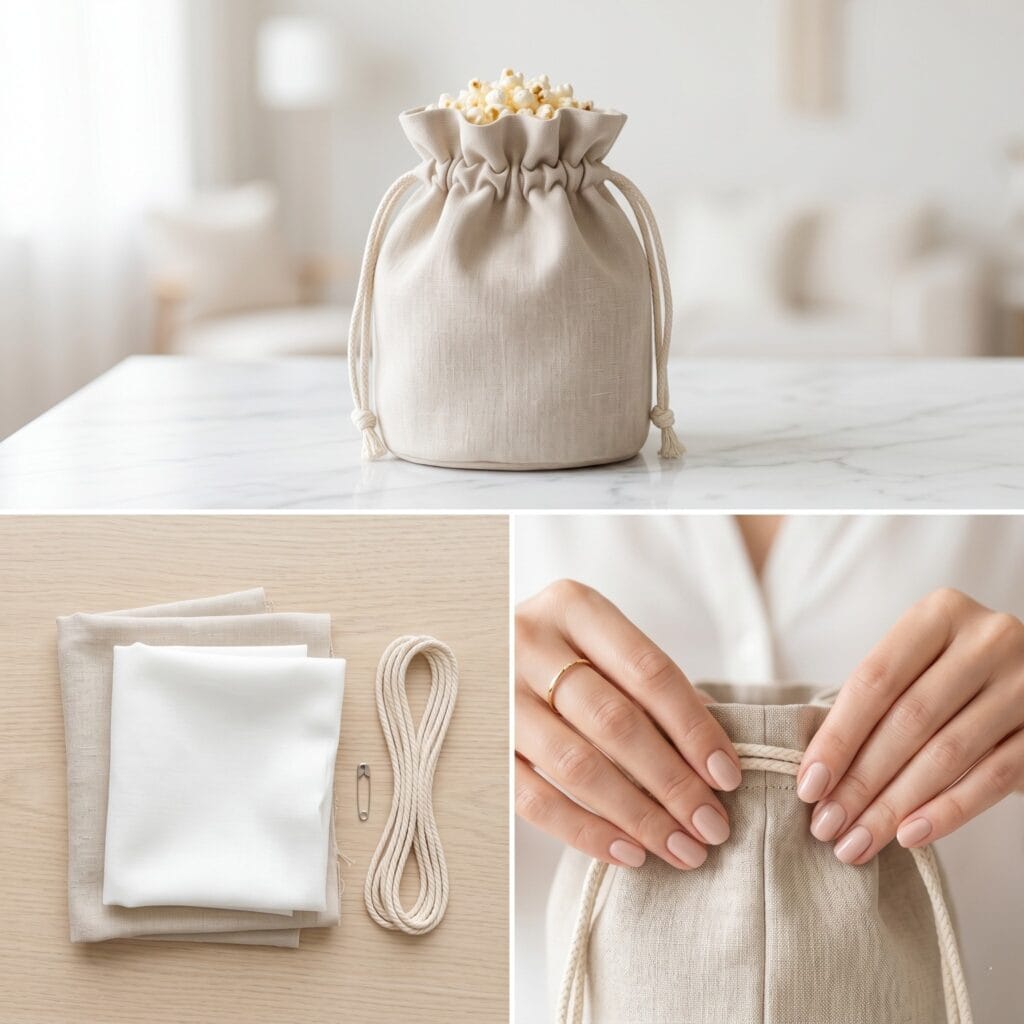
- Special Supplies: Linen fabric scraps, food-safe EVA lining, two cotton macrame cords, and a small safety pin.
- How to Make It: First, cut your fabrics into two tall rectangles and two round bases. Next, sew the side seams of the rectangles. Then, attach them to the round bases to form two buckets. Afterward, slip the lining inside the exterior bucket. Sew around the top edge and leave a small opening. Finally, turn it inside out, sew a top casing, and thread your cords through.
Pro-Tip: Always finish the raw edges of your cotton cords. You can tie tight knots or wrap them tightly with thread. Consequently, this stops the drawstrings from unraveling in the washing machine.
3. The Zippered Bento DIY Reusable Snack Bags
This horizontal pocket has a very wide bottom. Thus, it slips easily into backpacks or narrow briefcases. The zipper closure makes these DIY reusable snack bags highly secure. It keeps all those tiny crumbs trapped safely inside.
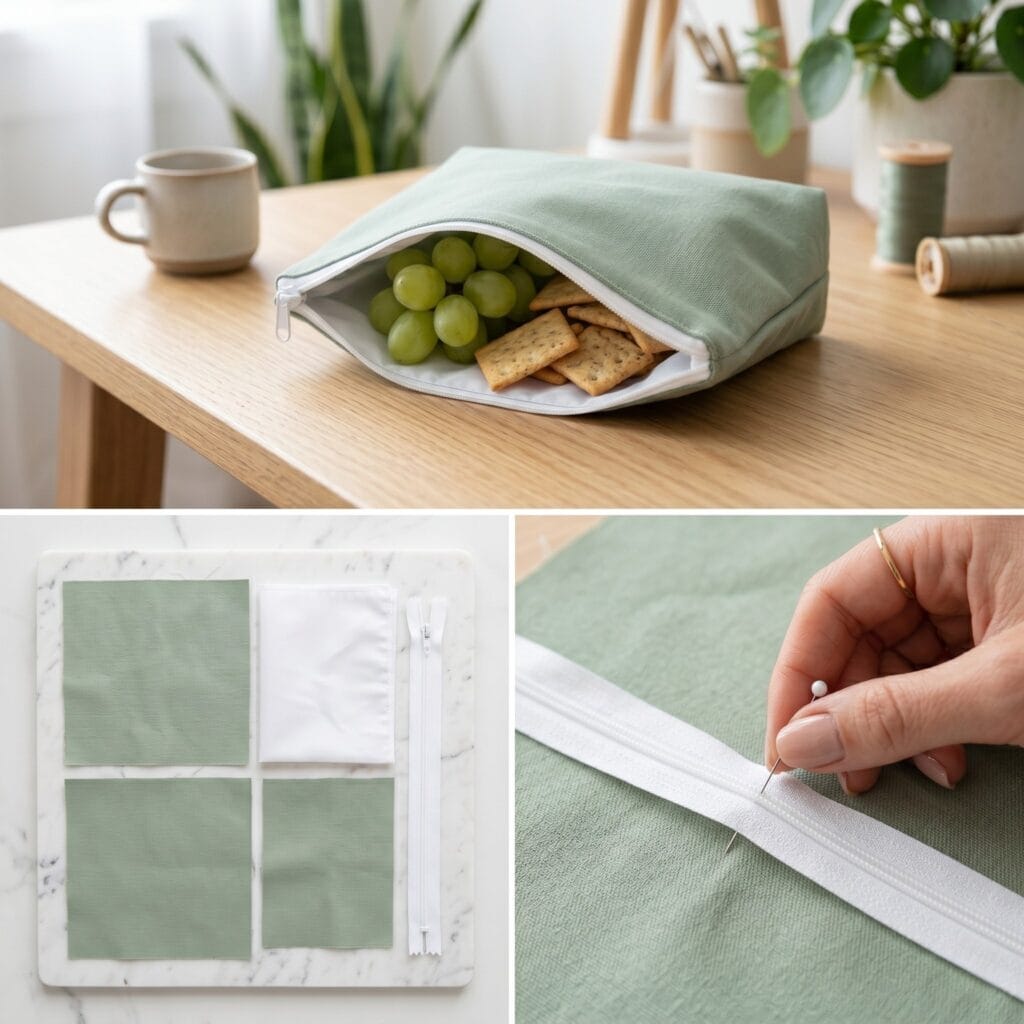
- Special Supplies: Sturdy cotton canvas, flexible PUL lining, and a nylon zipper. Avoid metal zippers because they can rust over time.
- How to Make It: First, sandwich one side of the zipper between your exterior fabric and the lining. Next, sew along the zipper line using a zipper foot. Then, repeat this step for the other side. After that, open the zipper halfway. Sew around the entire border, leaving a small gap in the bottom. Finally, turn the bag right side out and stitch the gap closed.
Pro-Tip: Ironing PUL fabric requires extra caution. Never apply a hot iron directly to the shiny coated side. Instead, always press from the cotton side using a very low heat setting.
4. The Roll-Top Lunch Sack
This nostalgic design looks exactly like a classic brown paper lunch bag. However, it is much stronger and highly reusable. It is large enough to hold whole fruits and sandwiches at the same time.
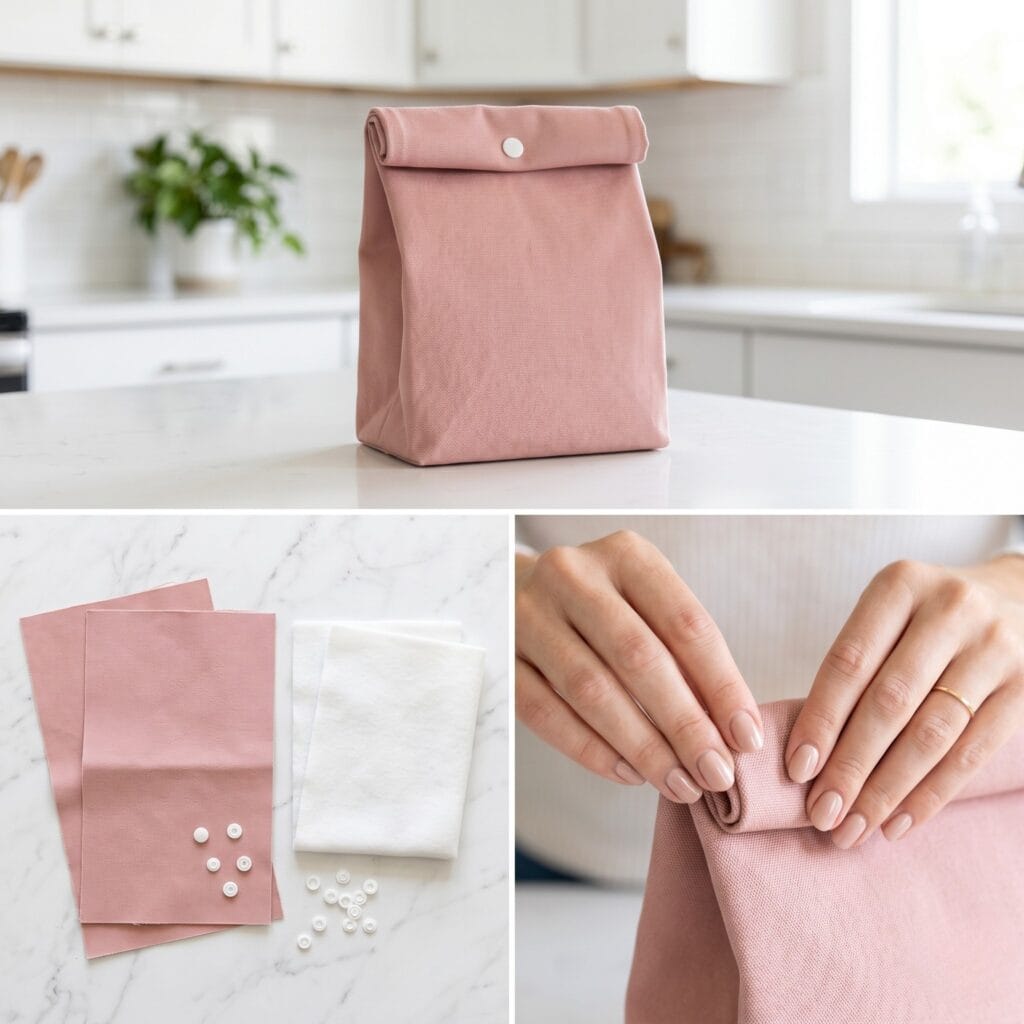
- Special Supplies: Heavyweight cotton twill, insulated fleece batting, waterproof PUL lining, and plastic snaps.
- How to Make It: First, layer your outer fabric with the insulated fleece. Quilt them together with simple straight lines. Next, sew the side seams to build the bag structure. Then, box the bottom corners by sewing across the folded triangle. Repeat this exact process for your PUL lining. After that, insert the lining into the outer shell. Finally, fold the top edges inward, sew the rim, and add your plastic snaps.
Pro-Tip: Your sewing machine might struggle with thick canvas layers. Therefore, switch to a heavy-duty denim needle. This simple change prevents skipped stitches and broken needles.
5. The Triangle Treat Pod DIY Reusable Snack Bags
This 3D geometric pouch is actually very simple to sew. In fact, its unique pyramid shape protects delicate food nicely. It keeps soft berries or crispy crackers from getting crushed. This definitely makes it a great choice among our DIY reusable snack bags.
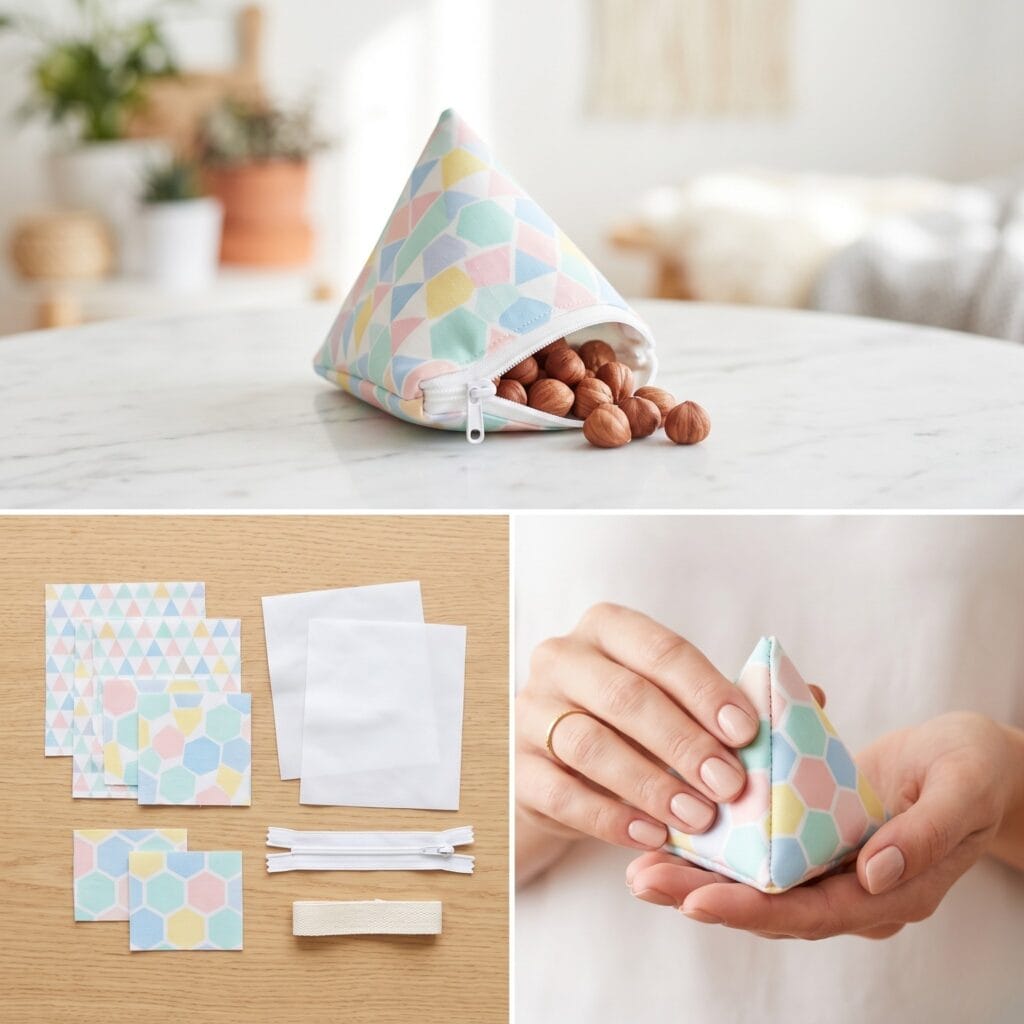
- Special Supplies: Quilting cotton scraps, food-safe PUL lining, a short nylon zipper, and a small nylon webbing loop.
- How to Make It: First, sew a rectangular pouch just like a standard flat zippered bag. Next, attach the zipper to the short ends. Then, pinch the bottom corners in the opposite direction of the top zipper. This creates a perpendicular seam. Insert your nylon webbing loop right here. Finally, sew it shut and turn the pod right side out.
Pro-Tip: Use pinking shears when trimming the internal seams of this pyramid. Consequently, this reduces annoying bulk in the corners. It also helps the pod maintain its sharp shape.
6. The Beeswax Wrap Hybrid
This pouch combines beeswax wraps with basic sewing techniques. Therefore, it completely removes the need for zippers or synthetic fabrics. The wax makes the cotton naturally water-resistant and self-adhering.
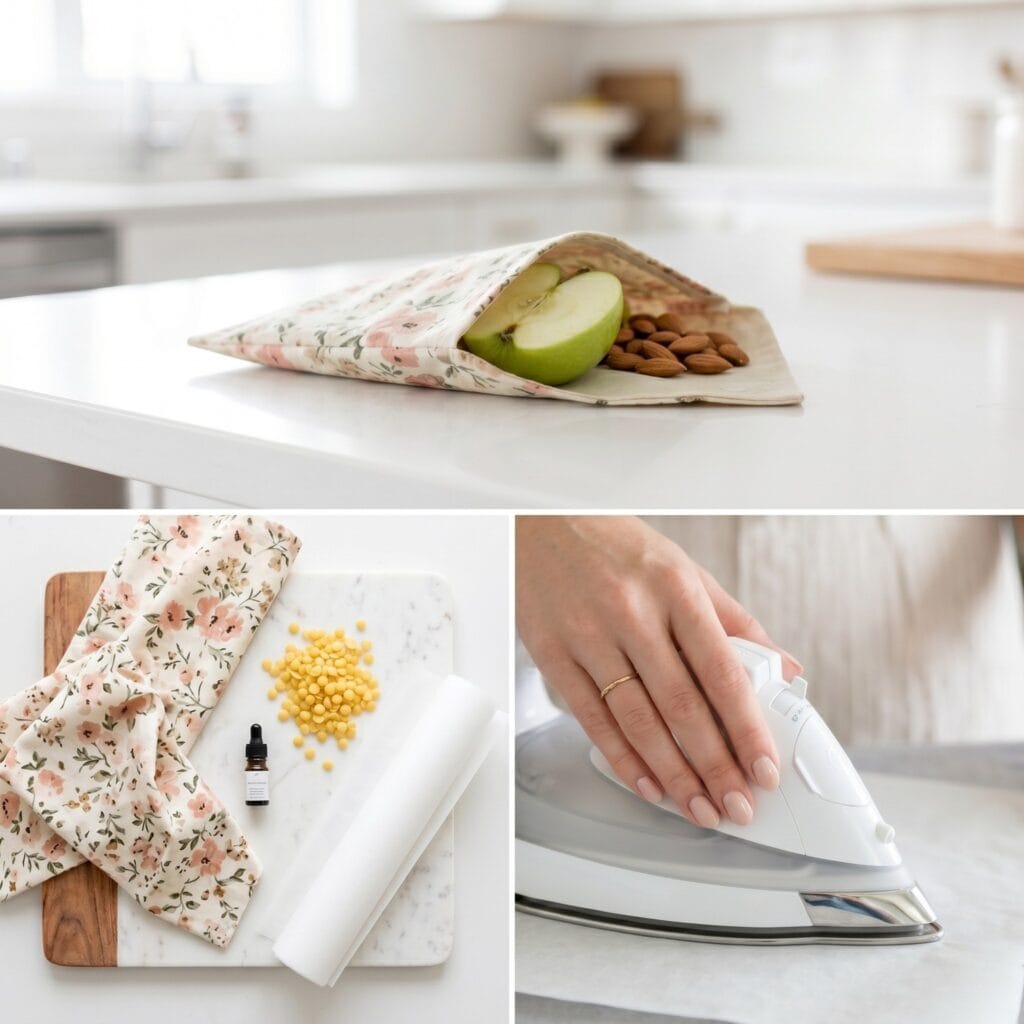
- Special Supplies: Organic lightweight cotton scraps, cosmetic-grade beeswax pellets, jojoba oil, powdered pine rosin, and parchment paper.
- How to Make It: First, sew your cotton scraps into a simple envelope pouch. Use a tight zigzag stitch on the raw edges. Next, lay the pouch flat on a baking sheet. Then, sprinkle the fabric with beeswax, pine rosin, and jojoba oil. Cover it with parchment paper. Finally, use a warm iron to melt the wax deep into the fabric fibers.
Pro-Tip: Never wash beeswax fabric items in hot water. The hot water will instantly melt the wax away. Instead, clean this pouch by gently wiping it with a cool damp cloth.
7. The Flap & Snap Envelope
This slim envelope design is perfect for dry goods. It easily holds granola bars, dried fruit, or small cookies. Also, it slides effortlessly into tight jacket pockets.
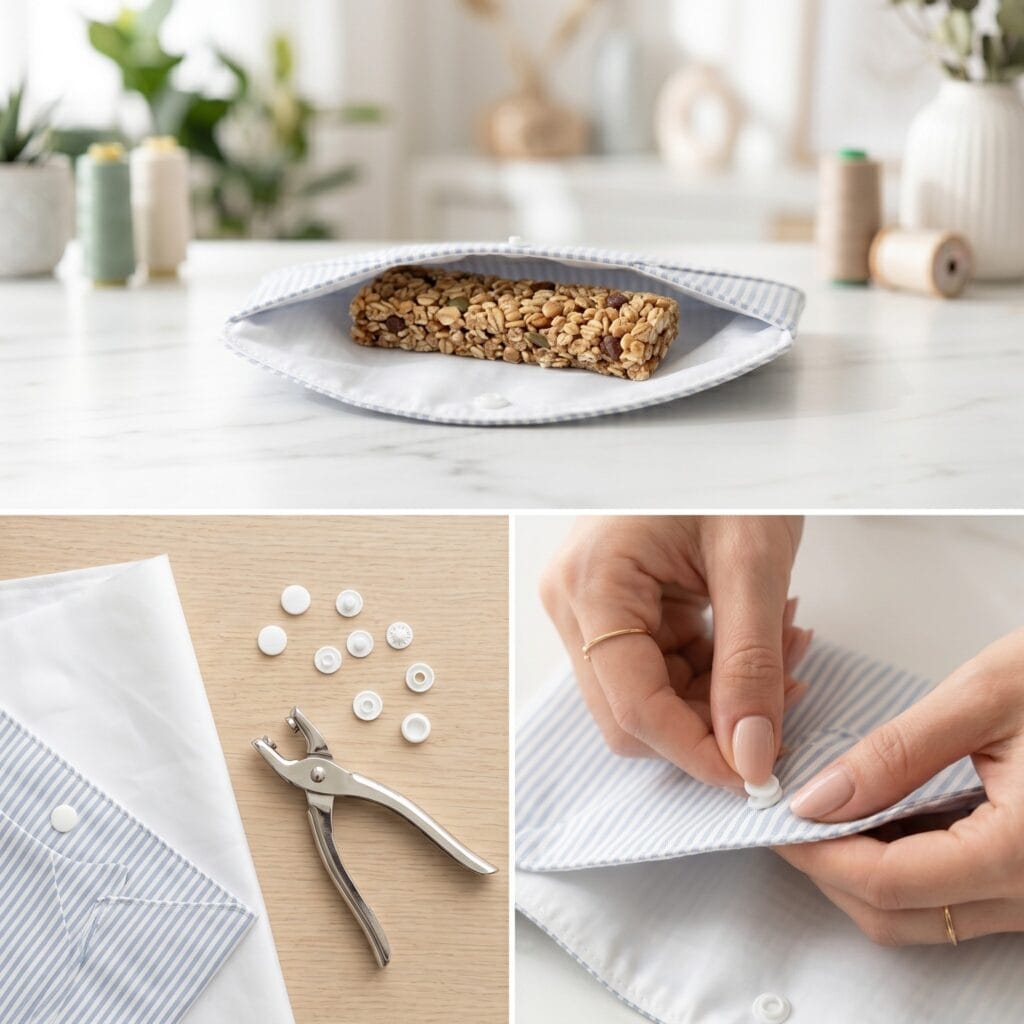
- Special Supplies: Patterned cotton, waterproof PUL lining, plastic snap fasteners, and a snap setting tool.
- How to Make It: First, cut a long rectangle with a curved top edge. Next, place the outer fabric and lining together. Sew around the border, but leave a small gap at the bottom. Then, turn the fabric right side out and sew the perimeter flat. Fold the bottom edge up to form the main pocket. Finally, stitch the sides together and install your snap closure on the flap.
Pro-Tip: Always reinforce the fabric area before punching a snap hole. Iron a tiny square of interfacing behind the snap. As a result, the fabric will not tear over time with repeated pulling.
8. The Side-Gusset Expandable Bag
When making DIY reusable snack bags, this design is built specifically for larger portions. The clever side folds allow it to lay completely flat when empty. However, it expands greatly to hold bulky items like big bagels.
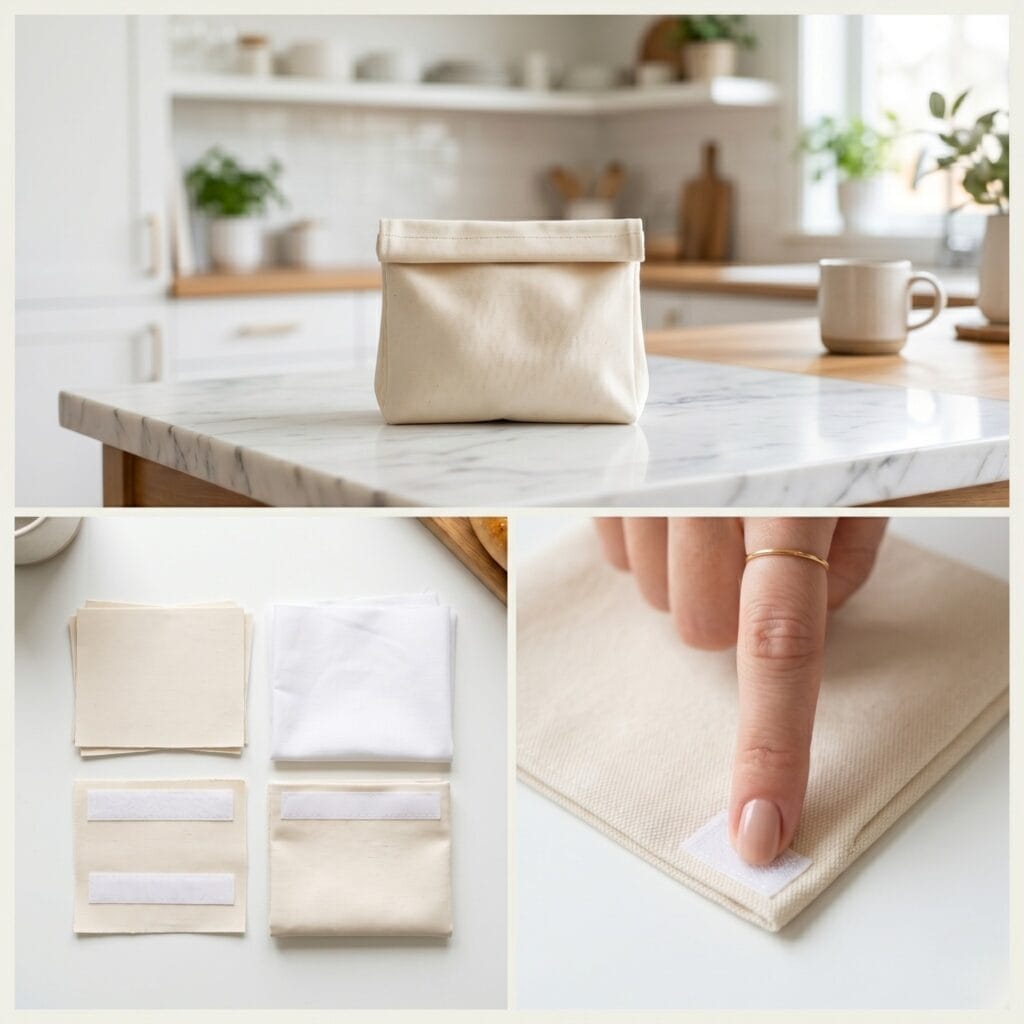
- Special Supplies: Sturdy canvas scraps, thick food-safe EVA lining, and wide hook and loop tape.
- How to Make It: First, build a standard flat pouch using your canvas and lining. Next, push the side seams inward by one inch to create folds. Then, press these folds flat with a warm iron. Pin the folds securely near the top opening. Finally, sew across the top edge and attach the hook and loop tape inside the rim.
Pro-Tip: Always turn your sewing machine handwheel manually over thick side folds. This gives you precise control. Furthermore, it stops the needle from snapping on the heavy canvas joints.
9. The Taco Shell Wrap DIY Reusable Snack Bags
This round design serves two amazing purposes for lunch breaks. First, it holds your snack securely during travel. Second, it unfolds completely flat to become a clean mini placemat. This is truly one of the most useful DIY reusable snack bags for kids.

- Special Supplies: Two large cotton circles, one PUL lining circle, pre-folded bias tape, and plastic snaps.
- How to Make It: First, layer the PUL lining between the two cotton circles. Next, bind the raw outer edge completely with your bias tape. Then, fold the finished circle in half to find the center line. Finally, add two plastic snaps along the curved edge of one half. Add the receiving snaps to the exact opposite side.
Pro-Tip: Sewing bias tape around a curve can be very tricky. Therefore, steam iron your tape into a gentle curve before pinning it. This simple step ensures a perfectly smooth border without ugly wrinkles.
10. The Dumpling Pouch
This cute design uses a hidden metal flex frame closure. Consequently, the bag snaps open easily when you squeeze the sides. It springs shut automatically when you let go. It offers great one-handed access for quick snacking.
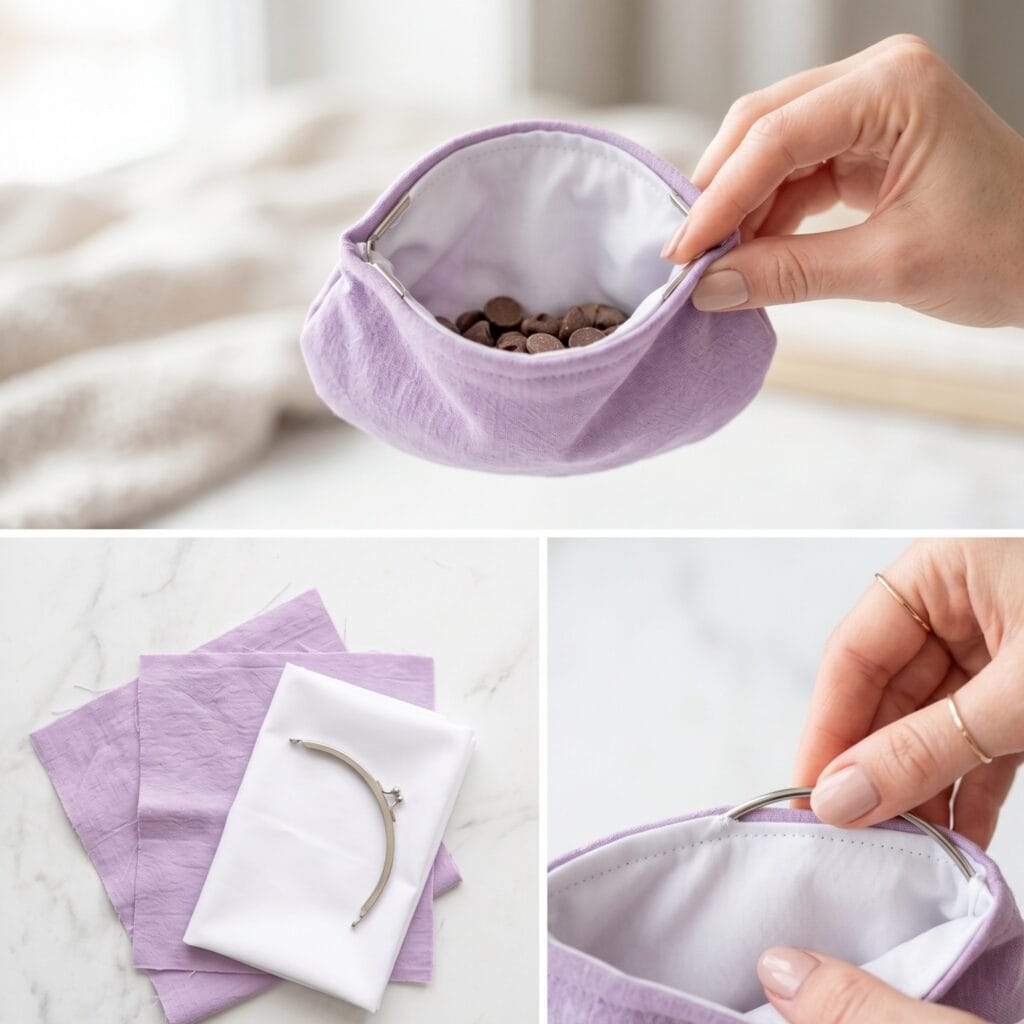
- Special Supplies: Soft cotton scraps, flexible PUL lining, and an internal metal flex frame.
- How to Make It: First, sew a square pouch body using your outer and inner fabrics. Next, fold the top raw edges down by one inch. Sew a horizontal line to make a hollow tube. Leave a tiny gap in the side seams. Then, push the metal flex frame completely through this tube. Finally, insert the small metal hinge pin and stitch the gap closed.
Pro-Tip: You must remove metal flex frames before deep cleaning. If your bag gets very dirty, hand wash it carefully. Otherwise, the internal metal parts might rust inside your washing machine.
Important Crafting Safety Note:
Always verify that the waterproof linings, plastics, and waxes you purchase are explicitly labeled as “food-grade” or “food-safe.” Materials intended for general crafting, such as standard vinyl tablecloths or commercial waterproofing sprays, may contain harmful chemicals, lead, or phthalates that should never come into direct contact with food.