

Cleaning out your studio workbench leaves small material remnants. Specifically, turning those beautiful scraps into mini leather bag charms is a mindful practice. It elevates basic everyday totes instantly. Consequently, you can turn them into finished mini leather bag charms without cutting into new hides. With mini leather bag charms, every tiny strip finds a new purpose.
Indeed, building miniature leather sculptures is a peaceful weekend ritual. Here, we outline the essential professional hand tools you need. Then, we will share 10 deeply original design concepts for your workspace.
This blog post contains affiliate links. As an Amazon Associate, I earn from qualifying purchases. The content on some of these projects may be enhanced with structural craft inspirations.
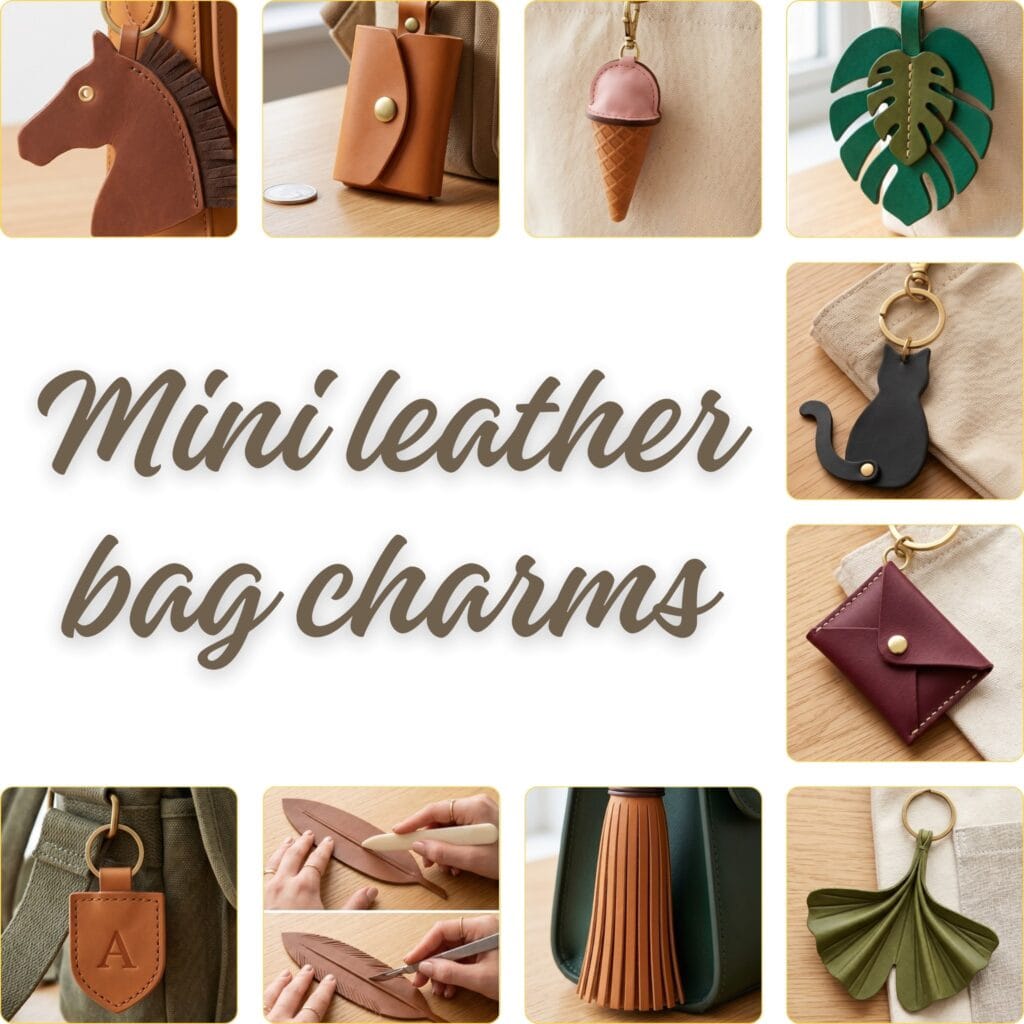
Essential Tools for Mini Leather Bag Charms
Because cutting and stitching small pieces requires absolute precision, selecting sharp tools dictates final quality. Therefore, using professional implements prevents messy edges. This is the golden rule of crafting mini leather bag charms. It keeps your tiny stitch lines perfectly aligned.
A few foundational tools are used throughout every single project in this guide, marked with a (used throughout) tag below.
🔨 Highly Recommended: All-in-One Punching & Pronging Machine
Instead of buying a separate awl, pricking irons, and hole punch, this all-in-one manual press handles both stitching-hole pronging (1, 2, 4, and 6-tooth punches included) and standard round punching (8 sizes, 1.5–6mm) in a single tool.


➡️ Need to set rivets, grommets, or snaps too? That’s a different press with different dies — see our second recommendation just below.
🔨 Highly Recommended: All-in-One Fastener Press
Two fastener types are press-set in this guide’s projects — grommets on Idea #4 Equestrian Silhouette and snap buttons on Idea #6 Saddle Pocket — and Technique 4 keeps a rapid rivet as its optional loose-swing joint, with dies for all three included on this press, plus basic hole punching. Note: the machine and dies are included, but the rivets, grommets, and snaps themselves are sold separately — see the Hardware & Fasteners list above.

Pro-Tip: Instead of guessing your leather dimensions, trace your chosen shapes onto thick cardstock first. In fact, this vital planning step saves valuable luxury scrap pieces instantly.
(If you love exploring creative ways to use small workshop remnants, check out our companion guide on 15 Brilliant Scrap Leather Projects You Will Love to Try.)
Core Techniques for Mini Leather Bag Charms
Before you dive into the ten designs below, let’s slow down and cover the hand skills that bring each one to life. Think of this as your foundation — the quiet, repetitive motions that make miniature leatherwork feel almost meditative once your hands know them.
Essential Materials & Tools
🧩 Base Material
- Leather Scraps (Assorted Colors)(used throughout) — small offcuts in different colors and finishes | Check Leather Scraps (Assorted Colors)(used throughout) on Amazon
✂️ Cutting & Marking Tools
- Scratch Awl & Pricking Irons — the single-point scratch awl marks your stitch line before the iron touches leather | Check Price on Amazon
- Stitching Iron — the multi-tooth iron that opens a full row of holes per strike; choose it OR the pricking iron, not both, for your stitch line | View Stitching Iron on Amazon
- Self-Healing Cutting Mat (used throughout) — protects your worktop and keeps blade edges sharp longer | Find Self-Healing Cutting Mat (used throughout) on Amazon
- Sharp Leather Knife (used throughout) — for clean, precise cuts on every charm | See Price on Amazon
- Craft Scissors — for trimming layered leaf and fruit shapes cleanly | View on Amazon
- Bone Folder Tool — scores sharp, lasting fold lines for origami-style pieces | See Bone Folder Tool on Amazon
- Alphabet Stamp Set & Mallet — presses crisp monogram lettering into damp leather (its non-metal mallet also strikes the eyelet setter) | See Price on Amazon
🔩 Hardware & Fasteners
- Solid Brass Rivets (Pendulum-Style) — sets with intentional play for swinging charm pieces | See Solid Brass Rivets (Pendulum-Style) on Amazon
- Brass Eyelet Grommets — adds a small structural detail, like an eye or accent hole | Explore Brass Eyelet Grommets on Amazon
- Mini Brass Snap Fasteners — a tiny, functional closure for pocket-style charms | View on Amazon
- Small Brass Chicago Screws — screw-back binding posts for a joint that stays snug yet still swings (Technique 4) | Find Brass Chicago Screws on Amazon
⚙️ Setting Tools & Dies
- Leather Punch — creates clean holes for rivets, grommets, and snaps | Find on Amazon
- Brass Eyelet Setter Kit — the matching punch-and-die set that actually sets the Brass Eyelet Grommets (Technique 3) | Find Brass Eyelet Setter Kit on Amazon
- Mini Snap Setter Kit — presses the Mini Brass Snap Fasteners evenly instead of crushing them by hand (Technique 9) | Find Mini Snap Setter Kit on Amazon
🧵 Stitching & Binding Supplies
- Waxed Linen Thread — holds tight under daily pocket and keychain wear | Check Waxed Linen Thread on Amazon
- Stitching Needles (Set of 2) — the pair you need for a proper saddle stitch | Check Price on Amazon
- Waxed Twine — a thicker binding option for book-style and pouch charms | View Waxed Twine on Amazon
- Small Linen Paper Sheets — the pages for your miniature bound book charm | Check Small Linen Paper Sheets on Amazon
🎨 Finishing & Detail Supplies
- Matte Edge Paint — seals raw edges with a clean, permanent finish | Find Matte Edge Paint on Amazon
- Natural Beeswax — buffs finished edges into a smooth, polished sheen | Explore Natural Beeswax on Amazon
- Clear Leather Glue — bonds layered leather cleanly without visible residue | Check Price on Amazon
- Thin Fringed Suede Strips — adds soft texture, like a mane or tassel detail | Find on Amazon
- Nitrile Gloves — keep contact cement and edge paint off your skin while you brush them on | Find Nitrile Gloves on Amazon
🔗 Bag Attachment Hardware
- Small Split Rings — the plain split ring every charm hangs from — the swivel clasp clips to it | Find Split Rings on Amazon
- Swivel Lobster Clasp — clips to the split ring and keeps a flat charm from twisting as you walk | Find Swivel Lobster Clasp on Amazon
📐 Patterns & Wet-Shaping
- Cardstock — trace each template onto cardstock before cutting expensive leather | Find Cardstock on Amazon
- Metal Ruler — check every measurement and guide straight cuts and scored lines | Find Metal Ruler on Amazon
- Sponge for Wet-Shaping — dampens leather evenly with clean water before stitching-iron and stamping work | Find Craft Sponge on Amazon
Optional Studio Upgrades
Never required to finish the projects above — convenience upgrades for makers who want them.
📦 Beginner Project Kits & Coordinated Bundles
For beginners or makers starting from scratch, these coordinated bundles and all-in-one project packs bring together the core supplies in one convenient order.
- Leather Crafting Kit with Tools — A coordinated entry-level set can combine basic leather, hand tools, thread, and project guidance for first-time makers. | Find Leather Crafting Kit with Tools on Amazon
⚡ Studio Tools & Workshop Equipment
Optional studio upgrades — every project above can be completed without these.
- Punching and Pronging Press — A manual press with stitching prongs and round punches speeds repeatable hole-making for batches of small charms. | See Price on Amazon
- Leather Fastener Press with Dies — A dedicated hand press with compatible dies streamlines consistent setting of rivets, eyelets, and snap fasteners. | See Leather Fastener Press with Dies on Amazon
1. The Saddle Stitch
Supplies Needed: Leather Scraps (Assorted Colors)(used throughout), Self-Healing Cutting Mat (used throughout), Sharp Leather Knife (used throughout), Scratch Awl & Pricking Irons, Waxed Linen Thread, Stitching Needles (Set of 2), Craft Scissors, Clear Leather Glue, Matte Edge Paint, Natural Beeswax
This is the oldest trick in leatherworking — two needles, one thread, and a stitch so strong it won’t unravel even if one thread breaks. It’s the quiet backbone of nearly every heirloom leather piece ever made.
Quick Steps:
First, thread a needle onto each end of a single length of waxed thread. Next, pass both needles through the same pricked hole from opposite sides, pulling until the thread centers itself. Then, cross the needles and pass each one through the next hole, always in opposite directions. Pull each stitch snug before moving to the next hole.
Used in: The Tailored Mini Saddle Pocket.
2. Long-Stitch Binding
Supplies Needed: Leather Scraps (Assorted Colors)(used throughout), Self-Healing Cutting Mat (used throughout), Sharp Leather Knife (used throughout), Leather Punch, Small Linen Paper Sheets, Waxed Twine, Stitching Needles (Set of 2), Matte Edge Paint, Natural Beeswax
The Narrative: Borrowed from centuries-old bookbinding, this technique turns a simple folded cover into something that feels like a tiny, treasured diary.
Quick Steps:
First, fold your paper sections and nest them inside the leather cover along the spine. Next, mark and punch evenly spaced holes through both the cover and paper along the spine line. Then, thread a single needle in and out through each hole in sequence, wrapping around the spine edge between holes to create a visible woven stitch pattern.
Used in: The Bound Botanical Book Charm.
3. Setting a Grommet or Eyelet
Supplies Needed: Leather Scraps (Assorted Colors)(used throughout), Self-Healing Cutting Mat (used throughout), Sharp Leather Knife (used throughout), Leather Punch, Brass Eyelet Grommets, Brass Eyelet Setter Kit (strike it with the non-metal mallet from your Alphabet Stamp Set when your setter needs a strike), Matte Edge Paint
A single small grommet can transform a flat leather cutout into something with real dimension — like the exact moment a horse’s eye catches the light.
Quick Steps:
First, punch a hole precisely where you want the grommet to sit. Next, insert the eyelet through the hole from the front. Then, place the washer on the back and use a grommet-setting tool with a mallet to strike firmly until the eyelet flares open and locks in place.
Used in: The Equestrian Profile Silhouette.
4. Articulated Joint Setting
Supplies Needed: Leather Scraps (Assorted Colors)(used throughout), Self-Healing Cutting Mat (used throughout), Sharp Leather Knife (used throughout), Leather Punch, Small Brass Chicago Screws, Matte Edge Paint
A loose rapid rivet works itself free with daily handling, so this joint uses a small Chicago screw instead — a screw-back binding post that clamps the two layers reliably while still acting as the pivot your charm swings from. A rapid rivet remains a valid option when you want maximum play: set it fully snug rather than deliberately loose.
Quick Steps:
First, punch matching holes in both the moving piece and the base piece. Next, push the Chicago screw post through both layers and thread the screw on from the other side. Tighten until the layers just stop wobbling, then back off about a quarter turn — snug enough that daily handling will not unscrew it, loose enough that the piece still swings freely.
Used in: The Articulated Pendulum Cat.
5. Using a Stitching Iron
Supplies Needed: Leather Scraps (Assorted Colors)(used throughout), Self-Healing Cutting Mat (used throughout), Sharp Leather Knife (used throughout), Bone Folder Tool, Matte Edge Paint, Natural Beeswax
A stitching iron is what gives fine leatherwork that unmistakable evenly-spaced stitch line — the small detail your eye registers as “handmade quality” without quite knowing why.
Quick Steps:
First, mark your stitch line; if the leather is vegetable-tanned you may lightly dampen that line to soften it — skip this step for chrome-tanned or finished scraps. Next, position the stitching iron’s prongs on the marked line and strike it squarely with a mallet, exactly as your iron’s manufacturer instructs — never rock the teeth sideways, which bends them and opens the holes unevenly. Then, lift and reposition the iron so its first prong lands in the last hole you made, keeping your spacing perfectly consistent down the line.
Used in: The Scalloped Fish-Scale Fan.
6. Alphabet Stamping on Damp Leather
Supplies Needed: Leather Scraps (Assorted Colors)(used throughout), Self-Healing Cutting Mat (used throughout), Sharp Leather Knife (used throughout), Alphabet Stamp Set & Mallet, Sponge for Wet-Shaping with clean water
A single letter, struck at exactly the right moment, is what turns a plain leather shape into something that feels personal — like an old apothecary label.
Quick Steps:
First, lightly dampen the leather surface with a barely-wet sponge — just enough to darken it slightly. Next, position your brass stamp perfectly upright on the dampened area. Then, strike the top of the stamp firmly with a mallet in one confident hit, and let the leather dry fully before handling.
Used in: The Monogrammed Apothecary Shield.
7. Wet-Molding & Bone Folder Scoring
Supplies Needed: Leather Scraps (Assorted Colors)(used throughout), Self-Healing Cutting Mat (used throughout), Sharp Leather Knife (used throughout), Craft Scissors, Clear Leather Glue, Matte Edge Paint
With just water and a bone folder, flat leather can be coaxed into the same delicate veined structure as a real leaf.
Quick Steps:
First, dampen the back of your leather shape with a wet cloth or sponge. Next, use the pointed end of a bone folder to press firm, deliberate lines where you want your folds or veins to sit. Then, gently fold along these scored lines and let the leather dry completely before releasing it.
Used in: The Origami Ginkgo Leaf.
8. Layering & Lamination
Supplies Needed: Leather Scraps (Assorted Colors)(used throughout), Self-Healing Cutting Mat (used throughout), Sharp Leather Knife (used throughout), Craft Scissors, Clear Leather Glue, Matte Edge Paint
Some of the most striking charms in this guide aren’t carved or stamped at all — they’re simply built, thin layer by thin layer, like a tiny piece of geological strata.
Quick Steps:
First, cut each layer slightly smaller than the one beneath it. Next, apply a thin, even coat of leather glue to the back of each layer. Then, press each piece into place one at a time, working from the largest base layer up to the smallest top layer, and let the glue cure fully before handling.
Used in: The Layered Monstera Leaf Splice, The Layered Sliced Fig.
9. Installing a Mini Snap Fastener
Supplies Needed: Leather Scraps (Assorted Colors)(used throughout), Self-Healing Cutting Mat (used throughout), Sharp Leather Knife (used throughout), Leather Punch, Mini Brass Snap Fasteners, Mini Snap Setter Kit, Matte Edge Paint
A tiny snap is what turns a flat piece of leather into a functioning pocket — small, satisfying, and endlessly useful.
Quick Steps:
First, punch a hole through each layer where the snap will sit. Next, place the socket half through one layer and the stud half through the other. Then, use a snap-setting tool to press each half firmly until it clicks securely into place.
Used in: The Tailored Mini Saddle Pocket.
🔑 Finish Every Charm (all ten designs): Each project ends the same way: punch one hanging hole centred about 5 mm (roughly 3/16 in) below the top edge — just wide enough for your split-ring wire to turn freely — then thread a split ring through the hole and clip a swivel lobster clasp to the ring. The swivel keeps a flat charm from twisting as you walk. Prefer a soft finish? Stitch a narrow leather loop through the hole instead of metal hardware.
📏 Measure Before You Cut: Decide the finished size first, then trace it onto cardstock with your metal ruler and cut the template before the leather is touched. The charms in this guide sit between 4 and 7 cm (about 1.5–3 in) tall; a typical bag charm works nicely in 1.2–2 mm (3–5 oz) leather — thinner material folds cleanly for the origami shapes, while the pocket designs want the firmer end of that range. Mark saddle-stitch holes with the pricking iron about 3–4 mm apart so the stitched line stays even.
🌱 Beginner Notes: Stamp and wet-mold only vegetable-tanned leather — it takes a damp impression and dries back firm, while chrome-tanned leather absorbs water unevenly and will not hold a shape once it dries. Keep chrome-tanned and other soft scraps for flat, unstamped designs. If this is your first project, start with a flat, hand-sewn or glued charm — the Bound Botanical Book Charm or the Layered Sliced Fig — before trying the wet-molded Origami Ginkgo Leaf, the snap-set saddle pocket, or the articulated cat.
10 Original Mini Leather Bag Charms to Craft Today
Supplies Needed: Leather Scraps (Assorted Colors)(used throughout), Self-Healing Cutting Mat (used throughout), Sharp Leather Knife (used throughout), Scratch Awl & Pricking Irons, Waxed Linen Thread, Stitching Needles (Set of 2), Matte Edge Paint, Natural Beeswax
Unlike plastic keychains, leather wears in with age instead of cracking. Here are ten designs to build your own set.
1. The Gelato Scoop Cone: Mini Leather Bag Charms Craft
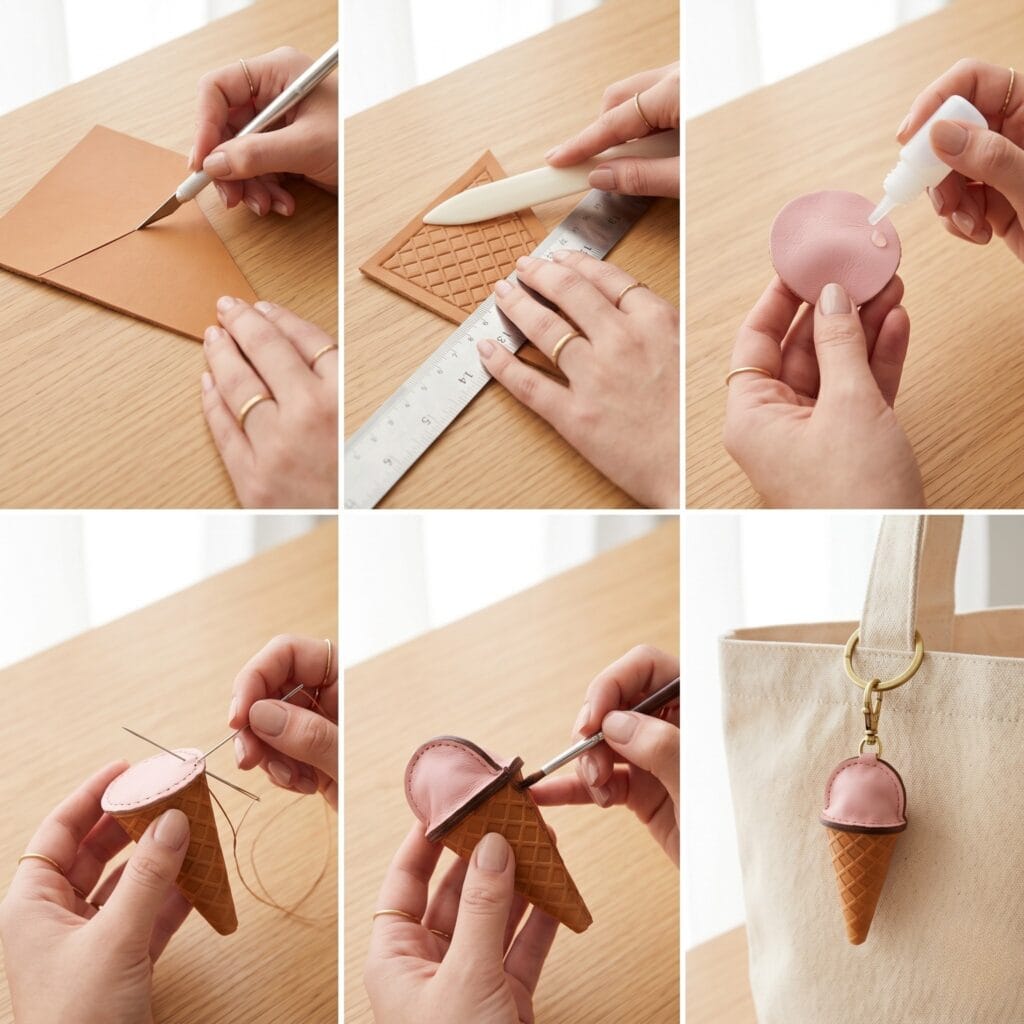
This whimsical design captures the sweet nostalgia of hot European summers. Specifically, it reminds us of melting artisan gelato cones in sunny Italian piazzas.
Supplies Needed: Tan tooling leather scrap, pastel pink napa leather remnant, brown edge paint, and a scratch awl.
Quick Steps:
- First, cut a small triangular cone shape from your rigid tan leather strip.
- Next, score diagonal lines onto the tan surface to mimic a real waffle grid.
- Then, stitch a puffy pink napa circle onto the top cone rim tightly (see Technique 1: The Saddle Stitch above).
Styling Tip: Next, paint the outer raw edges with deep chocolate brown paint. Finally, clip it onto a cream canvas beach tote.
2. The Articulated Pendulum Cat: Mini Leather Bag Charms Design
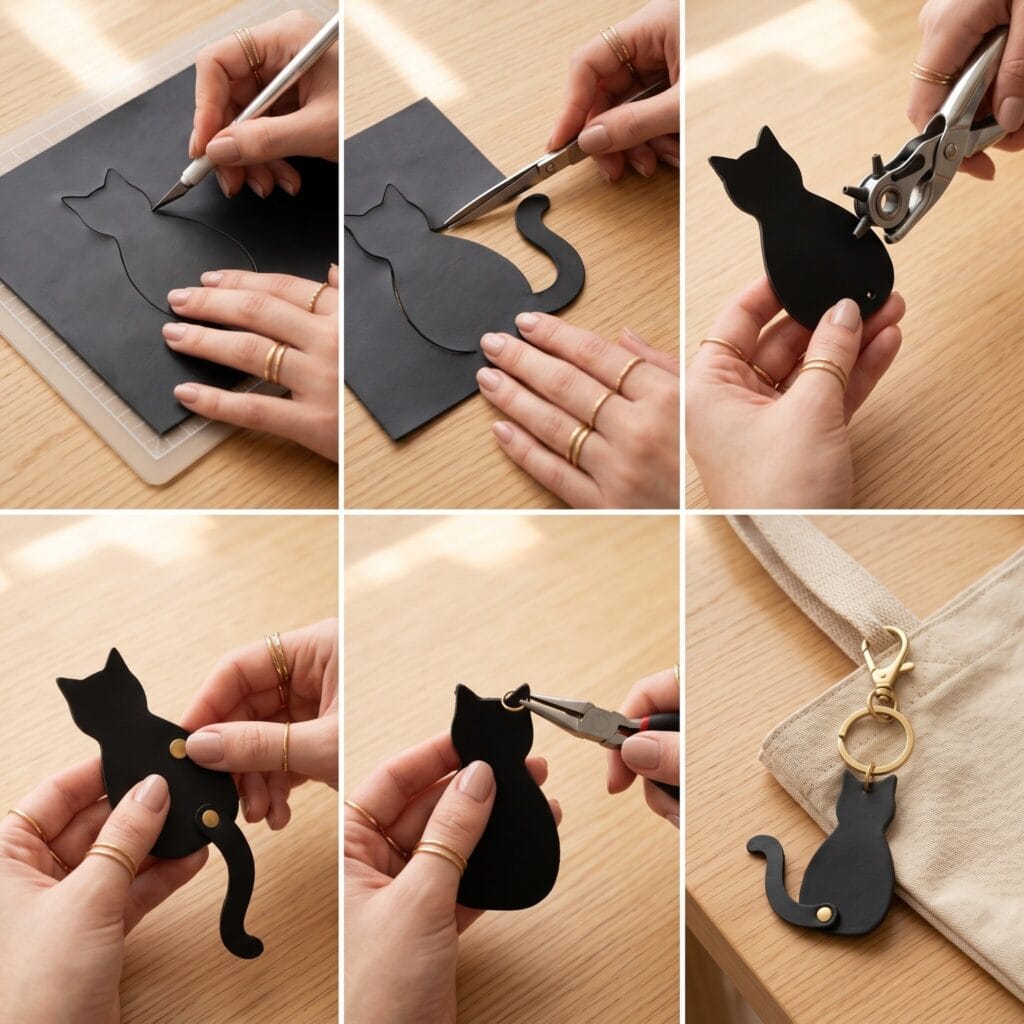
This kinetic piece embodies the playful, independent spirit of a studio cat. Indeed, it mimics a feline watching dust motes dance in the midday window sun.
Supplies Needed: Smooth black leather scraps, one small brass Chicago screw, and a sharp leather punch.
Quick Steps:
- First, cut two identical cat silhouettes from your black leather scrap stash — they become the front and back faces of the body — plus one separate curved tail piece from the same scrap.
- Next, punch the pivot hole at the lower base of the torso on BOTH body faces, keeping the two holes aligned — the tail swings from this point.
- Then, lay the tail between the two body faces, align all three pivot holes, and pass a small brass Chicago screw through them — pick a screw about 1–2 mm longer than your full stack so it tightens snug, then back off a quarter turn for swing (see Technique 4: Articulated Joint Setting above).
Styling Tip: Punch the hanging hole above the cat’s head, then thread a split ring with a swivel lobster clasp through it (see Finish Every Charm above) — the tail keeps swinging happily as you walk with your bag.
3. The Monogrammed Apothecary Shield: Mini Leather Bag Charms Style
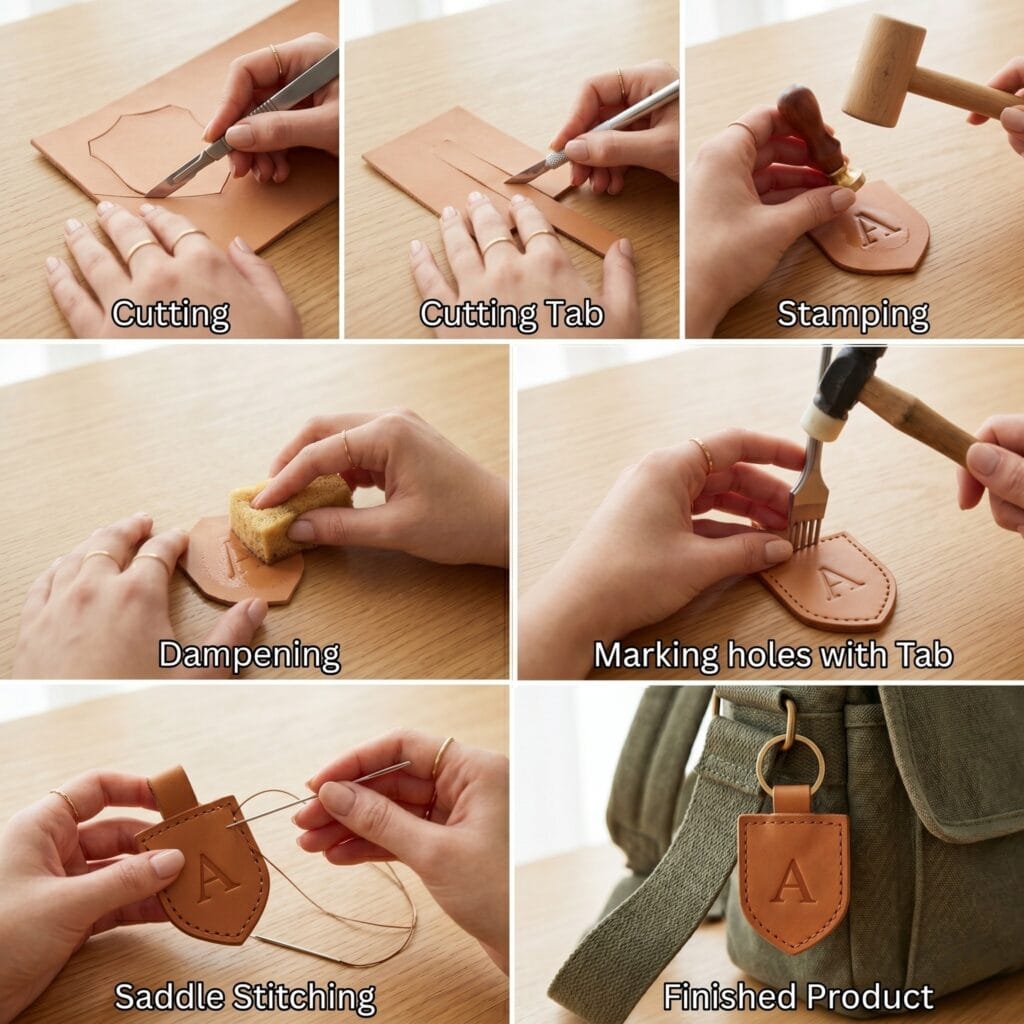
This vintage-inspired tag pays homage to historic European pharmacies. Mainly, it carries the grounding aura of old amber glass tincture bottles arranged on dark oak shelves.
Supplies Needed: Thick vegetable-tanned leather, brass alphabet stamp set, mallet, and waxed linen thread.
Quick Steps:
- First, cut a curved shield shape from a piece of rigid vegetable-tanned scrap.
- Next, wet the center surface lightly and strike the ‘A’ monogram stamp firmly (see Technique 6: Alphabet Stamping above).
- Then, groove a thin border channel around the shield edge and stitch it (see Technique 1: The Saddle Stitch above).
Styling Tip: Consequently, buff the finished leather shield with natural beeswax. Furthermore, attach it to your favorite structured leather briefcase for a classic look.
4. The Equestrian Profile Silhouette: Mini Leather Bag Charms Build
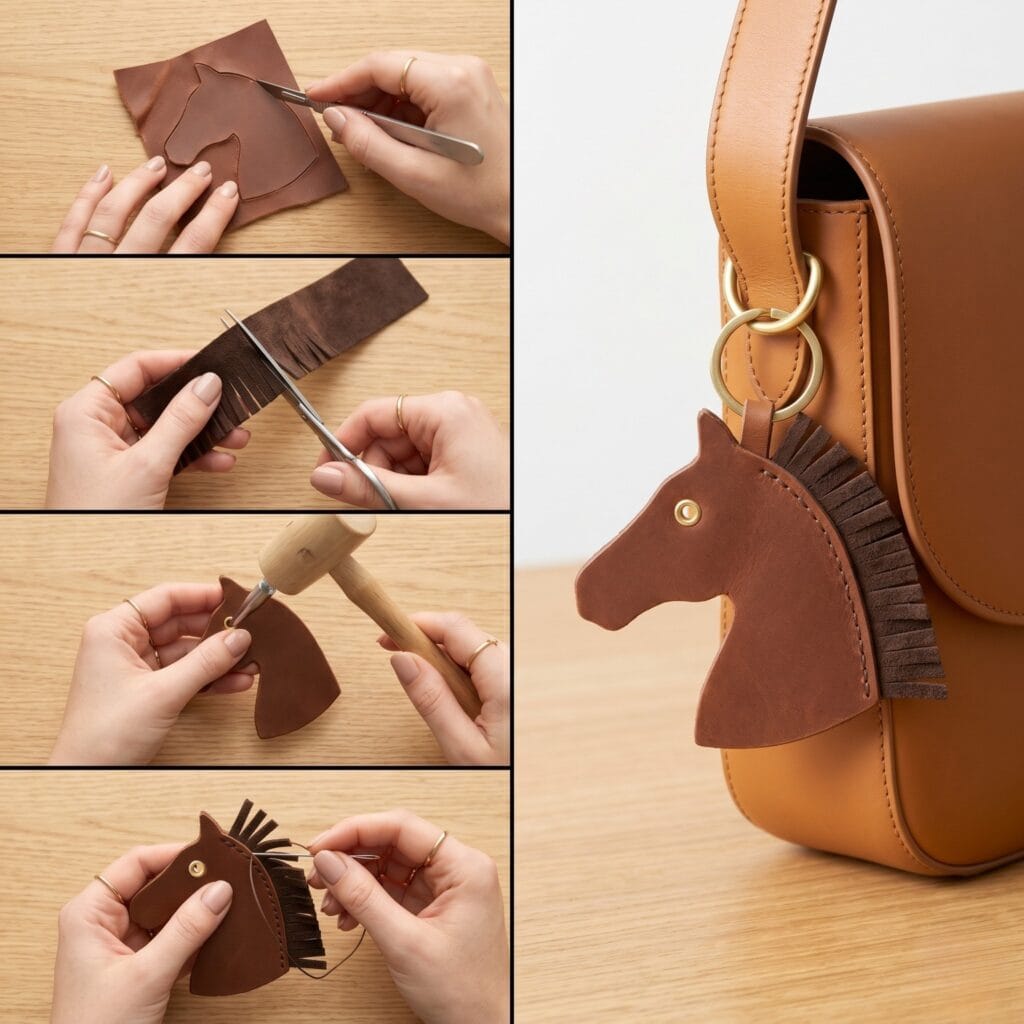
This equestrian profile celebrates traditional saddlery — a punched eyelet bridle detail and a saddle-stitched mane give the charm its character.
Supplies Needed: Fine brown calfskin remnants, a single brass grommet, and thin fringed suede strips.
Quick Steps:
- First, cut a sleek, modern horse head profile from your brown calfskin scrap.
- Next, set a small brass eyelet grommet exactly where the eye belongs (see Technique 3: Setting a Grommet or Eyelet above).
- Then, glue thin suede strips between the leather back layers to form a mane.
Styling Tip: Ultimately, sand the edges until they feel completely smooth. Afterward, match this horse silhouette charm with a classic tan leather shoulder bag.
5. The Origami Ginkgo Leaf: Mini Leather Bag Charms Concept
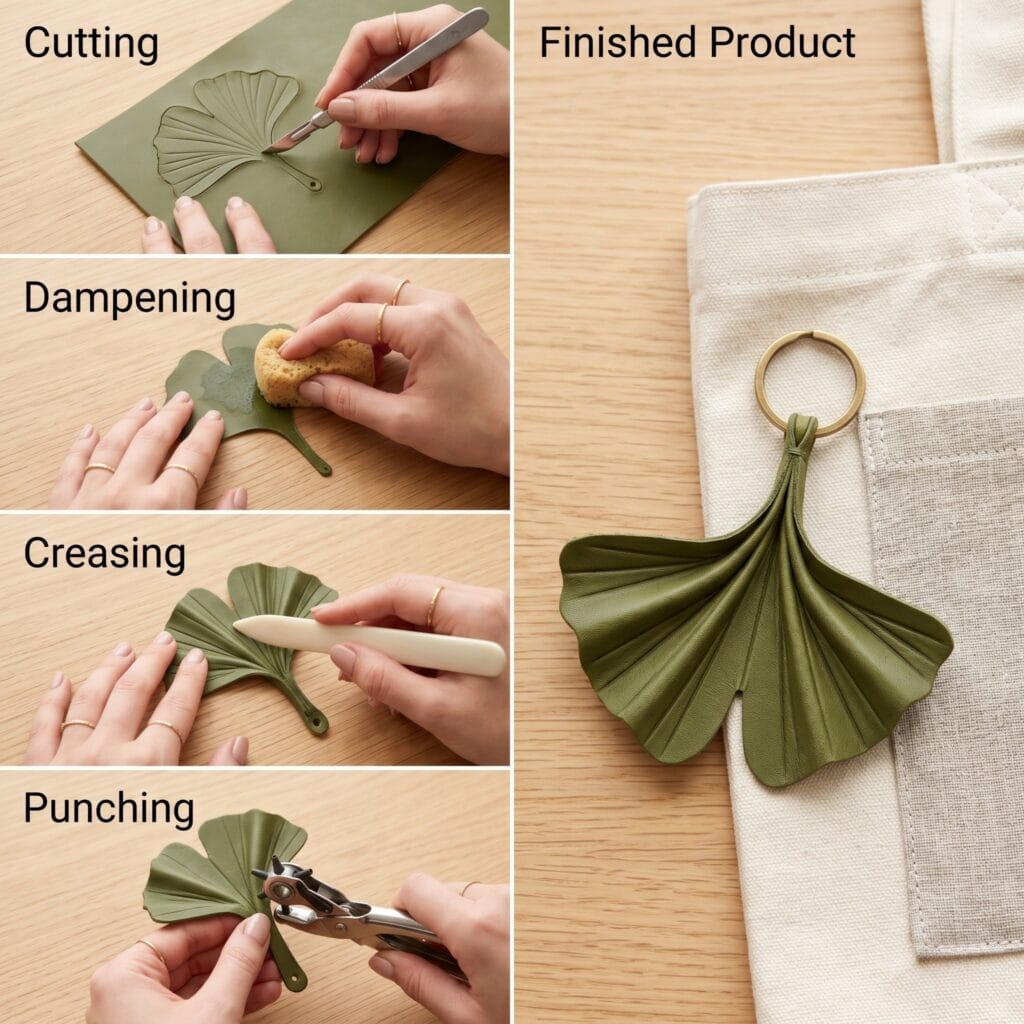
This organic design honors the timeless elegance of botanical fossils. Naturally, it symbolizes resilience and the quiet transition of autumn seasons in the studio garden.
Supplies Needed: Olive green chrome-tanned leather, a bone folder tool, clean water, and a leather punch.
Quick Steps:
- First, cut a distinct fan-shaped ginkgo leaf from a green leather piece.
- Next, dampen the leather back and fold it sharply along the central veins.
- Then, press the folds using a bone folder to lock the three-dimensional lines (see Technique 7: Wet-Molding & Bone Folder Scoring above).
Styling Tip: So, let the green leaf dry completely before using it. Meanwhile, hang it next to textured glass accessories to create a soft contrast.
Similarly, if you love matching rich organic textures with clear glass materials, explore our masterclass on Upcycled Glass Jar Crafts: 10 Stunning DIY Studio Secrets.
6. The Tailored Mini Saddle Pocket: Mini Leather Bag Charms Project
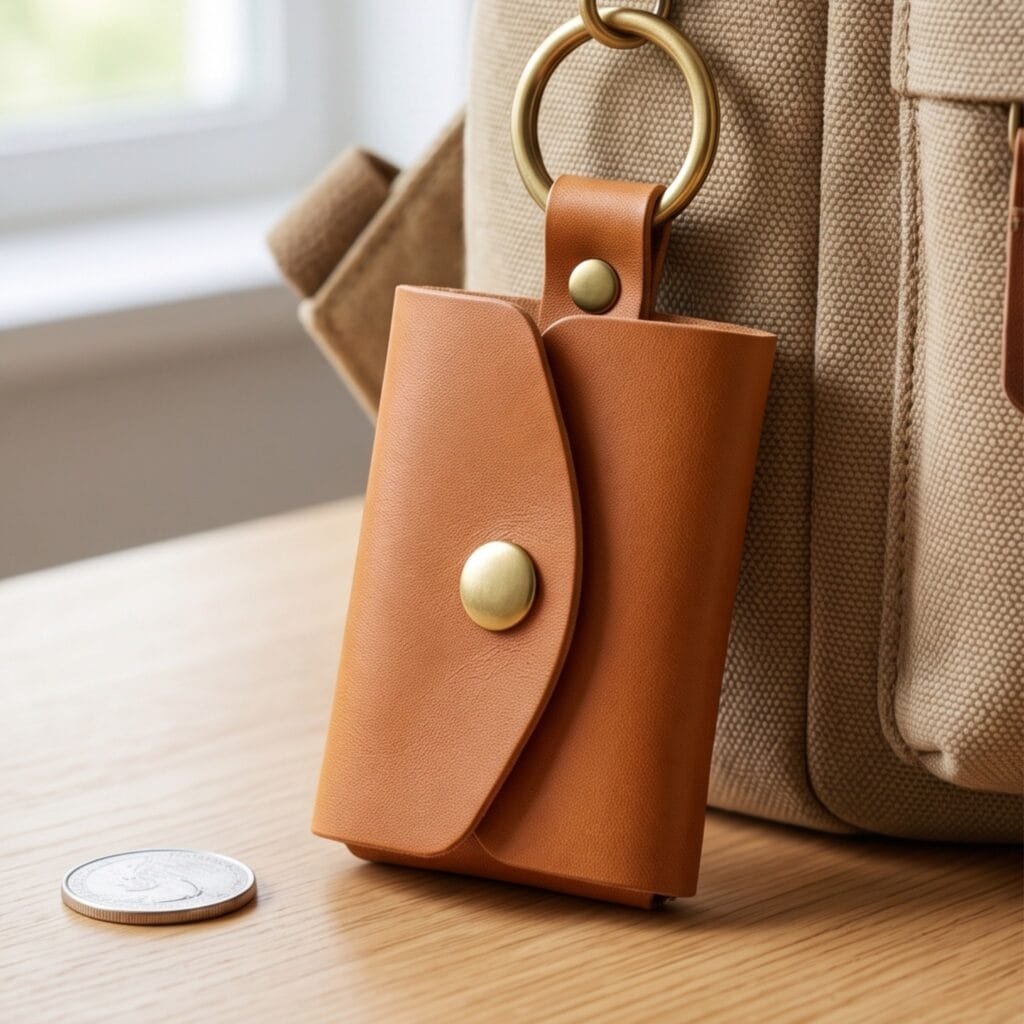
This design shrinks a classic saddlebag pattern down to five centimeters — a working snap pouch the size of a coin purse, built with the same folds as its full-size ancestor.
Supplies Needed: Firm taba leather scraps, mini brass snap fastener, and two stitching needles.
Quick Steps:
- First, cut a miniature T-shaped pattern to form the pocket body and front flap.
- Next, install the lower half of your mini brass snap onto the front panel area (see Technique 9: Installing a Mini Snap Fastener above).
- Then, fold the sides in and use a traditional saddle stitch to seal the pocket (see Technique 1: The Saddle Stitch above).
Styling Tip: An AirTag is about 3.2 cm across, so this pouch only works if you size the T-shaped pattern around your own tracker first — leave room for seam allowance and snap clearance, test the fit with the snap closed, and only then stitch it. Clip the finished pocket to your bag with a split ring and swivel lobster clasp through the hanging hole (see Finish Every Charm above).
7. The Layered Monstera Leaf Splice: Mini Leather Bag Charms Layout
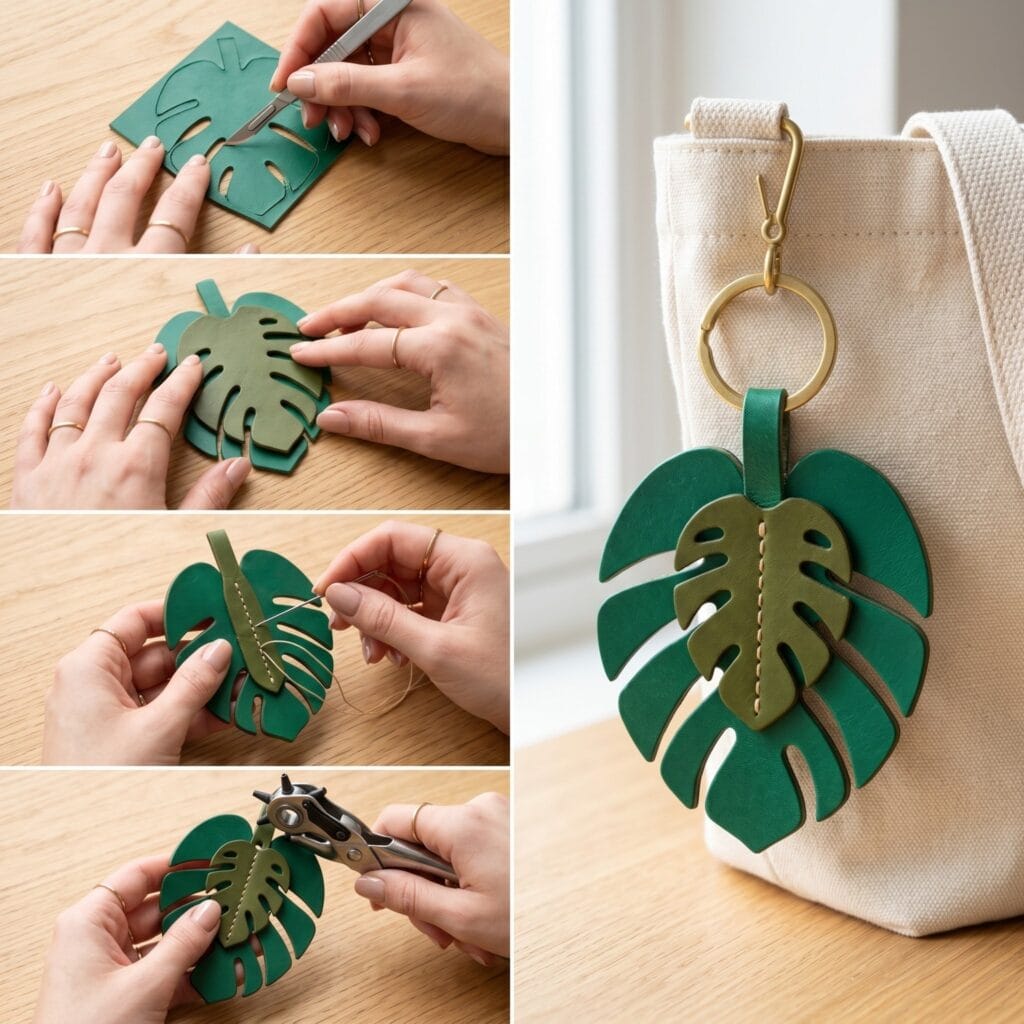
This tropical design infuses your wardrobe with fresh botanical energy. True, it mimics looking upward at giant jungle leaves catching filtered greenhouse light.
Supplies Needed: Dark green leather scrap, sage green leather remnant, clear leather glue, and scissors.
Quick Steps:
- First, cut a large monstera leaf contour from your dark green leather stash.
- Next, cut a matching, slightly smaller leaf version from your sage green scrap.
- Then, glue the light leaf directly onto the center dark leaf surface smoothly (see Technique 8: Layering & Lamination above).
Styling Tip: Therefore, punch a single clean hole through the top leaf stem. By doing this, the beautiful dual-layer green shades pop against dark winter coats.
8. The Layered Sliced Fig: Mini Leather Bag Charms Pattern
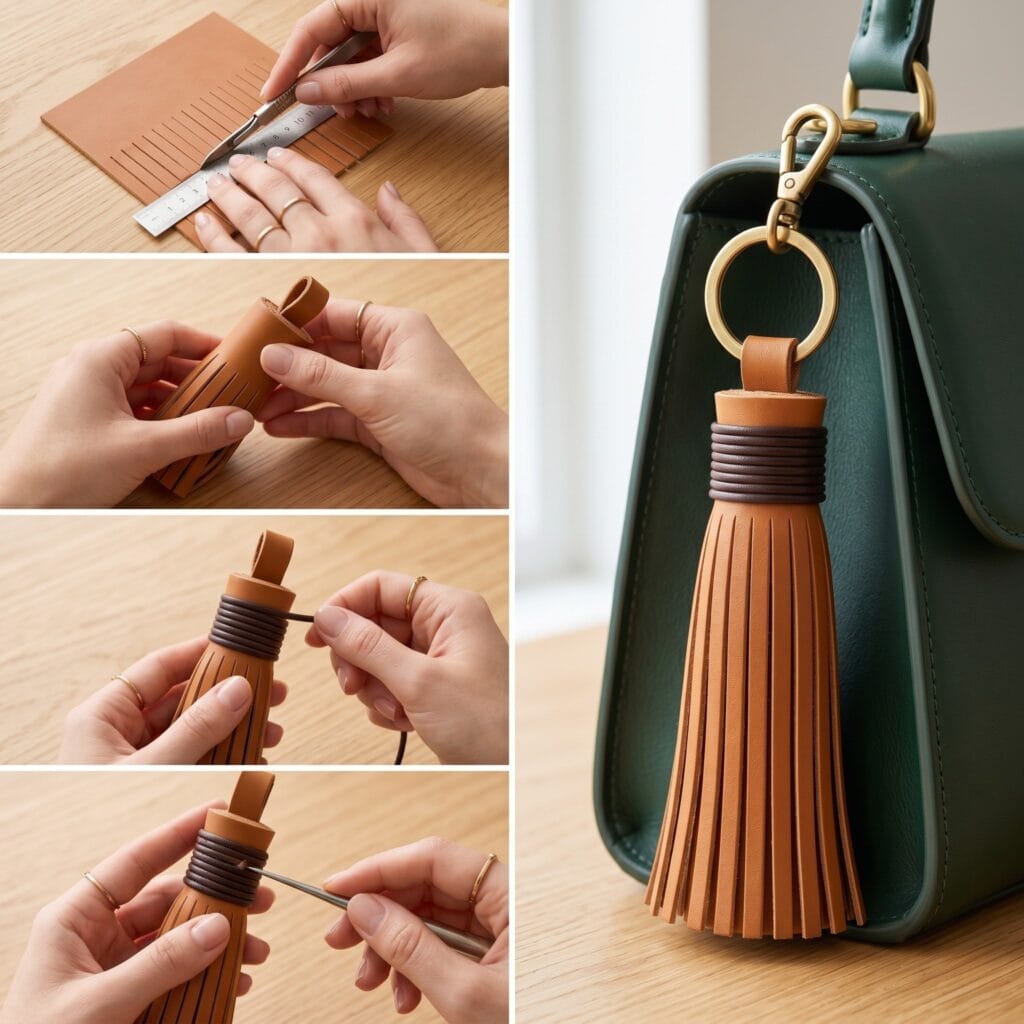
This rich accessory celebrates the abundance of warm Mediterranean orchards. Indeed, it captures the vibrant moment a ripe fig splits open in the summer heat.
Supplies Needed: Deep purple leather, plum leather scrap, pastel pink leather strip, and purple edge paint.
Quick Steps:
- First, cut out three concentric teardrop shapes, ranging from large to small.
- Next, laminate the purple, plum, and pink leather layers together using clear glue (see Technique 8: Layering & Lamination above).
- Then, stitch around the outer rim to secure the layered fruit assembly (see Technique 1: The Saddle Stitch above).
Styling Tip: Next, coat the raw edge sandwich with matte purple paint. As a consequence, the beautiful cross-section looks incredibly realistic.
9. The Bound Botanical Book Charm: Mini Leather Bag Charms Framework
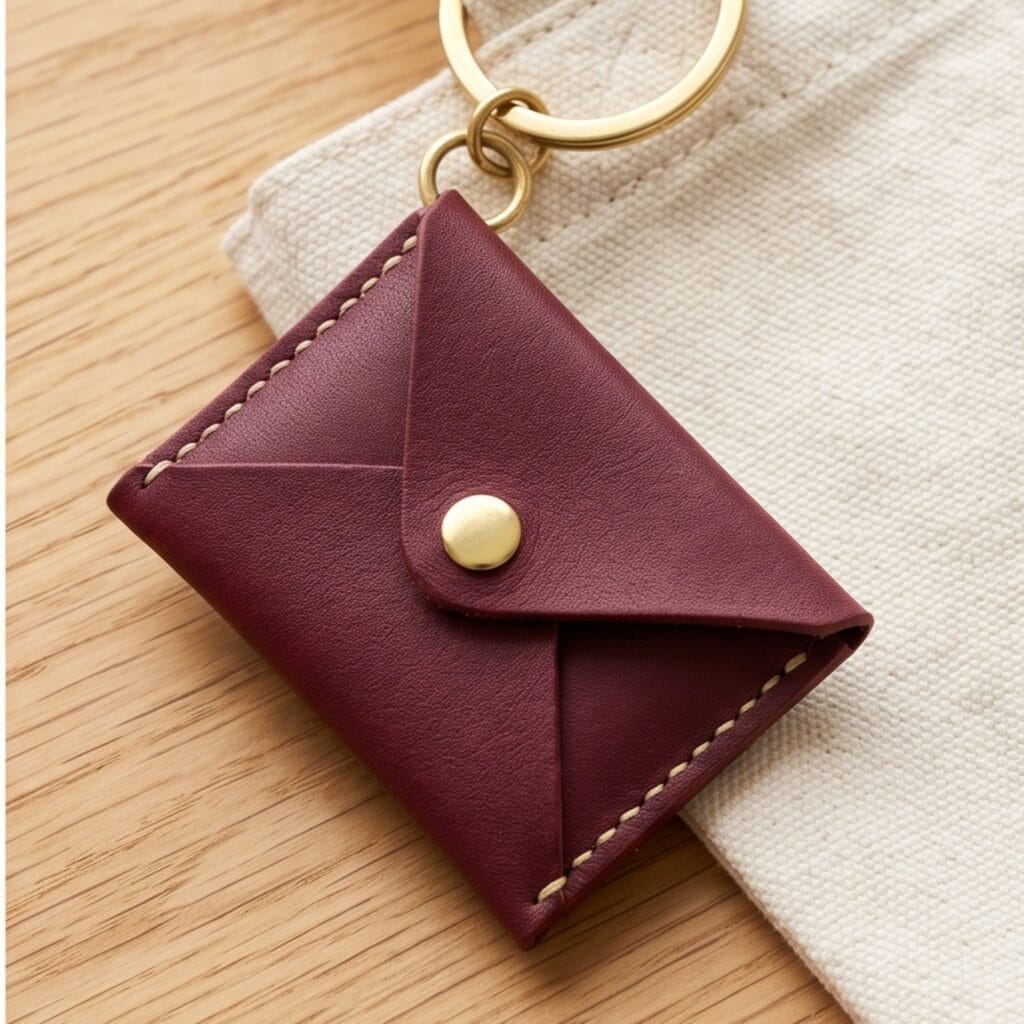
This nostalgic piece speaks to the heart of writers and collectors. Essentially, it feels like a tiny antique journal meant for sketching micro botanical diagrams.
Supplies Needed: Raw taba leather scrap, a few small sheets of linen paper, and thick waxed twine.
Quick Steps:
- First, cut a small rectangle of taba leather to serve as a vintage book cover.
- Next, fold three tiny sections of linen paper and nest them inside the cover.
- Then, use a simple long-stitch technique through the book spine to bind the pages (see Technique 2: Long-Stitch Binding above).
Styling Tip: Ultimately, wrap a thin leather lace around the cover to keep it closed. Then, attach this miniature diary to a soft cotton tote bag.
10. The Scalloped Fish-Scale Fan: Mini Leather Bag Charms Method
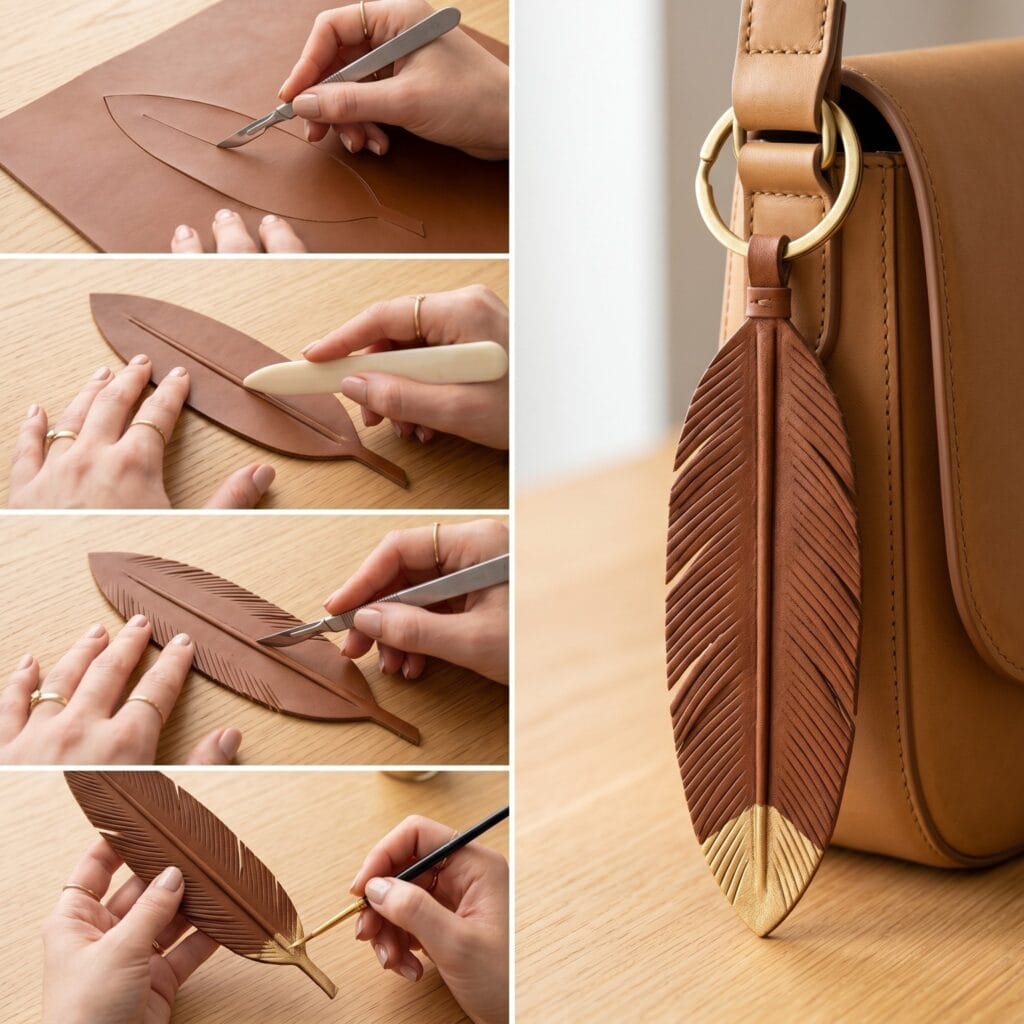
This elegant charm draws inspiration from glamorous Art Deco architecture. So, it mimics the flowing, rhythmic symmetry of traditional tiled courtyard fountains.
Supplies Needed: Nude, cream, and tan leather scraps, a rigid leather backing piece, a cardstock template, a sharp leather knife or craft scissors, and a stitching iron.
Quick Steps:
- First, trace the half-circle template onto cardstock and cut five identical scales from various nude leather scraps with your knife or scissors.
- Next, overlap the scales in a fan pattern onto a rigid leather backing sheet.
- Then, sew across the curved scale tracks to secure the beautiful mosaic tile design (see Technique 5: Using a Stitching Iron above).
Styling Tip: Consequently, trim away any excess backing leather around the fan border. Use it to add a sophisticated vintage accent to your luxury purses.
Elevate Your Wardrobe With Mini Leather Bag Charms
Curating your own miniature leather accessories is a wonderful creative outlet. Ultimately, these mini leather bag charms ideas put leftover scraps to real use.
First, spend an hour sorting your workshop scrap bins by color. Choose pieces that speak to your current aesthetic room. In the end, your finished mini leather bag charms will feel like beautiful, intentional extensions of your daily craft journey.
So, which sculptural silhouette are you inspired to sew first? Please, share your miniature design ideas in the comments section below!
Important Crafting Safety Notes
Crafting is a rewarding creative activity, but maintaining a safe workshop environment is essential for yourself, your family, and your pets. Please review these vital safety precautions before starting:
• Blade & Cutting Safety: Always cut away from your body on a self-healing mat, keep your leather knife and scissors sharp (a dull blade is the one that slips), and never test an edge with your fingertip. Sheathe or roll blades for storage with the edge turned inward.
• Adhesives, Edge Paint & Ventilation: Brush adhesives and edge paint in a ventilated spot and follow each label’s open time, coat count, and full cure time exactly. Keep solvents away from heat sources, and wear nitrile gloves when you spread contact cement or edge paint so the solvents stay off your skin.
• Child & Pet Safety (Small Hardware): Split rings, lobster clasps, Chicago screws, snaps, and eyelets are choking hazards for small children and pets, and needles and awls can injure curious hands or paws. Keep findings in a closed tin, sweep punches and offcuts off the floor, and store work in progress out of reach.
• Awl, Iron & Mallet Control: Seat pricking irons and stamps on a firm mat or stone, keep your fingertips behind the teeth rather than beside them, and use controlled mallet taps — eye protection is wise whenever a hammer can glance off a metal tool. Return awls and needles to a tin after each session and clear scraps so nothing slippery ends up underfoot.
• Materials Quality & Label Guidance: Choose leather and finishes meant for the job — vegetable-tanned scraps for pieces that get handled daily, and any sealer or paint applied exactly as its label directs for dry time, coat count, and full cure.
For more detailed guidance on safe crafting practices, liability disclosures, and website usage, please review our Terms and Conditions.
Mini Leather Bag Charms FAQ
What leather do I need for mini charms?
Assorted leather scraps in different colors and finishes are enough for every design here. Rigid vegetable-tanned offcuts hold wet-molded and stamped details best, and leather wears in with age instead of cracking.
Do I need both a stitching iron and a pricking iron?
Choose one or the other for your stitch line. The multi-tooth stitching iron opens a full row of holes per strike, while the scratch awl marks your line before the pricking iron touches the leather.
How do I make a charm with a moving part?
Use an articulated joint: punch the pivot hole at the same spot on both body faces, lay the tail between them, and pass a small brass Chicago screw through — one about 1–2 mm longer than the stack.
How do I get crisp folds in leather?
Score sharp, lasting fold lines with a bone folder for origami-style pieces, and wet-mold damp leather into shape before it dries.
“Which of these How to Make 10 Easy Mini Leather Bag Charms Today ideas are you excited to try first, or do you have a creative tip of your own to share? Drop a comment below—I’d love to hear your thoughts and see what you create!”
[…] stitching clear of the handle attachment. Add a detachable accent only after the tab is secure. Our mini leather bag charm ideas offer optional inspiration for that finishing […]
[…] Continue blanket stitching across the cord ends, then weave the final thread tail inside the token before trimming. Hang this small slow stitching project from a bedside hook or bag. For another portable handmade idea, try these mini leather bag charms. […]