

Muddy washes can steal the glow from fall. These diy autumn watercolor ideas keep color clear with simple layers, measured water, and patient drying so beginners can paint seasonal cards, journal pages, framed studies, and cozy handmade decor without scrubbing the paper into fuzz.
Each study starts with a light wash and builds toward darker marks only after the surface loses its shine. If you are practicing basic brush control, our easy painting ideas for beginners offer another friendly place to build confidence, while finished pieces can become part of your cozy DIY fall decorations.
Affiliate Disclosure: This post contains affiliate links. As an Amazon Associate, I earn from qualifying purchases. If you buy through these links, I may earn a commission at no additional cost to you.
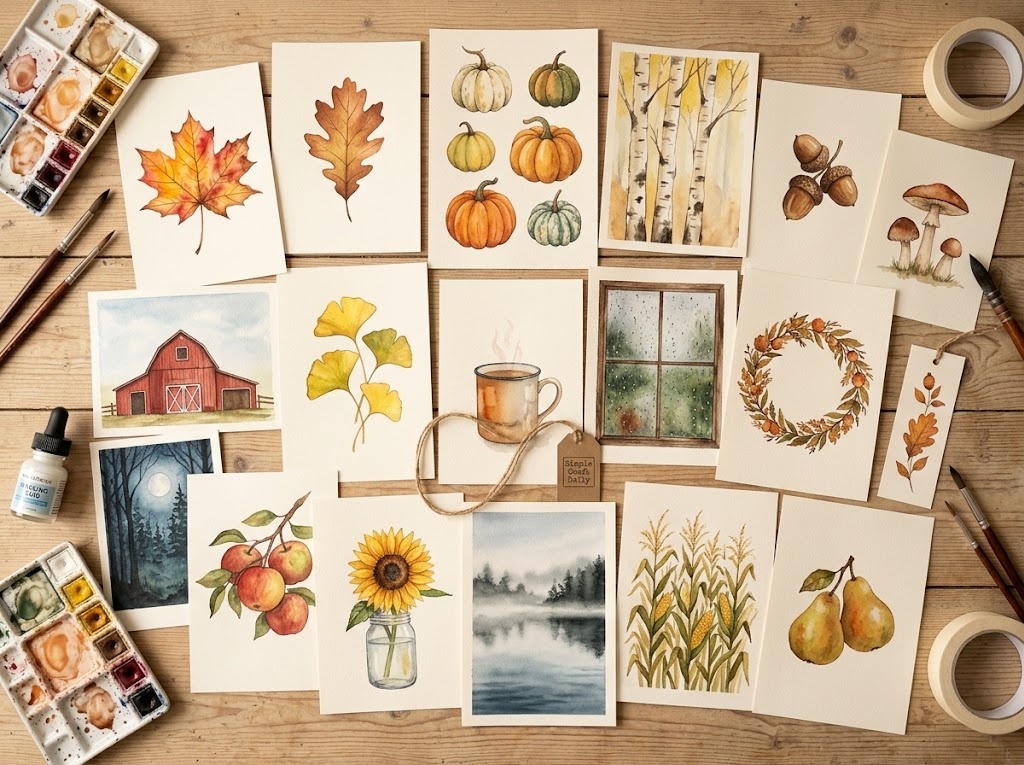
Essential Materials & Tools
wp:paragraphYou do not need every paint color to make rich autumn work. A dependable paper weight, clean water, and prepared puddles of pigment will do more for your washes than a crowded palette. For diy autumn watercolor ideas, keep two water containers nearby, one for rinsing and one for clean water, plus paper towel, a pencil, a ruler, and a rigid board for taping paper.
/wp:paragraph✨ Consumable Raw Materials
- Professional Watercolor Pan Set with Warm Autumn Pigments — Choose a palette with yellow ochre, burnt sienna, burnt umber, sepia, sap green, crimson, ultramarine, and Payne’s gray for transparent autumn mixes | Check Professional Watercolor Pan Set with Warm Autumn Pigments on Amazon
- Cold-Press Watercolor Paper Pad, 140 lb / 300 gsm — Textured heavyweight sheets hold wet-on-wet washes more steadily than thin sketch paper | Check Price on Amazon
- Hot-Press Watercolor Paper, 140 lb / 300 gsm — Smooth paper supports crisp acorn caps, veins, branches, and small card details | View Hot-Press Watercolor Paper, 140 lb / 300 gsm on Amazon
- Watercolor Masking Fluid with Fine Applicator — Specialty watercolor medium that preserves white areas — Removable frisket preserves moon circles, birch trunks, and small light shapes through broad washes | Find Watercolor Masking Fluid with Fine Applicator on Amazon
- Watercolor Pencil Set in Earth Tones — Blendable earth-tone pencils add controlled cap scales, seed heads, and fine botanical marks | See Price on Amazon
- White Gouache Paint, 15 ml Tube — Opaque white gives steam, rain, stars, and reflected highlights a clean finish after watercolor dries | See White Gouache Paint, 15 ml Tube on Amazon
- Low-Tack Watercolor Paper Tape, 1 inch — Low-tack tape secures paper to a rigid board and leaves a clean border when removed from fully dry paper | Check Low-Tack Watercolor Paper Tape, 1 inch on Amazon
🧰 Core Crafting Tools & Equipment
- Watercolor Brush Set, Round Sizes 2, 6, and 10 — A size 10 carries broad washes, a size 6 shapes leaves and foliage, and a size 2 handles stems and veins | Explore Watercolor Brush Set, Round Sizes 2, 6, and 10 on Amazon
- Natural-Hair or Synthetic Watercolor Mop Brush, Size 1/2 inch — Large soft washes for skies and fog — optional if a size-10 round can substitute, but it makes broad gradients much easier. | View on Amazon
- Ceramic Watercolor Mixing Palette with Wells — Stain-resistant wells make it easier to prepare enough diluted paint for one complete background | Find on Amazon
- Two Water Containers — Separate containers for rinse water and clean water keep pale ochre, mist, and sky washes from becoming muddy. | See Two Water Containers on Amazon
- Paper Towel — Consumable tool for blotting, lifting, and clean damp-brush wipes — keep a stack within reach | Explore Paper Towel on Amazon
- Pencil and Ruler — Creates light planning lines and straight edges for barns, windows, bookmark panels, and composed studies. | View on Amazon
- Rigid Painting Board — Provides a firm surface for taped paper so wet sheets stay stable during broad watercolor washes. | Find on Amazon
- Masking Fluid Pickup Eraser — Lifts dried masking fluid cleanly — the removal steps offer it as the low-tear alternative to rubbing by finger. | Check Masking Fluid Pickup Eraser on Amazon
- Sharp Craft Scissors or Paper Trimmer — For cutting panels to size and trimming final edges — a paper trimmer gives the straightest cuts. | Check Sharp Craft Scissors or Paper Trimmer on Amazon
Mix transparent washes in a palette well instead of stirring repeatedly on paper. Also, let every watercolor layer dry completely before applying masking fluid or opaque gouache, since either material can disturb damp pigment in diy autumn watercolor ideas.
/wp:paragraph wp:paragraphUse separate jars for rinse water and clean water so pale ochre and sky washes stay bright. Before you begin any large area, mix enough paint to cover it in one pass; consequently, you will avoid a hard-edged refill mark halfway through the wash.
/wp:paragraphOptional Studio Upgrades
Never required to finish the projects above — convenience upgrades for makers who want them.
📦 Beginner Project Kits & Coordinated Bundles
For beginners or makers starting from scratch, these coordinated bundles and all-in-one project packs bring together the core supplies in one convenient order.
- Beginner Watercolor Painting Kit with Paper and Brushes — Either-or alternative: this bundle replaces the individually listed paints, paper, and brushes — buy it instead of the core supplies, not in addition to them. | Check Price on Amazon
⚡ Studio Tools & Workshop Equipment
Optional studio upgrades — every project above can be completed without these.
- Daylight LED Magnifying Craft Lamp with Desk Clamp — Adjustable daylight helps you judge subtle differences among ochre, sienna, and crimson during close detail work | View Daylight LED Magnifying Craft Lamp with Desk Clamp on Amazon
- Adjustable Wooden Artist Table Easel with Storage Drawer — A stable angled support lets a taped board guide wet landscape washes downward in a controlled flow | Find Adjustable Wooden Artist Table Easel with Storage Drawer on Amazon
- Rolling Three-Tier Craft Cart with Wooden Top — Mobile storage separates paper, pigments, clean water, rinse water, and drying paintings in a compact art corner | See Price on Amazon
18 DIY Autumn Watercolor Ideas to Paint Step by Step
Supplies Needed: Professional Watercolor Pan Set with Warm Autumn Pigments, Cold-Press Watercolor Paper Pad, 140 lb / 300 gsm, White Gouache Paint, 15 ml Tube, Watercolor Brush Set, Round Sizes 2, 6, and 10, Ceramic Watercolor Mixing Palette with Wells, Two Water Containers, Paper Towel, Pencil and Ruler, Rigid Painting Board, Low-Tack Watercolor Paper Tape, 1 inch
For these diy autumn watercolor ideas, tape a 5 x 7 in panel or a 9 x 12 in sheet to a rigid board with 1-inch low-tack tape. First, test each mixture on a paper scrap. Paint from pale values to dark values, then pause whenever a wash still reflects light; most small panels need 15 to 20 minutes before dry-brush details, while larger wet backgrounds may need 30 minutes.
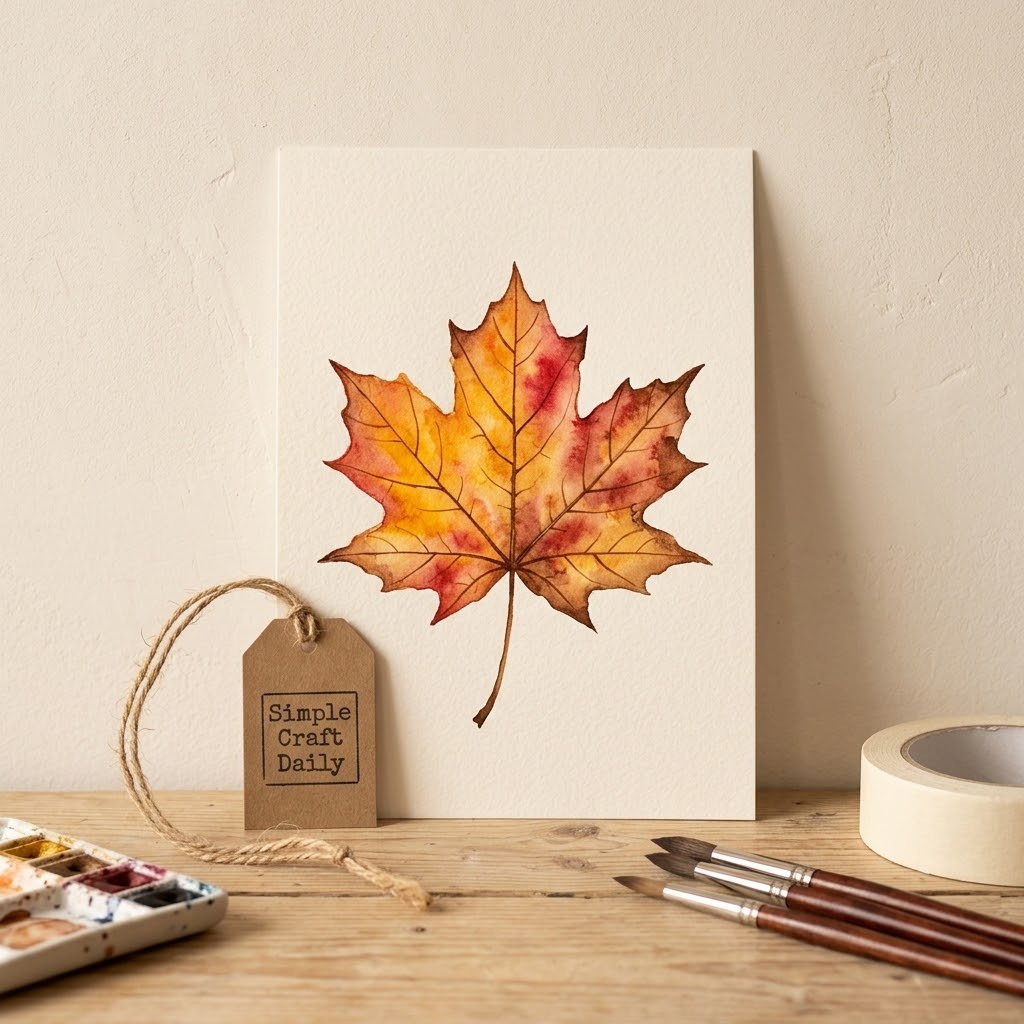
1. DIY Autumn Watercolor Maple Leaf Study
Supplies Needed: Professional Watercolor Pan Set with Warm Autumn Pigments, Cold-Press Watercolor Paper Pad, 140 lb / 300 gsm, Watercolor Brush Set, Round Sizes 2, 6, and 10, Ceramic Watercolor Mixing Palette with Wells, Low-Tack Watercolor Paper Tape, 1 inch, Pencil, Rigid Painting Board.
Tape a 5 x 7 in cold-press panel to a board. With a pencil, draw a light maple-leaf silhouette and a central vein. Mix a pale yellow ochre wash in the ceramic palette, then use the size 6 round to fill the leaf while leaving a few tiny dry paper glints near the points.
While the yellow remains damp, touch diluted crimson along two or three outer lobes and let it bloom inward. Allow the panel to dry for 15 to 20 minutes. Next, use the size 2 round with burnt sienna for the central vein and short branching veins; drag the nearly dry brush outward so the lines break naturally. This diy autumn watercolor idea looks especially good as a card front.
2. DIY Autumn Watercolor Ideas: Copper Oak Leaves
Supplies Needed: Professional Watercolor Pan Set with Warm Autumn Pigments, Hot-Press Watercolor Paper, 140 lb / 300 gsm, Watercolor Brush Set, Round Sizes 2, 6, and 10, Ceramic Watercolor Mixing Palette with Wells, Low-Tack Watercolor Paper Tape, 1 inch, Pencil, Rigid Painting Board.
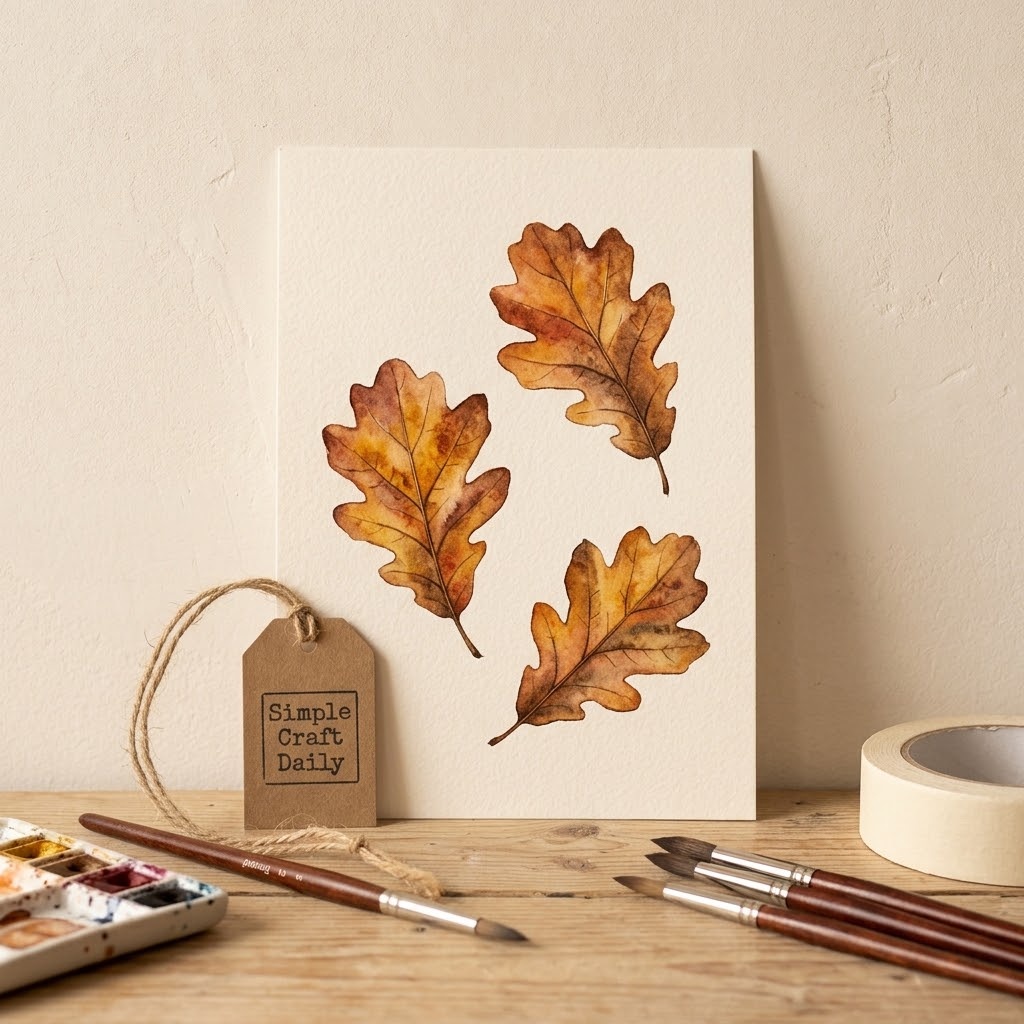
Tape a 5 x 7 in hot-press panel down and sketch three overlapping oak leaves with faint pencil lines. Mix yellow ochre and burnt sienna in separate wells. Paint the back leaf first with diluted ochre, using the size 6 round to form its rounded lobes.
Wait until the first leaf edge loses its shine before painting the next leaf beside it. Then add burnt sienna to the lower halves for a copper shift. After 15 minutes of drying, use the size 2 brush and sepia for stems, veins, and a few broken edge notches. These diy autumn watercolor ideas make tidy seasonal place cards on smooth paper.
3. DIY Autumn Watercolor Pumpkin Trio
Supplies Needed: Professional Watercolor Pan Set with Warm Autumn Pigments, Cold-Press Watercolor Paper Pad, 140 lb / 300 gsm, Watercolor Brush Set, Round Sizes 2, 6, and 10, Ceramic Watercolor Mixing Palette with Wells, Low-Tack Watercolor Paper Tape, 1 inch, Pencil, Rigid Painting Board.
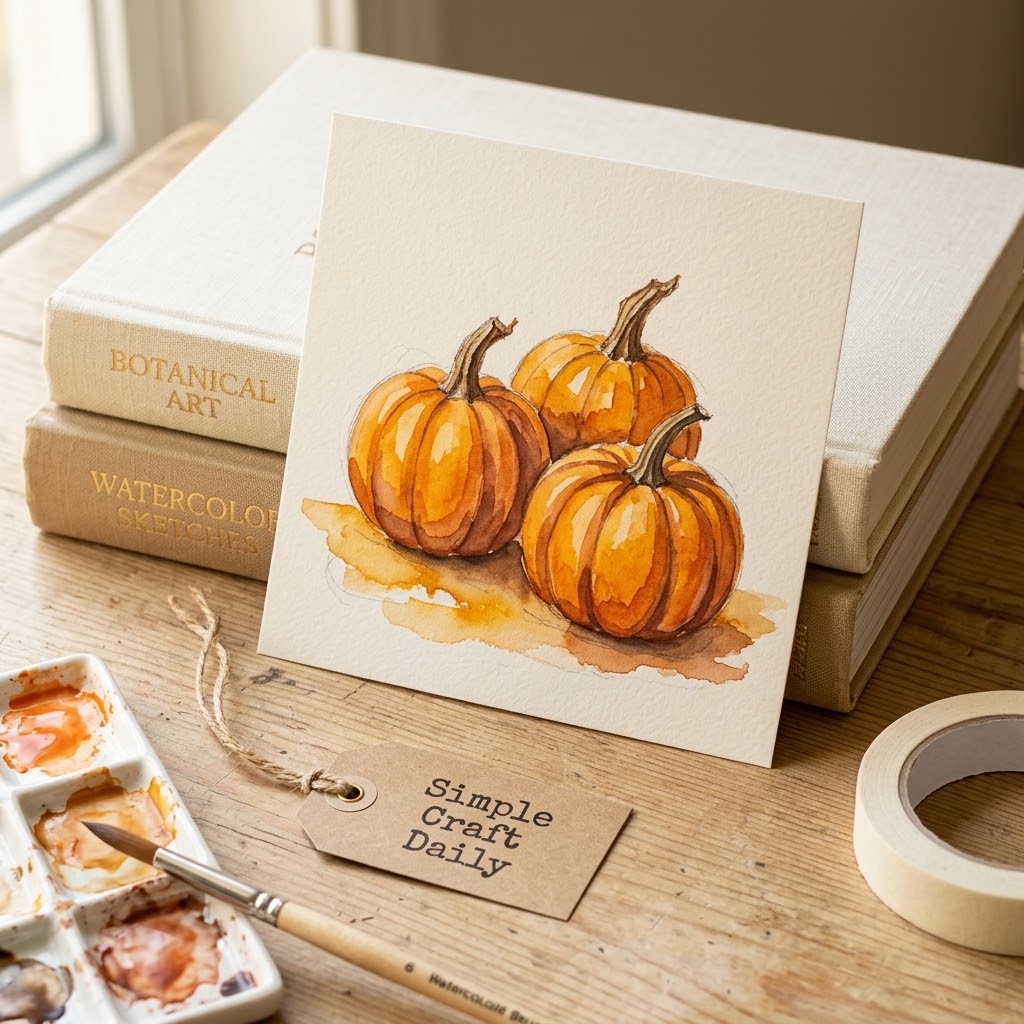
Tape a 5 x 7 in cold-press panel and pencil three overlapping pumpkin circles, with one tall pumpkin behind two shorter ones. Mix diluted orange from yellow ochre and crimson. With the size 6 round, paint each pumpkin as curved vertical sections and leave a narrow paper highlight along one curve.
Allow the orange layer to dry for 20 minutes. Then add curved burnt sienna shadow bands between sections, keeping the darkest marks at the lower edges. Use the size 2 round with dry brown paint for short stems. For another rounded fall subject, explore these gorgeous easy pumpkin painting ideas. This diy autumn watercolor idea works beautifully on a handmade harvest card.
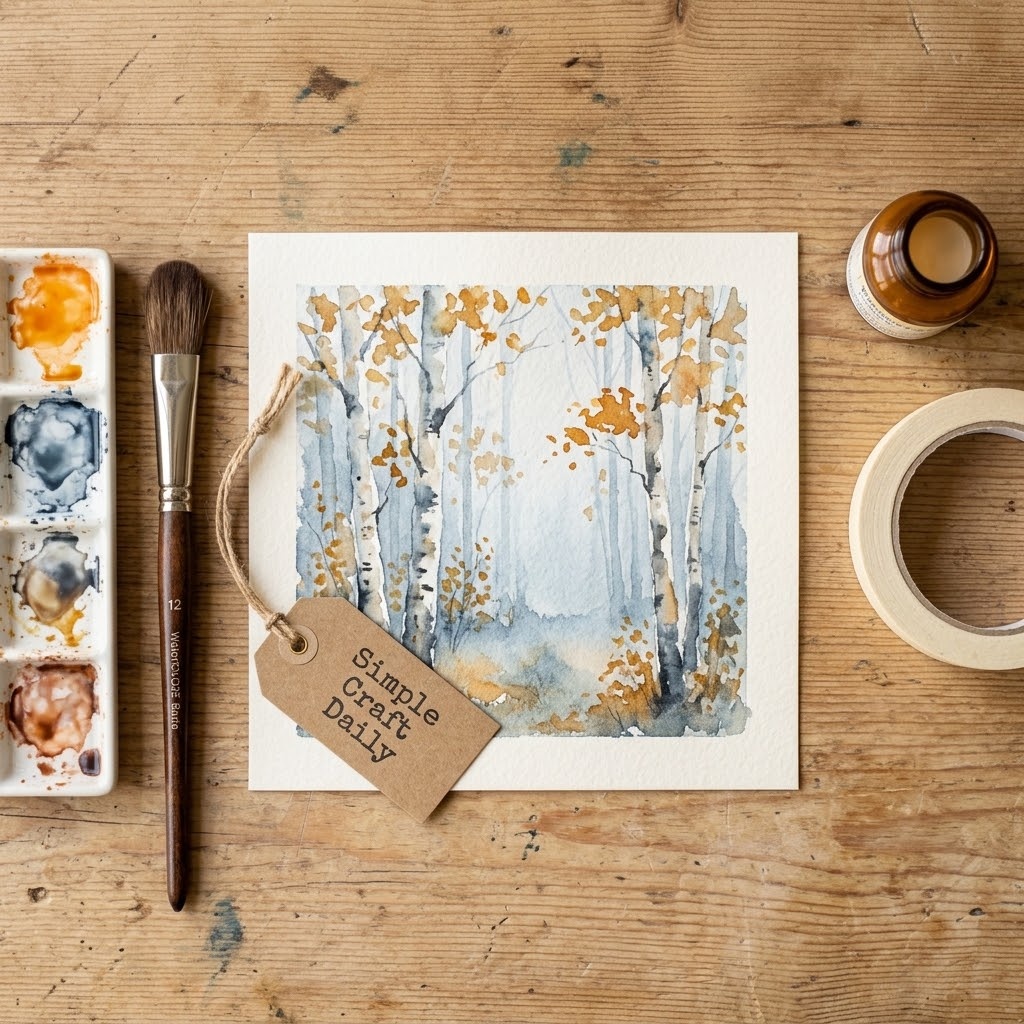
4. DIY Autumn Watercolor Ideas: Misty Birch Grove
Supplies Needed: Professional Watercolor Pan Set with Warm Autumn Pigments, Cold-Press Watercolor Paper Pad, 140 lb / 300 gsm, Watercolor Brush Set, Round Sizes 2, 6, and 10, Natural-Hair or Synthetic Watercolor Mop Brush, Size 1/2 inch, Ceramic Watercolor Mixing Palette with Wells, Watercolor Masking Fluid with Fine Applicator, Masking Fluid Pickup Eraser, Pencil.
On a 5 x 7 in cold-press panel, draw three slim birch trunks. Apply masking fluid over the trunk shapes only when the paper is completely dry. Let the masking fluid dry according to its label, usually 15 to 30 minutes, before using the mop brush to lay a pale blue-gray dawn wash around the reserved trunks.
While the wash is damp, stipple distant foliage with diluted sap green, ochre, and a touch of sienna using the size 6 round. Keep the far foliage pale. After the entire wash dries for at least 30 minutes, rub away the masking fluid gently with a clean finger or lift it with a masking-fluid pickup eraser, then add a few broken gray marks to the birch trunks with the size 2 round. This diy autumn watercolor idea creates convincing depth with only a few values.
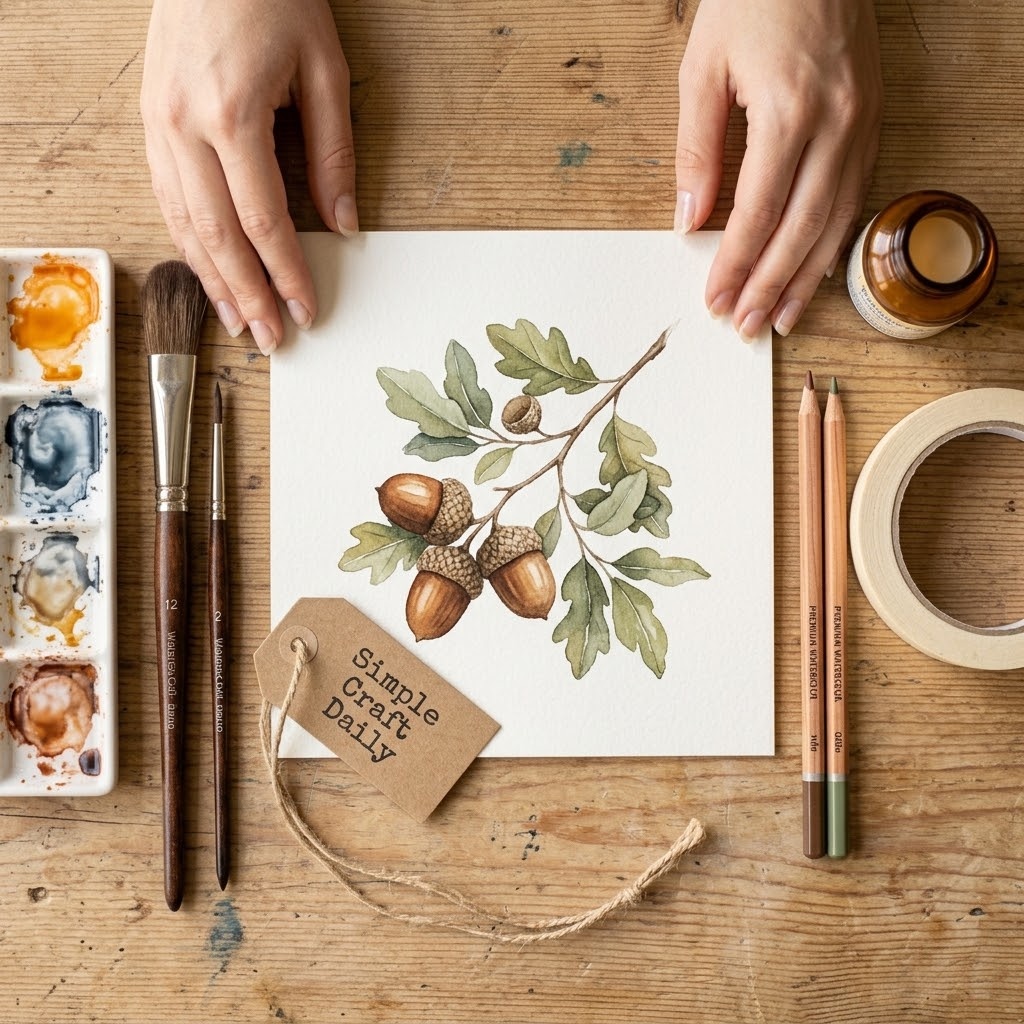
5. Acorn Branch with Fine Cap Scales
Supplies Needed: Professional Watercolor Pan Set with Warm Autumn Pigments, Hot-Press Watercolor Paper, 140 lb / 300 gsm, Watercolor Brush Set, Round Sizes 2, 6, and 10, Ceramic Watercolor Mixing Palette with Wells, Watercolor Pencil Set in Earth Tones.
Use a brown watercolor pencil to place a lightly bent branch across a 4 x 6 in hot-press panel. With the size 2 round and diluted sepia, paint over the branch, tapering it at the ends. Add three acorn ovals beneath the twig with a warm burnt sienna wash.
Let each acorn body dry for 15 minutes so neighboring forms keep a crisp edge. Next, use the size 2 brush with sepia to paint the caps. Add tiny half-moon scales in two short rows, then activate a few watercolor-pencil marks with a barely damp brush for extra texture. This diy autumn watercolor idea rewards a slow hand and restrained detail.
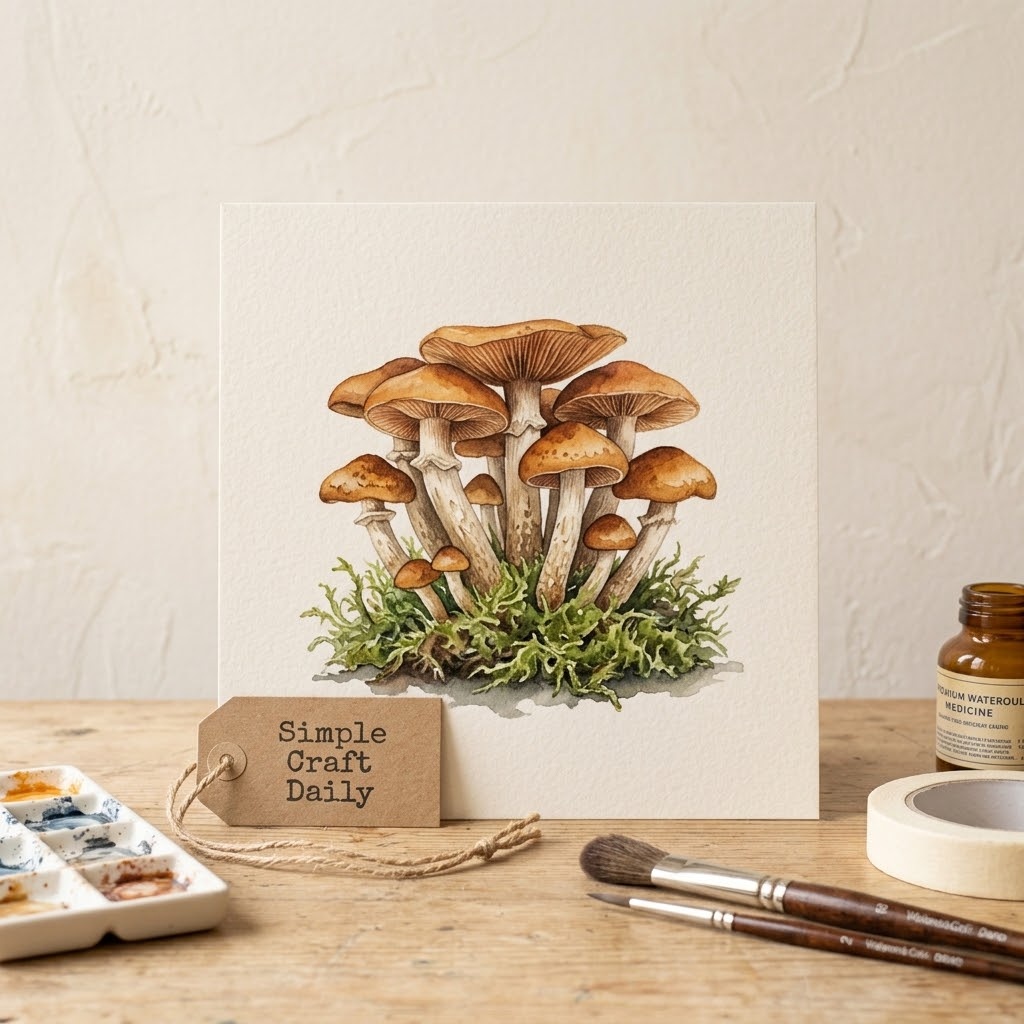
6. DIY Autumn Watercolor Ideas: Mushroom Cluster
Supplies Needed: Professional Watercolor Pan Set with Warm Autumn Pigments, Cold-Press Watercolor Paper Pad, 140 lb / 300 gsm, Watercolor Brush Set, Round Sizes 2, 6, and 10, Ceramic Watercolor Mixing Palette with Wells, Pencil.
Sketch three mushrooms on a 5 x 7 in cold-press panel: one tall mushroom, one medium mushroom, and one small mushroom. Use the size 6 round to paint pale stems with diluted yellow ochre, leaving a thin dry-paper strip along the left side of each stem.
Next, lay a light russet wash over each cap, keeping the lower rim pale. Let the caps dry for 15 minutes, then use burnt sienna and sepia with the size 2 round for cap spots, underside lines, and small moss marks along the ground. Add a diluted gray-violet cast shadow beneath the cluster, mixed from Payne’s gray with a touch of crimson, so the forms sit firmly on the page. These diy autumn watercolor ideas are especially effective on textured cold-press paper.
Professional Watercolor Pan Set with Warm Autumn Pigments
Artist-grade warm-autumn pans: the core supply behind every wash in these 18 ideas.
I earn a commission if you make a purchase, at no additional cost to you.
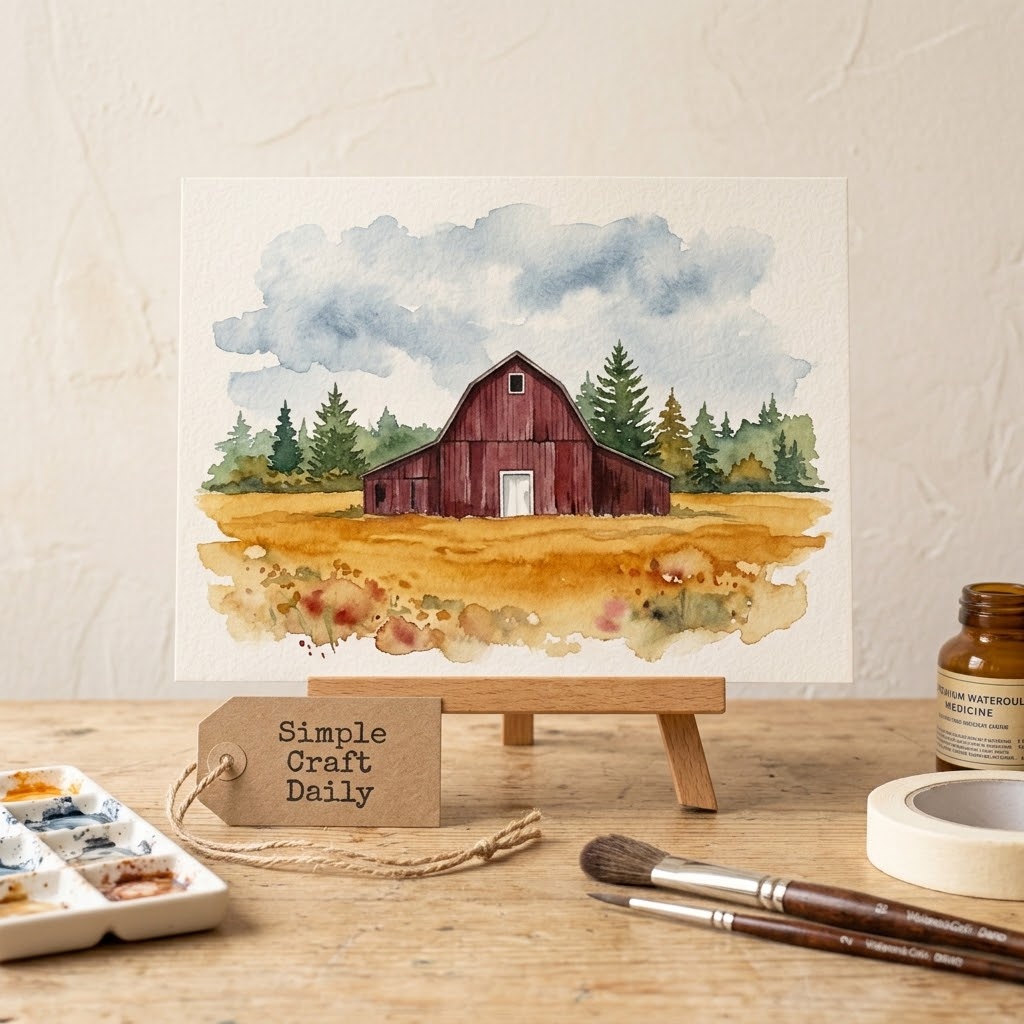
7. Red Barn Landscape
Supplies Needed: Professional Watercolor Pan Set with Warm Autumn Pigments, Cold-Press Watercolor Paper Pad, 140 lb / 300 gsm, Watercolor Brush Set, Round Sizes 2, 6, and 10, Natural-Hair or Synthetic Watercolor Mop Brush, Size 1/2 inch, Ceramic Watercolor Mixing Palette with Wells, Low-Tack Watercolor Paper Tape, 1 inch, Pencil, Ruler, Rigid Painting Board.
Tape a 9 x 12 in cold-press sheet to a board. With the mop brush, place a pale ultramarine and Payne’s gray sky wash across the upper third. While it is damp, lift a few cloud openings with a clean, thirsty brush. Paint a soft yellow ochre field below and allow the background to dry for 30 minutes.
Use a ruler and pencil to mark a 1 1/2 in wide barn slightly off center, then draw a simple roofline. Fill the barn with crimson, then add a dark evergreen line behind it with the size 6 round. Use the size 2 brush for roof edges and a few field marks. This diy autumn watercolor idea also scales well for a larger display. When you want to enlarge the composition later, these DIY fall canvas paintings offer useful display inspiration.
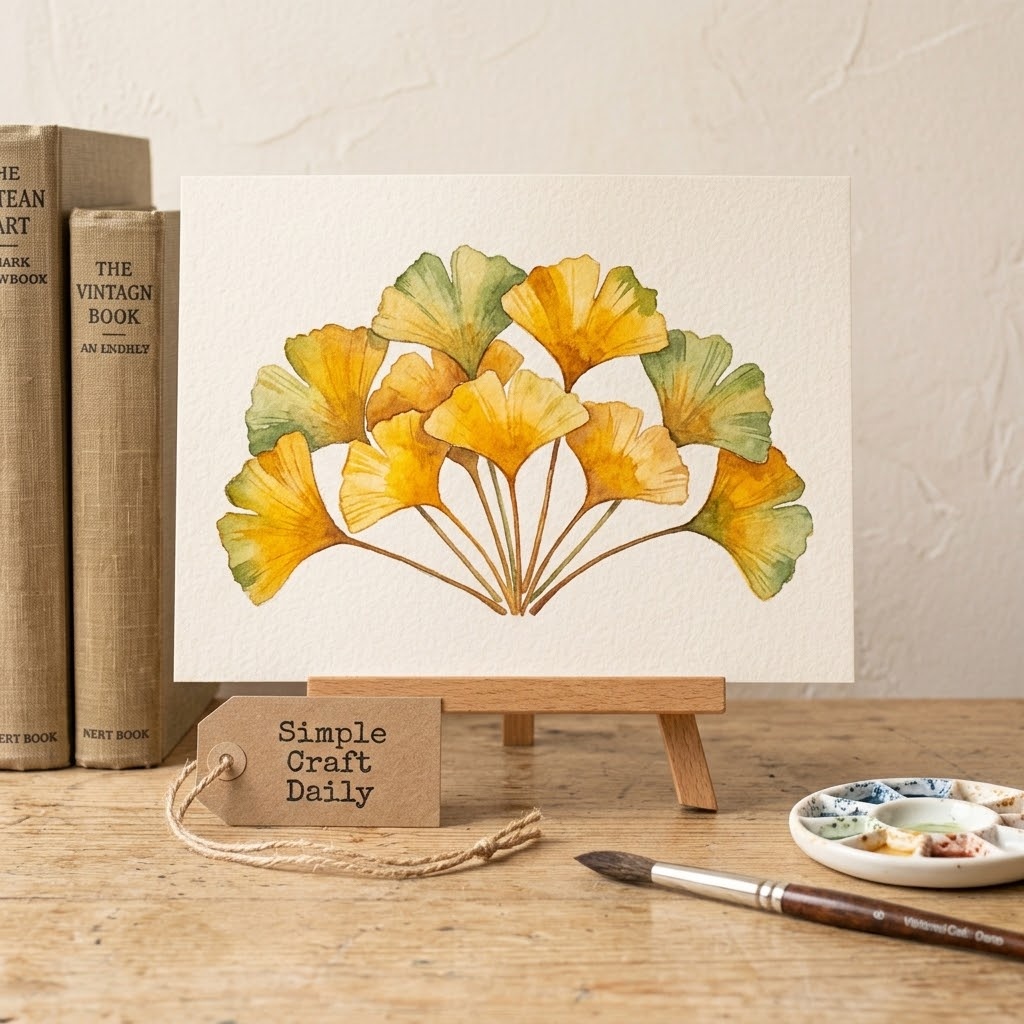
8. DIY Autumn Watercolor Ideas: Golden Ginkgo Leaves
Supplies Needed: Professional Watercolor Pan Set with Warm Autumn Pigments, Hot-Press Watercolor Paper, 140 lb / 300 gsm, Watercolor Brush Set, Round Sizes 2, 6, and 10, Ceramic Watercolor Mixing Palette with Wells, Low-Tack Watercolor Paper Tape, 1 inch, Pencil, Rigid Painting Board.
Tape a 5 x 7 in hot-press sheet down and make six faint fan shapes with pencil. Paint one ginkgo fan at a time with a wet yellow ochre wash, using the size 6 round from stem to scalloped edge. Leave narrow white gaps between overlapping fans.
While each fan is damp, drop a touch of sap green near one outer edge only once. Repeated mixing on the page can turn the yellow dull. Let the leaves dry for 15 minutes, then use the size 2 brush with sienna for slender stems and a few radiating fan lines. This clean diy autumn watercolor idea suits a narrow journal margin or gift tag.
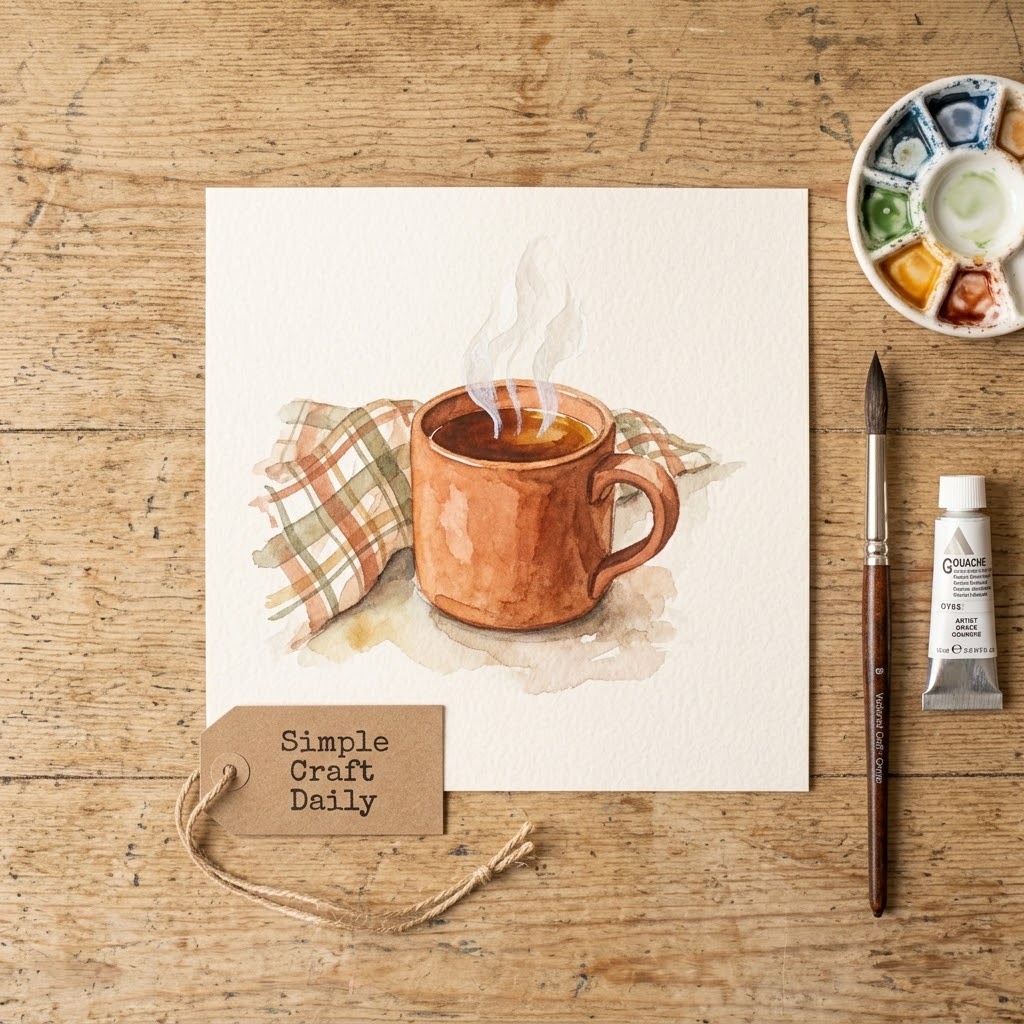
9. Cozy Mug and Steam
Supplies Needed: Professional Watercolor Pan Set with Warm Autumn Pigments, Cold-Press Watercolor Paper Pad, 140 lb / 300 gsm, Watercolor Brush Set, Round Sizes 2, 6, and 10, Ceramic Watercolor Mixing Palette with Wells, White Gouache Paint, 15 ml Tube, Pencil.
Sketch a rounded mug with a simple C-shaped handle on a 4 x 6 in cold-press panel. Paint the mug body first with diluted burnt sienna, leaving a small pale reflection on one side. When the body dries for 15 minutes, paint a dark sepia tea ellipse inside the rim.
Use a size 2 round to suggest a plaid napkin beneath the mug with two pale crimson lines and two ochre lines. Let every watercolor mark dry for 20 minutes. Finally, mix a small amount of white gouache with water and paint two thin curling steam strokes above the tea. Keep the gouache marks sparse so this diy autumn watercolor idea retains its transparent feel.
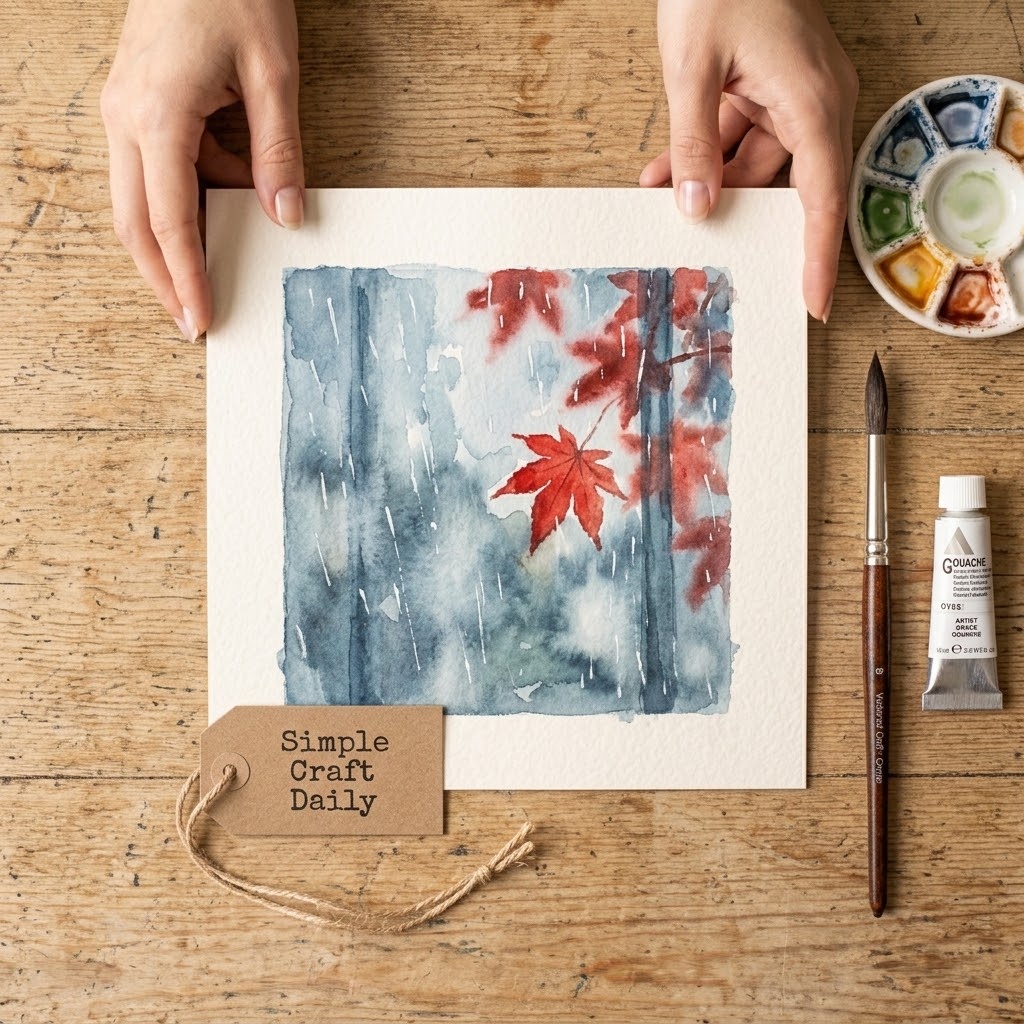
10. DIY Autumn Watercolor Ideas: Rainy Window
Supplies Needed: Professional Watercolor Pan Set with Warm Autumn Pigments, Cold-Press Watercolor Paper Pad, 140 lb / 300 gsm, Watercolor Brush Set, Round Sizes 2, 6, and 10, Natural-Hair or Synthetic Watercolor Mop Brush, Size 1/2 inch, Ceramic Watercolor Mixing Palette with Wells, White Gouache Paint, 15 ml Tube, Ruler.
Use the mop brush to wet a 5 x 7 in cold-press panel with clear water, avoiding puddles. Float a pale blue-gray wash across the surface. While it remains damp, touch in blurred crimson and sienna leaf shapes beyond an imagined window; let their edges soften naturally rather than outlining them.
After 30 minutes of drying, use a ruler and the size 2 round with Payne’s gray to add two faint window-frame lines. Then thin white gouache with enough water to make it flow from the brush point. Add six to ten short vertical rain marks, leaving most of the blue-gray wash visible. This diy autumn watercolor idea relies on a limited number of marks to keep the glass effect believable.
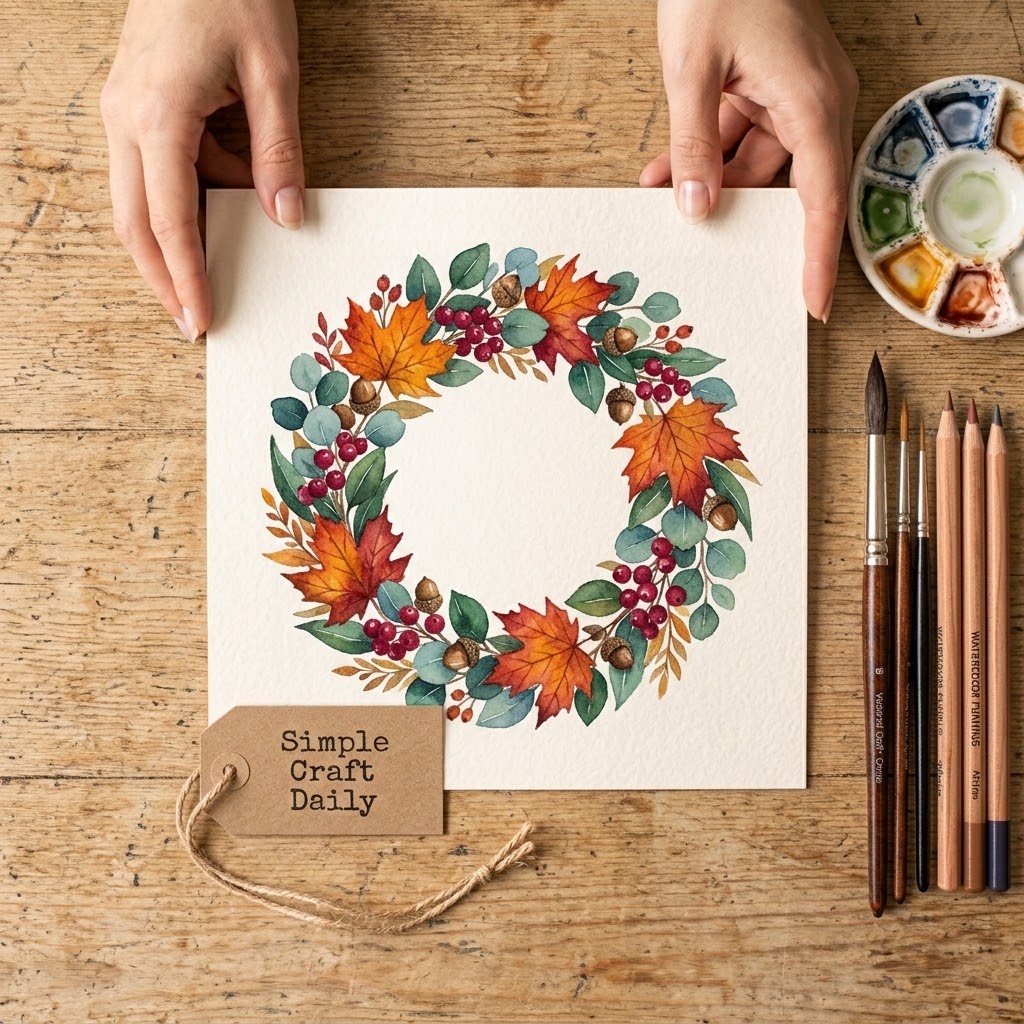
11. Harvest Wreath with Leaves and Berries
Supplies Needed: Professional Watercolor Pan Set with Warm Autumn Pigments, Hot-Press Watercolor Paper, 140 lb / 300 gsm, Watercolor Brush Set, Round Sizes 2, 6, and 10, Ceramic Watercolor Mixing Palette with Wells, Watercolor Pencil Set in Earth Tones.
On a 5 x 7 in hot-press sheet, use a watercolor pencil to draw a very light 3 in circle as a placement guide. Do not paint a solid ring. Instead, work clockwise in loose clusters of eucalyptus leaves, maple leaves, berries, and acorns, keeping the middle clean.
Use the size 6 round for leaf clusters in sap green, ochre, and crimson. Let each cluster dry for 15 minutes before placing contrasting berries over it. Then use the size 2 round for sepia twigs and acorn details. Activate a few pencil lines with a damp brush near the outer edge for a soft textured finish. This diy autumn watercolor idea makes a lovely journal title page.
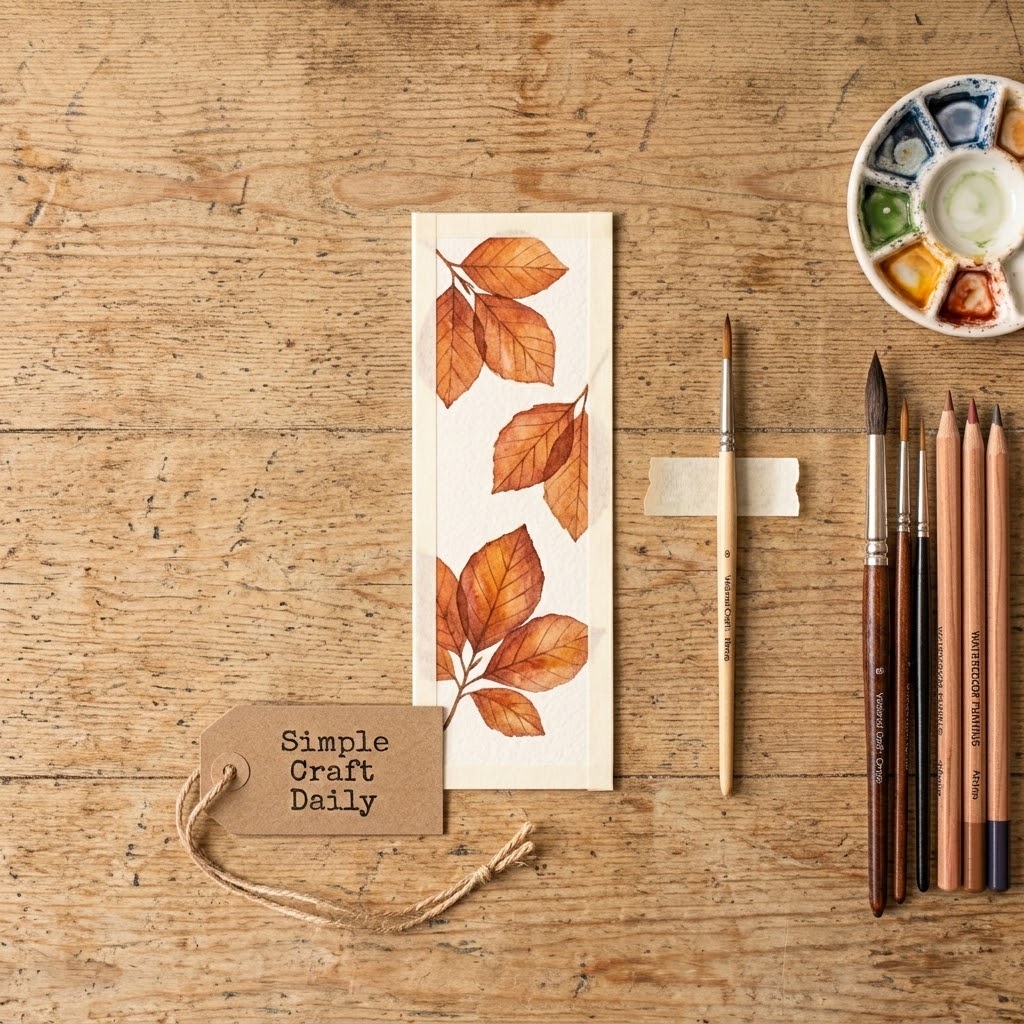
12. DIY Autumn Watercolor Ideas: Beech Leaf Bookmark
Supplies Needed: Professional Watercolor Pan Set with Warm Autumn Pigments, Cold-Press Watercolor Paper Pad, 140 lb / 300 gsm, Watercolor Brush Set, Round Sizes 2, 6, and 10, Ceramic Watercolor Mixing Palette with Wells, Low-Tack Watercolor Paper Tape, 1 inch, Pencil, Rigid Painting Board., Scissors or Paper Trimmer
Cut or tape off a 2 x 7 in rectangle on heavyweight cold-press paper. Use low-tack tape to create a clean border. Sketch five narrow beech leaves on a diagonal branch, then paint the uppermost leaf first with a pale ochre wash.
Paint one side of each leaf at a time, allowing the first side to dry for 10 minutes before painting beside it. Add burnt sienna at the tips while the ochre remains damp. After 20 minutes, use the size 2 round for the central veins and slender branch. Leave the bookmark taped in place for 24 hours before trimming or gifting, resting flat on a level shelf away from direct sun and drafts, so the paper dries as flat as possible. This diy autumn watercolor idea gives a useful gift a handmade finish.
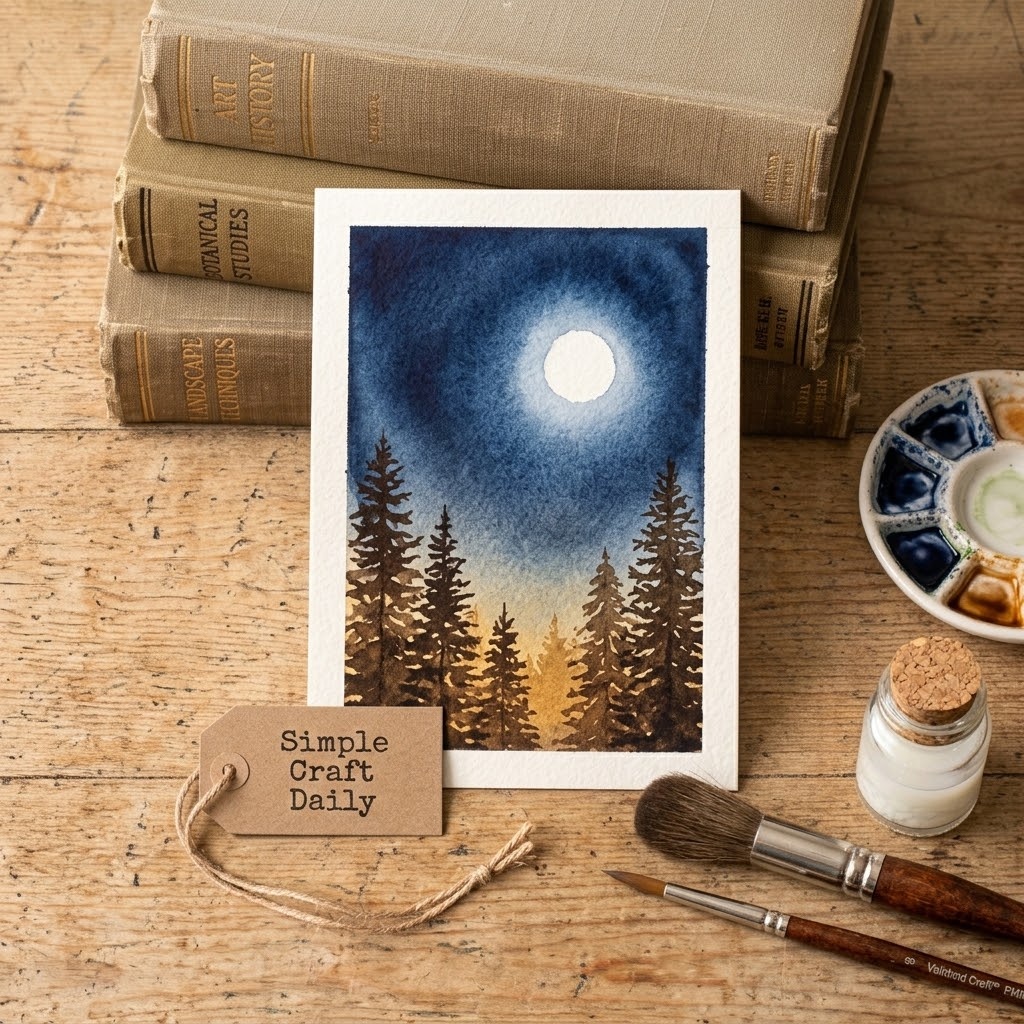
13. Moonlit Forest with Reserved Moon
Supplies Needed: Professional Watercolor Pan Set with Warm Autumn Pigments, Cold-Press Watercolor Paper Pad, 140 lb / 300 gsm, Watercolor Brush Set, Round Sizes 2, 6, and 10, Natural-Hair or Synthetic Watercolor Mop Brush, Size 1/2 inch, Ceramic Watercolor Mixing Palette with Wells, Watercolor Masking Fluid with Fine Applicator, Masking Fluid Pickup Eraser, Pencil.
On a 5 x 7 in cold-press panel, draw a 1 in moon near the upper third. Apply masking fluid within the circle only on dry paper, then let it dry fully according to the label. Use the mop brush to lay an indigo wash across the top, mixed from ultramarine with a touch of sepia and Payne’s gray until the blue reads cool and deep, and blend it into diluted sepia near the horizon.
Allow the sky to dry for 30 minutes before painting trees. Use the size 6 round for pale distant firs, then use a darker indigo-sepia mixture for larger foreground trees. Pull each tree down in short angled strokes and leave small gaps between branches. When the sky is completely dry, remove the masking fluid with a clean finger or a masking-fluid pickup eraser and soften the moon’s lower edge with a clean damp size 2 brush. This diy autumn watercolor idea gains depth from the shift between distant and foreground trees.
Cold-Press Watercolor Paper Pad, 140 lb / 300 gsm
140 lb cold-press takes wet washes without buckling: the surface these techniques rely on.
I earn a commission if you make a purchase, at no additional cost to you.
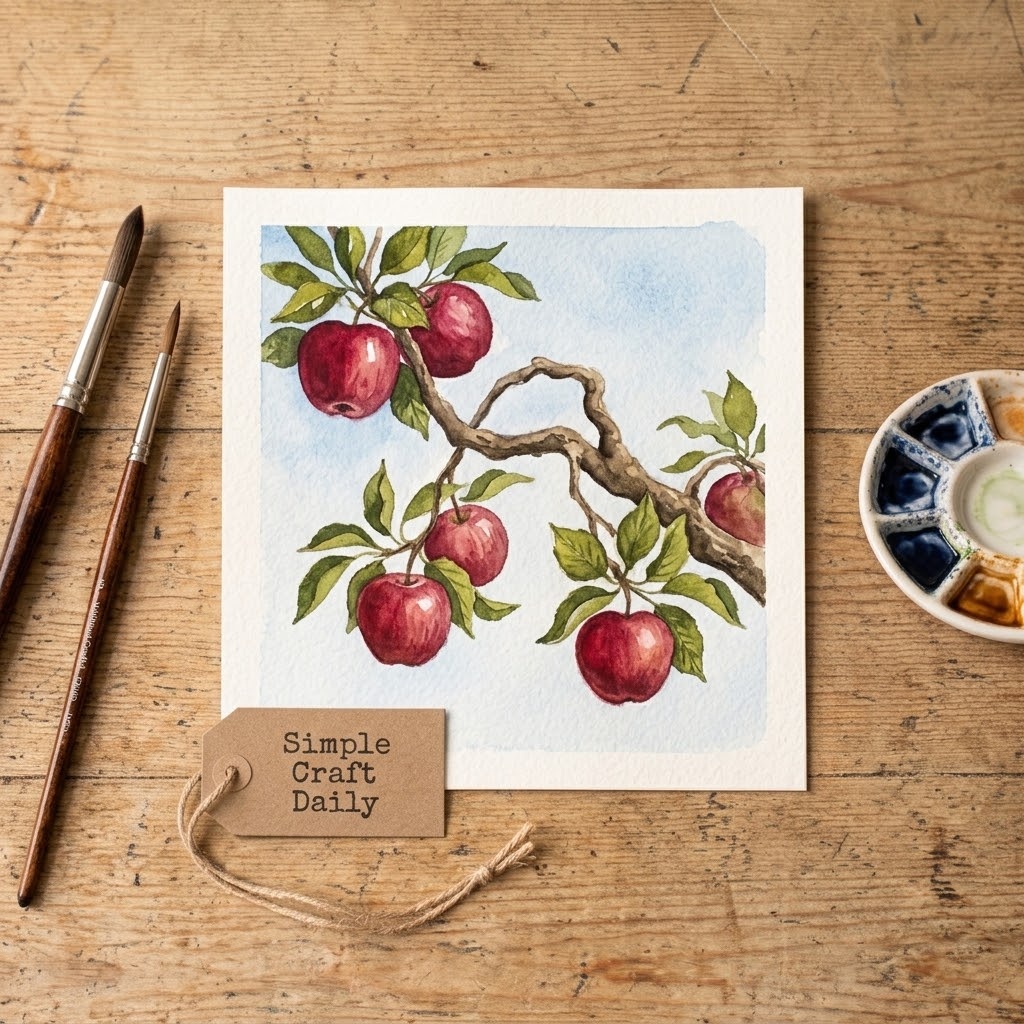
14. DIY Autumn Watercolor Ideas: Apple Orchard Branch
Supplies Needed: Professional Watercolor Pan Set with Warm Autumn Pigments, Hot-Press Watercolor Paper, 140 lb / 300 gsm, Watercolor Brush Set, Round Sizes 2, 6, and 10, Ceramic Watercolor Mixing Palette with Wells.
Brush a pale blue sky wash across the top half of a 5 x 7 in hot-press panel and let it dry for 15 minutes. Use the size 2 round with sepia to paint a bent branch that enters from one upper corner, tapering the twig ends as they cross the paper.
With the size 6 round, paint each apple as one rounded diluted crimson wash. While an apple remains damp, touch deeper crimson along its lower edge and let the color settle without stirring. Add olive-green leaves after the apples dry for 15 minutes. This diy autumn watercolor idea has enough open paper around it to work as a card design.
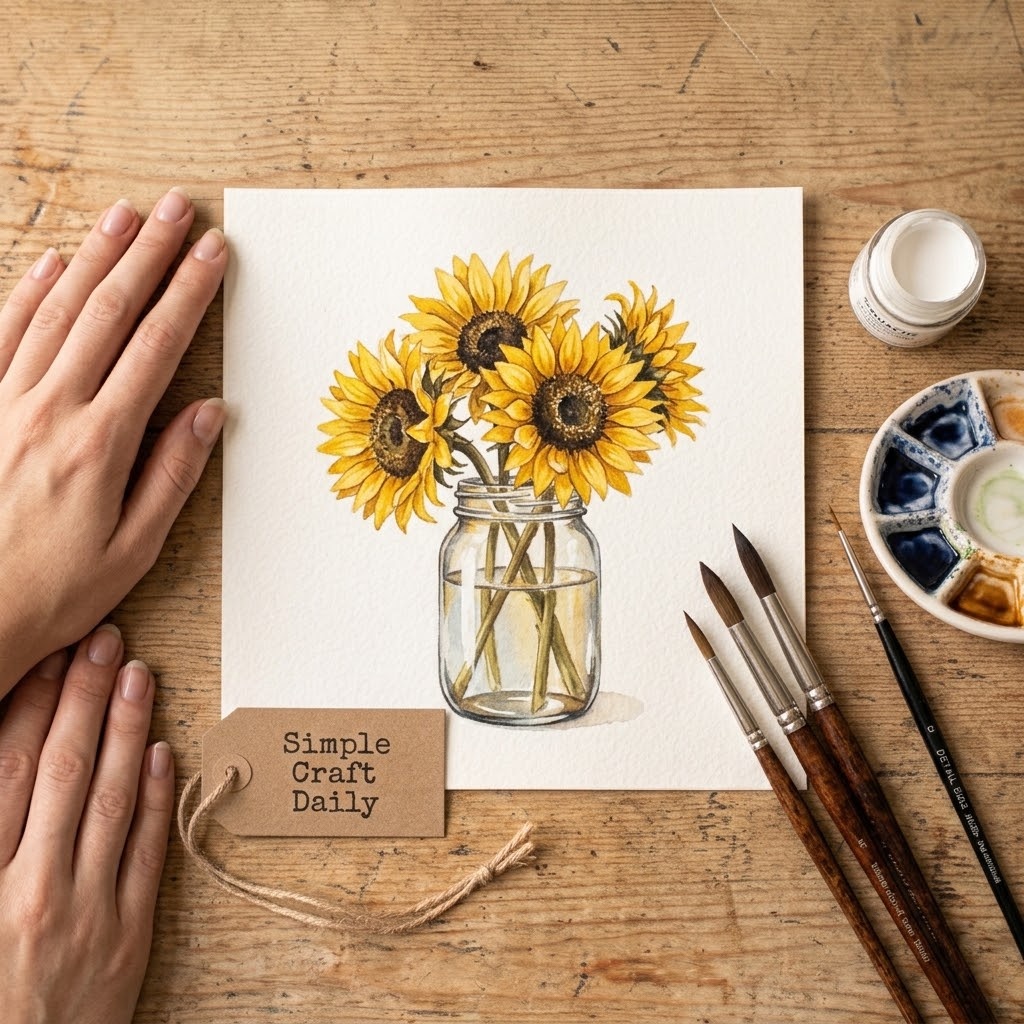
15. DIY Autumn Watercolor Sunflower Jar
Supplies Needed: Professional Watercolor Pan Set with Warm Autumn Pigments, Cold-Press Watercolor Paper Pad, 140 lb / 300 gsm, Watercolor Brush Set, Round Sizes 2, 6, and 10, Ceramic Watercolor Mixing Palette with Wells, White Gouache Paint, 15 ml Tube, Pencil.
Sketch a clear glass jar in the lower center of a 5 x 7 in panel. Paint green stems first with the size 6 round, stopping where the flower heads will sit. Next, make loose yellow ochre petal marks around three empty centers, allowing each petal to vary in length and angle.
After the petals dry for 15 minutes, paint dark burnt umber centers with the size 2 round. Add a soft gray-violet shadow beneath the jar using the same Payne’s gray and crimson mix, then leave thin paper slivers unpainted along the jar sides for glass reflections. Once fully dry, add one or two white gouache highlights. This diy autumn watercolor idea pairs well with these charming DIY pipe cleaner flowers.
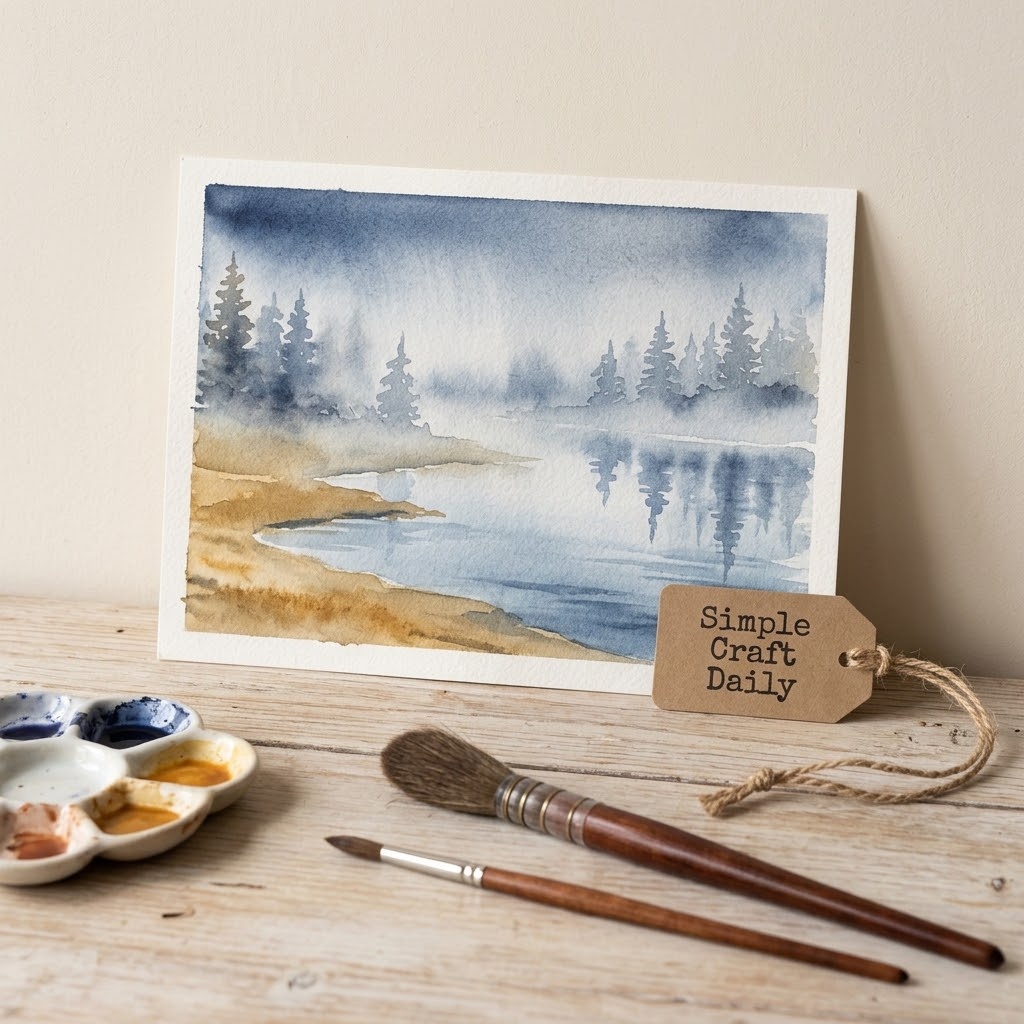
16. DIY Autumn Watercolor Ideas: Foggy Lake Reflections
Supplies Needed: Professional Watercolor Pan Set with Warm Autumn Pigments, Cold-Press Watercolor Paper Pad, 140 lb / 300 gsm, Watercolor Brush Set, Round Sizes 2, 6, and 10, Natural-Hair or Synthetic Watercolor Mop Brush, Size 1/2 inch, Ceramic Watercolor Mixing Palette with Wells, Low-Tack Watercolor Paper Tape, 1 inch, Rigid Painting Board.
Tape a 9 x 12 in cold-press sheet down. With the mop brush, lay a horizontal pale blue-gray wash from top to bottom, keeping the horizon just above center. While the paper is damp, use the size 6 round to place a soft line of distant pines in muted green-gray.
Immediately pull each pine reflection downward below the horizon with the same pigment. Then sweep one clean, damp horizontal stroke across the reflections to soften them. Let the page dry for 30 minutes before using the size 2 round to add three or four darker foreground pines. The quiet palette makes this study one of the most calming diy autumn watercolor ideas for a small framed landscape.
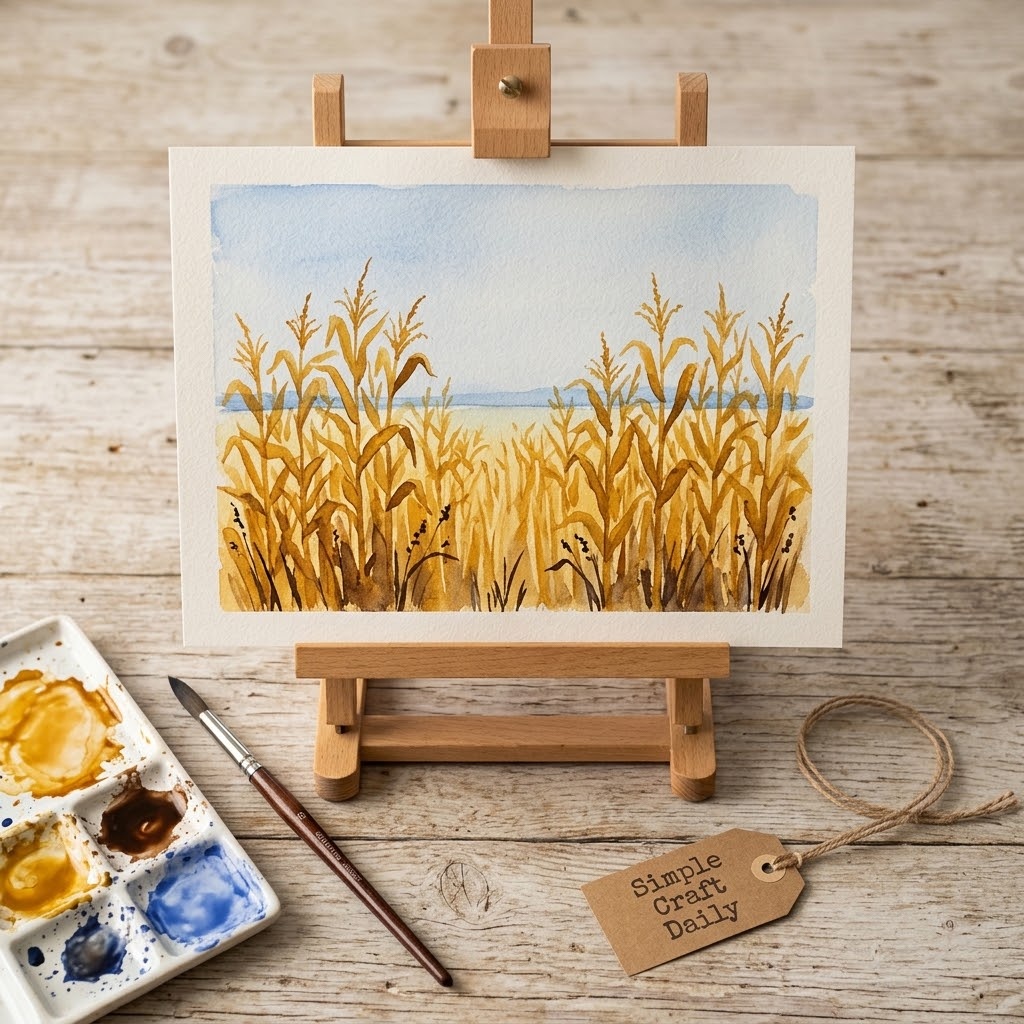
17. DIY Autumn Watercolor Corn Stalks
Supplies Needed: Professional Watercolor Pan Set with Warm Autumn Pigments, Cold-Press Watercolor Paper Pad, 140 lb / 300 gsm, Watercolor Brush Set, Round Sizes 2, 6, and 10, Ceramic Watercolor Mixing Palette with Wells.
Paint a pale blue horizon band across a 5 x 7 in cold-press panel with the size 10 round. When it dries for 15 minutes, use yellow ochre and the flat side of the size 6 round to make broken horizontal field texture below the horizon.
Next, paint upright corn stalks with vertical ochre strokes and narrow angled leaves. Mix a darker umber wash for only a few foreground stalks, especially near the lower corners. Use the size 2 brush to add tassels at the top of selected stalks. Limiting the darkest pigment gives this diy autumn watercolor idea depth without covering the warm middle values.
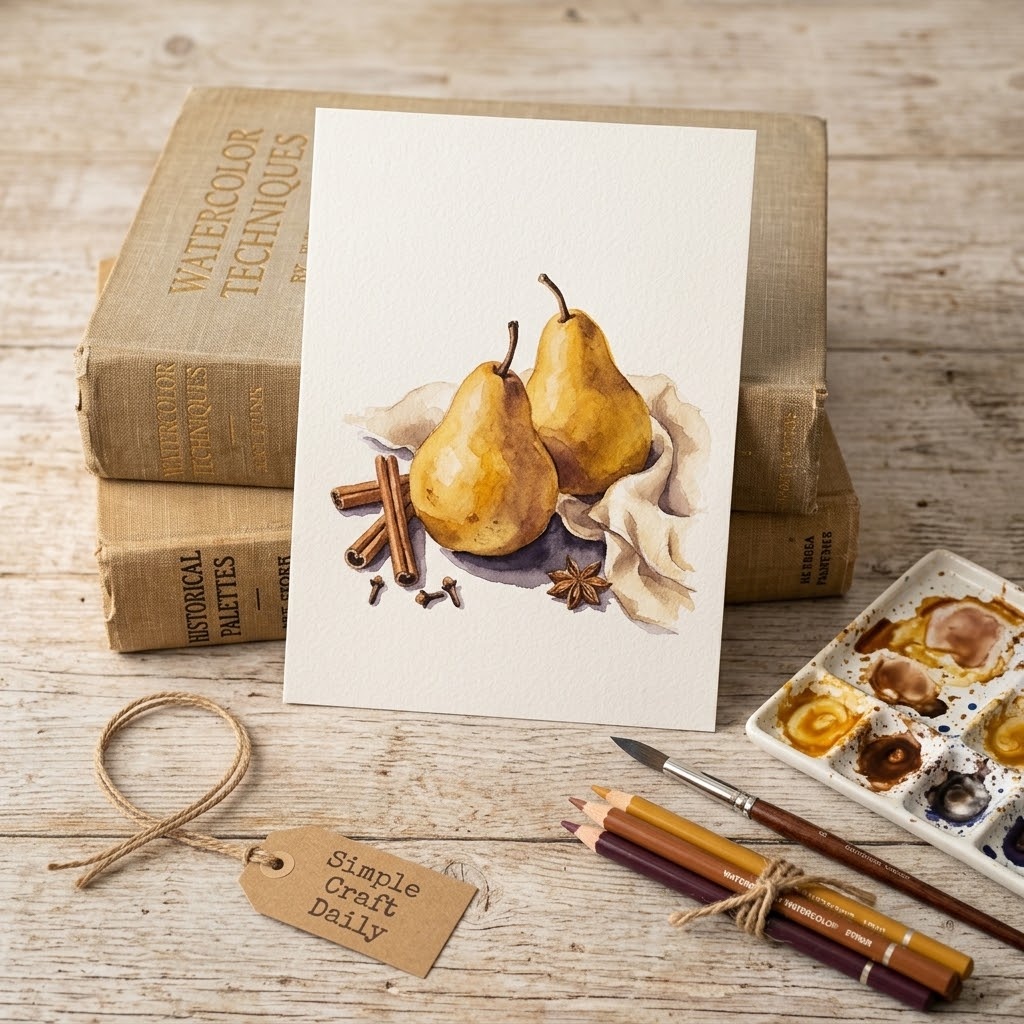
18. Spiced Pear Still Life
Supplies Needed: Professional Watercolor Pan Set with Warm Autumn Pigments, Hot-Press Watercolor Paper, 140 lb / 300 gsm, Watercolor Brush Set, Round Sizes 2, 6, and 10, Ceramic Watercolor Mixing Palette with Wells, Watercolor Pencil Set in Earth Tones.
On a 5 x 7 in hot-press panel, use an earth-tone watercolor pencil to sketch two pear shapes, two cinnamon sticks, and a loose oval for the table shadow. Paint both pears with pale yellow ochre using the size 6 round, leaving a small dry highlight on each upper curve.
Allow the pears to dry for 15 minutes. Then glaze their lower sides with diluted sienna, allowing the first pale layer to remain visible. Paint cinnamon sticks with the size 2 round using short brown lines and darker end circles. Finish with a soft gray-violet cast shadow beneath the still life using the same Payne’s gray and crimson mix, feathering its lower edge with clean water. This final diy autumn watercolor idea makes a warm seasonal kitchen print.
DIY Autumn Watercolor Ideas FAQ
What colors make DIY autumn watercolor ideas look rich instead of muddy?
Build most fall mixtures from two or three pigments at a time. Yellow ochre, burnt sienna, crimson, ultramarine blue, and sepia cover leaves, wood, sky, and shadow without turning every area brown. For diy autumn watercolor ideas, rinse the brush thoroughly, use clean water from the fresh-water jar, and let one layer dry before glazing another color over it.
How do DIY autumn watercolor ideas avoid buckled paper?
Choose 140 lb / 300 gsm paper, tape all four edges to a rigid board, and use enough water to move pigment without soaking the sheet. Let the painting dry completely before peeling tape away at a low angle. Some paper can still develop gentle waves after a wet wash, especially in humid rooms, but heavyweight paper limits the effect.
Can I fix a watercolor wash after it dries?
On sturdy watercolor paper, dampen a small unwanted area with a clean brush, blot it with paper towel, and repeat only once or twice. For darker corrections in diy autumn watercolor ideas, glaze a transparent layer over the dry wash rather than scrubbing. Excessive rubbing lifts paper fibers and creates a rough patch that catches pigment unevenly.
Quick Reference: All Supplies at a Glance
For your convenience, here is a quick summary of all materials and tools used in this tutorial:
✨ Consumable Raw Materials
- Professional Watercolor Pan Set with Warm Autumn Pigments | Check Professional Watercolor Pan Set with Warm Autumn Pigments on Amazon
- Cold-Press Watercolor Paper Pad, 140 lb / 300 gsm | Check Price on Amazon
- Hot-Press Watercolor Paper, 140 lb / 300 gsm | View Hot-Press Watercolor Paper, 140 lb / 300 gsm on Amazon
- Watercolor Masking Fluid with Fine Applicator | Find Watercolor Masking Fluid with Fine Applicator on Amazon
- Watercolor Pencil Set in Earth Tones | See Price on Amazon
- White Gouache Paint, 15 ml Tube | See White Gouache Paint, 15 ml Tube on Amazon
- Low-Tack Watercolor Paper Tape, 1 inch | Check Low-Tack Watercolor Paper Tape, 1 inch on Amazon
🧰 Core Crafting Tools & Equipment
- Watercolor Brush Set, Round Sizes 2, 6, and 10 | Explore Watercolor Brush Set, Round Sizes 2, 6, and 10 on Amazon
- Natural-Hair or Synthetic Watercolor Mop Brush, Size 1/2 inch | View on Amazon
- Ceramic Watercolor Mixing Palette with Wells | Find on Amazon
- Two Water Containers | See Two Water Containers on Amazon
- Paper Towel | Explore Paper Towel on Amazon
- Pencil and Ruler | View on Amazon
- Rigid Painting Board | Find on Amazon
- Masking Fluid Pickup Eraser | Check Masking Fluid Pickup Eraser on Amazon
- Sharp Craft Scissors or Paper Trimmer | Check Sharp Craft Scissors or Paper Trimmer on Amazon
Important Crafting Safety Notes
Crafting is a rewarding creative activity, but maintaining a safe workshop environment is essential for yourself, your family, and your pets. Please review these vital safety precautions before starting:
• Personal Protective Equipment (PPE) & Safe Handling: Always wear safety glasses or protective eyewear when cutting metal wire, clipping jump rings, trimming hard findings, or using power tools to prevent flying shards. Use heat-resistant work mats and exercise caution around high-temperature glue guns, irons, or heating tools to avoid burns. Wear disposable nitrile gloves and a particle dust mask when sanding wood or working with clays, resins, and solvent-based sealants to protect your skin and lungs.
• Room Ventilation & Fume Safety: Always craft in a well-ventilated space with open windows, cross-ventilation, or active exhaust whenever using solvent-based adhesives, instant bonders, aerosol sprays, epoxy resins, or heat-curing materials. Never inhale chemical fumes directly, and allow finished pieces to off-gas and cure completely in an airy area away from everyday living spaces.
• Child & Pet Safety (Choking & Swallowing Prevention): Small craft components—including safety eyes, split rings, clasps, jump rings, beads, bells, small magnets, unbaked clay scraps, and loose polyester fiberfill—present severe choking, intestinal obstruction, and ingestion hazards for babies, toddlers, and pets. Keep all unattached hardware, yarn cutoffs, and stuffing strictly out of reach. For handmade gifts intended for infants or young children, omit plastic washer eyes and detachable findings entirely in favor of securely stitched, double-knotted embroidered details.
• Sharp Tool Storage & Clean Work Area: Store sharp tools—such as rotary cutters, craft knives, bent-tip yarn needles, snips, scissors, and jewelry pliers—in secure, latching cases or high cabinets immediately after use. Thoroughly inspect, sweep, or vacuum your craft area and floor after finishing to ensure no dropped needles, pins, wire clippings, or small findings remain where curious pets or bare feet could step on or swallow them.
• Certified, Quality & Non-Toxic Supplies: Always choose verified non-toxic craft supplies (such as ACMI AP-certified paints and adhesives, lead-free and nickel-free jewelry findings, and skin-safe materials). Follow manufacturer label guidelines for curing durations, safe operating temperatures, and proper product disposal. Never use food preparation utensils or kitchen cookware for craft chemicals.
For more detailed guidance on safe crafting practices, liability disclosures, and website usage, please review our Terms and Conditions.
“Which of these DIY Autumn Watercolor Ideas You Will Absolutely Love ideas are you excited to try first, or do you have a creative tip of your own to share? Drop a comment below—I’d love to hear your thoughts and see what you create!”


