

Are you looking for beautiful coastal decor for your home? First, collecting ocean elements is very relaxing. However, store-bought coastal items often look cheap and plastic. Therefore, we created these stunning seashell crafts and decorations for you. Because we use natural elements like raw linen and brass, they look incredibly elegant. Plus, the crafting steps are very easy. As a result, you can upgrade your space fast. Indeed, your living room will feel like a luxury beach house. Also, if you love botanical elements, check our paper hibiscus flowers post for your table.
This blog post contains affiliate links. As an Amazon Associate, I earn from qualifying purchases. The content on some of these projects may be enhanced with structural craft inspirations.
Key Facts:
- Technique: Seashell Crafts and Decorations
- Total time: 24–48 hours
- Makes: 12 Seashell Crafts
Essential Supplies for Seashell Crafts and Decorations
| Supply | Spec / Size | Used For |
|---|---|---|
| Large Clam Shells | the deep base needed for pouring candle wax | |
| Oyster Shells | thick enough to hold gilded salt or wax | |
| Small Scallop Shells | flat and ideal for place cards and drilling | |
| Raw Brass Wire | bends into spirals for chimes and photo holders | |
| Natural Jute Rope | knots into rustic plant hangers | |
| Raw Wood Beads | strings into an oversized bohemian garland |
You need a few specific items to start. Fortunately, these materials are affordable and easy to find. Gather these essential supplies before you begin, and your crafting process will go smoothly from project to project.
A few items — craft glue, the craft drill, gloves, and a dust mask — come up across multiple projects in this guide. We’ve marked these as “(used throughout)” below, so you’ll know to grab them once no matter how many ideas you try.
🐚 Natural Shells
Large clam shells, oysters, and small scallops form the base of nearly every project in this guide.
- Large Clam Shells — the deep base needed for pouring candle wax | [Check Price on Amazon]
- Oyster Shells — thick enough to hold gilded salt or wax | [View Price on Amazon]
- Small Scallop Shells — flat and ideal for place cards and drilling | [Check Price on Amazon]
🪵 Earthy Elements & Bases
Raw brass wire, jute rope, and wood beads keep every design looking natural rather than plastic, while driftwood and a simple wooden ring provide two of the bases used below.
- Raw Brass Wire — bends into spirals for chimes and photo holders | [Check Price on Amazon]
- Natural Jute Rope — knots into rustic plant hangers | [View Price on Amazon]
- Natural Cotton Rope | [View Price on Amazon]
- Raw Wood Beads — strings into an oversized bohemian garland | [Check Price on Amazon]
- Driftwood Piece — the natural anchor for hanging wind chimes | [See Price on Amazon]
- Small Wooden Ring — the base for the linen napkin ring | [Check Price on Amazon]
- Raw Linen Fabric — wraps neatly around wooden rings for a textured, natural finish | [Check Price on Amazon]
🕯️ Candle Making Supplies
Natural soy wax and a cotton wick are all you need for the shell candle masterclass above.
- Natural Soy Wax Flakes — melts clean with no black smoke | [Check Price on Amazon]
- Cotton Wicks — burns evenly once set in the shell | [View Price on Amazon]
🎨 Paint & Finishing
Liquid gold paint adds a luxe touch to several designs, while plaster and a small canvas bring the wall art idea to life.
- Liquid Gold Paint — adds a luxe edge to shells and place cards | [Check Price on Amazon]
- White Plaster — the sculptural base for pressed-shell wall art | [View Price on Amazon]
- Small Canvas — the surface for the wabi-sabi plaster piece | [Check Price on Amazon]
🧱 Casting & Molding
Cement and eco-resin let you cast two very different but equally striking accent pieces.
- Fine Cement Mix — pours into a raw, modern ring holder | [Check Price on Amazon]
- Cone Silicone Mold — shapes the cement into a clean cone form | [View Price on Amazon]
- Clear Eco-Resin — suspends tiny shells like a frozen wave | [Check Price on Amazon]
- Round Silicone Mold — shapes resin into a clean coaster | [See Price on Amazon]
🔩 Hardware & Extras
A few finishing pieces — drawer knobs, sea salt, and blank cards — round out the remaining designs.
- Flat Metal Drawer Knobs — the base for upcycled coastal pulls | [Check Price on Amazon]
- Flaky Sea Salt — fills the gilded shell cellar | [View Price on Amazon]
- Blank Paper Cards — pairs with gilded shells for place settings | [Check Price on Amazon]
🛠️ Essential Tools & Safety
A small craft drill and strong glue handle most construction, while gloves and a dust mask keep you protected during drilling, cement work, and resin pours.
- Small Craft Drill (used throughout) — makes clean holes in shells for wire and rope | [Check Price on Amazon]
- Strong Craft Glue (used throughout) — bonds shells to hard, non-porous surfaces | [View Price on Amazon]
- Nitrile Gloves (used throughout) — protects skin during cement and resin work | [Check Price on Amazon]
- Dust Mask (used throughout) — keeps fine shell dust out of your lungs while drilling | [See Price on Amazon]
Core Techniques for Seashell Crafts and Decorations
The Masterclass above walks through building a shell candle from start to finish. The techniques below cover everything else you’ll need for the remaining eleven ideas.
1. Drilling Shells Safely
First, place your shell on a stable, flat surface, ideally on a folded towel to prevent slipping. Next, mark your drill point with a pencil, then start at a low speed to create a small starter notch before increasing speed. Then, drill straight through in one smooth motion — stopping and restarting can crack thinner shells. Wear a dust mask throughout, since shell dust is fine and sharp.
Used in: Minimalist Brass Wind Chimes, Wooden Bead Garlands.
2. Wire Wrapping & Spiral Bending
First, cut a length of raw brass wire longer than you think you’ll need. Next, wrap one end tightly around a pen or dowel several times to form a spiral coil, then slide it off gently. Then, shape the remaining wire as needed and secure any loose ends by tucking them back into the coil.
Used in: Minimalist Brass Wind Chimes, Wire Photo Holders.
3. Wrapping Fabric Around a Base
First, cut a strip of raw linen slightly longer than the circumference of your base. Next, apply a thin line of glue along the base and press the linen down, smoothing as you go. Then, overlap the fabric ends slightly at the back and trim any excess for a clean, seamless finish.
Used in: Linen Napkin Rings.
4. Gilding with Liquid Gold Paint
First, make sure your shell surface is clean and completely dry. Next, load a fine brush lightly with liquid gold paint — less is more here. Then, paint only the outer rim or edge in one smooth stroke, and let it dry fully before handling.
Used in: Gilded Salt Cellars, Seashell Place Cards.
5. Plaster Spreading & Object Pressing
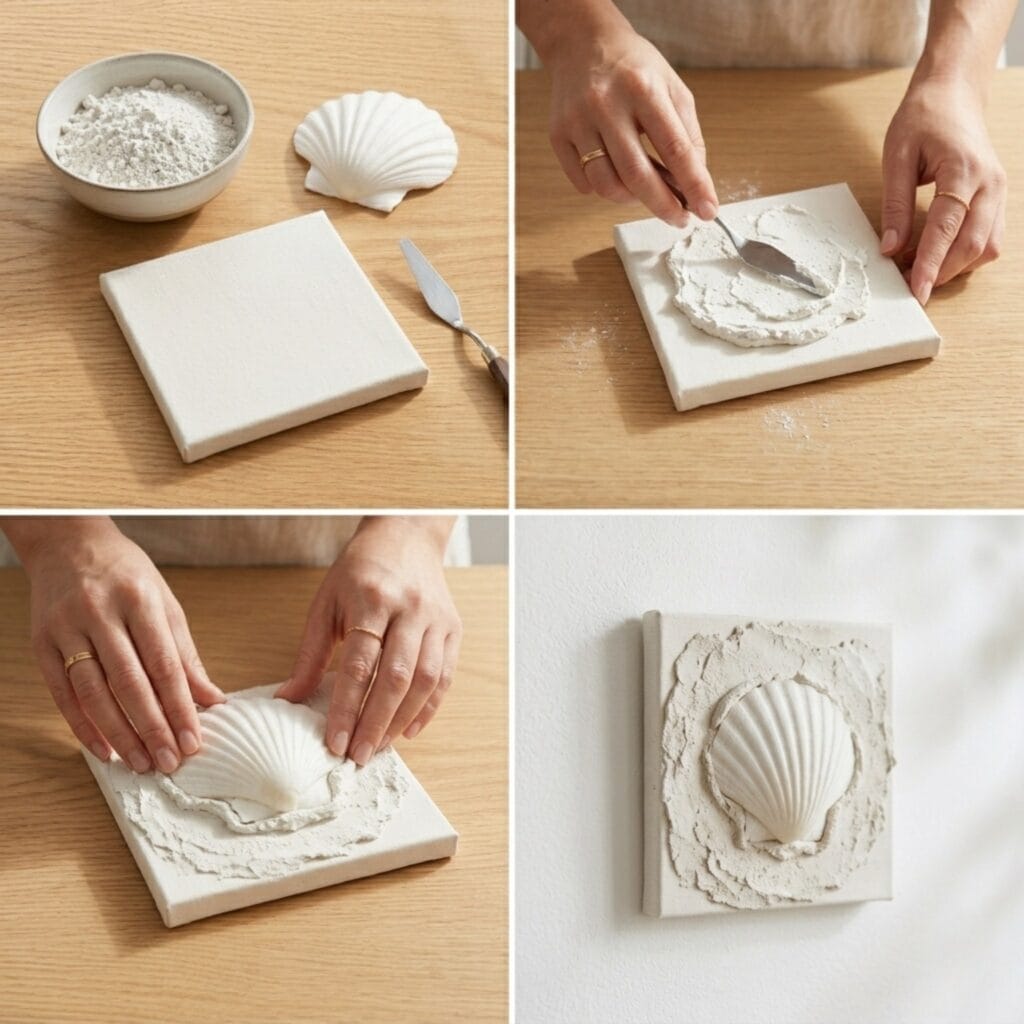
First, mix your plaster according to the package instructions until smooth. Next, spread it evenly across your canvas using a palette knife, working quickly before it begins to set. Then, press your shell firmly into the wet plaster at your desired spot, holding it steady for a few seconds until it stays in place on its own.
Used in: Wabi-Sabi Wall Art.
6. Stringing Wood Beads
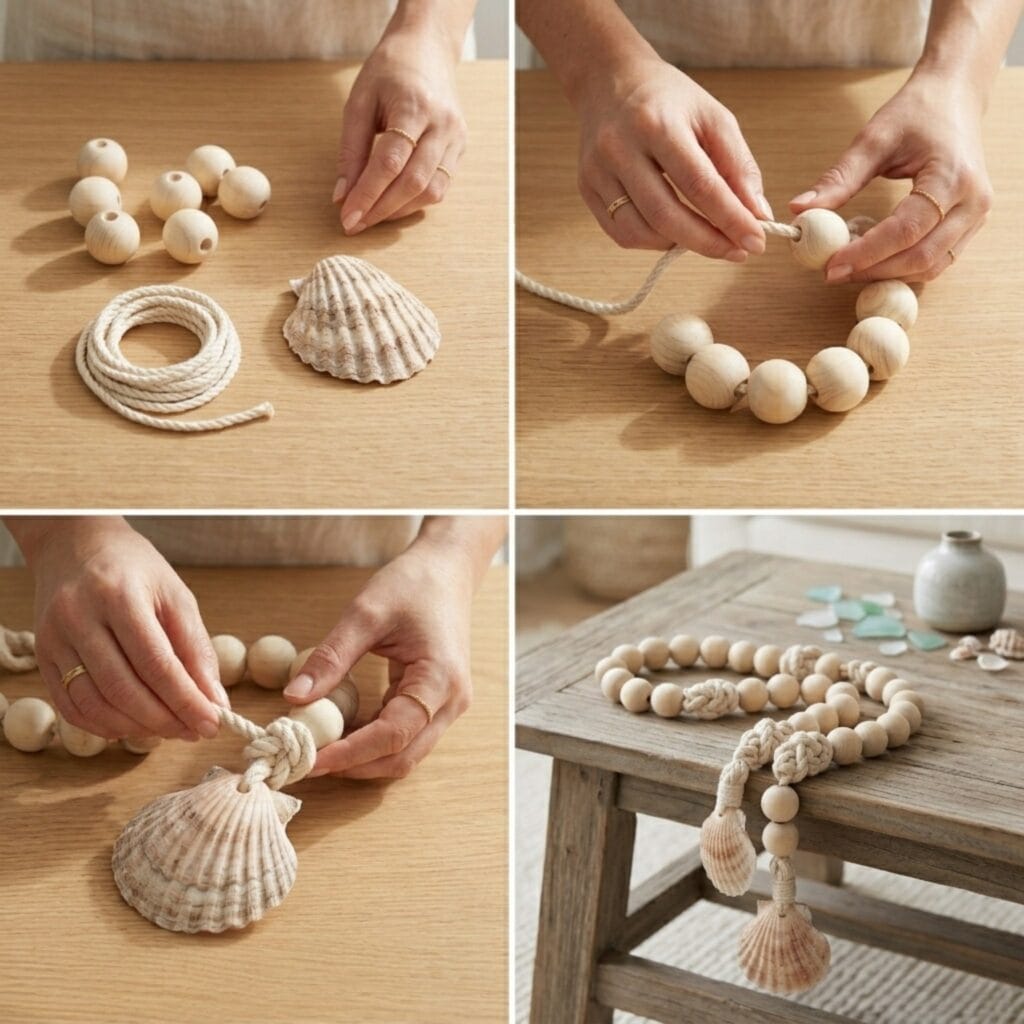
First, knot one end of your cotton rope to prevent beads from sliding off. Next, thread your wood beads on one at a time, spacing them evenly or in a pattern of your choice. Then, tie off the other end securely once you’ve reached your desired length.
Used in: Wooden Bead Garlands.
7. Bonding Shells to Hard Surfaces
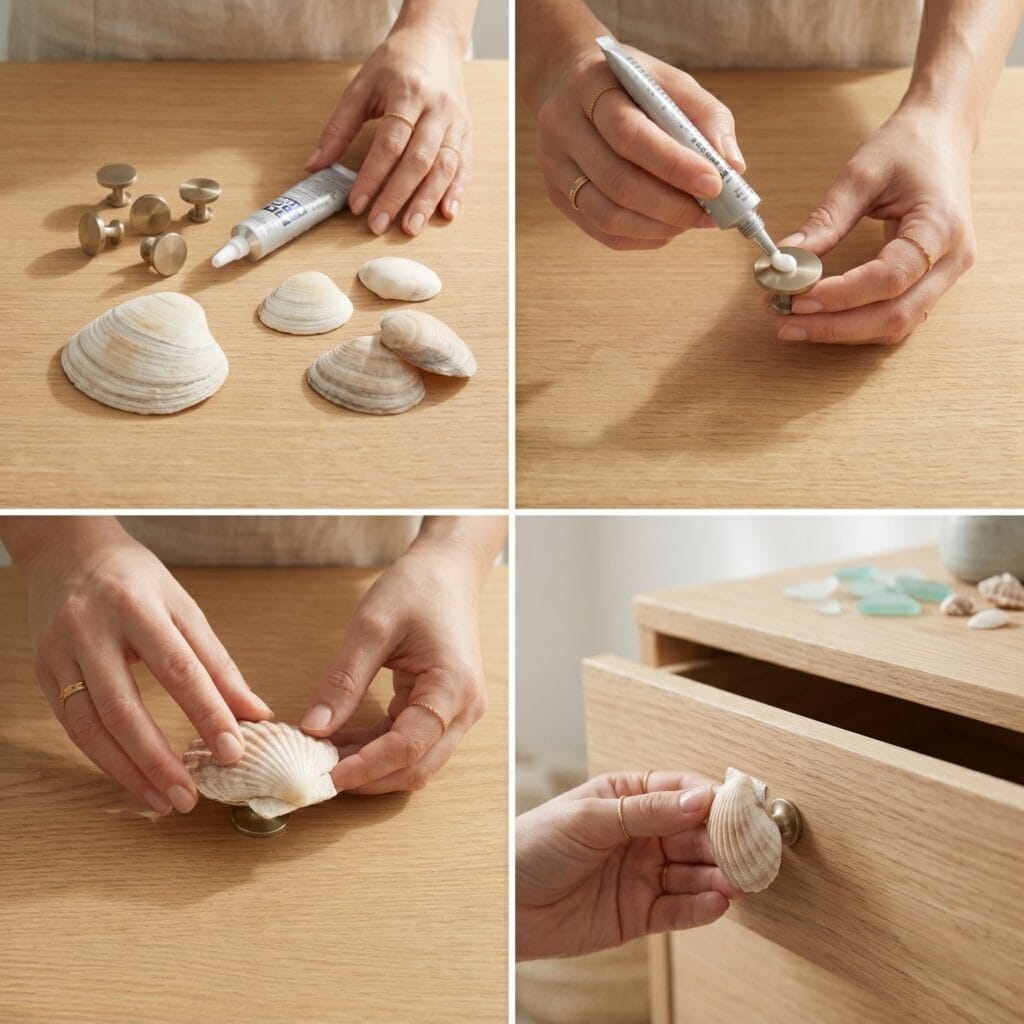
First, make sure both surfaces — the shell and the base — are clean and dry. Next, apply strong craft glue to the flattest part of the shell rather than the edges. Then, press firmly in place and hold for the time specified on your glue’s packaging, allowing it to cure fully before moving the piece.
Used in: Coastal Drawer Pulls, Seashell Place Cards, Wire Photo Holders.
8. Cement Pouring & Mold Casting
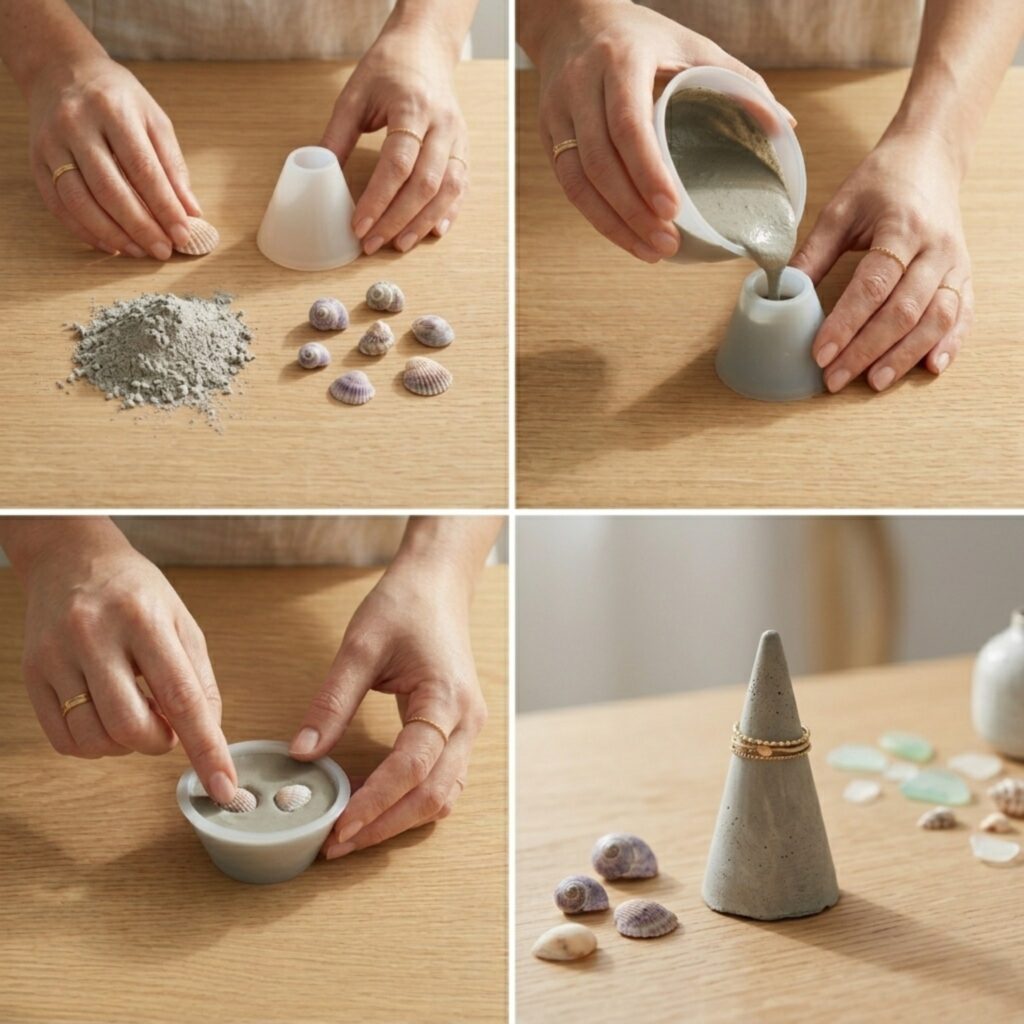
First, mix your cement according to the package instructions until it reaches a smooth, pourable consistency — not too thick, not too watery. Next, pour it slowly into your cone mold, tapping the sides gently to release any trapped air bubbles. Then, press your shell into the surface immediately, before the cement begins to set, and let it cure fully (check your product’s instructions for exact timing) before removing it from the mold.
Used in: Cement and Shell Ring Holders.
9. Macramé Knotting & Weaving-In Accents
First, cut several long, even strands of jute rope and gather them at one end with a secure overhand knot. Next, divide the strands into pairs and tie simple square knots at even intervals down the length to build your hanger pattern. Then, as you knot, tuck small shells directly into the knots themselves, securing them in place as each knot tightens around them.
Used in: Jute Plant Hangers.
10. Eco-Resin Casting
First, arrange your shells inside a round silicone mold exactly as you’d like them to appear in the finished piece. Next, mix your eco-resin according to the package instructions, stirring slowly to avoid introducing air bubbles. Then, pour the resin over the shells in a thin, steady stream, and let it cure fully — typically 24 to 48 hours — before gently flexing the silicone mold to release the coaster.
Used in: Eco-Resin Coasters.
12 Aesthetic Ideas for Seashell Crafts and Decorations
Additionally, these projects offer a sustainable and elegant look. Here, we have twelve unique coastal ideas to try right now.
1. Aesthetic Candles: Seashell Crafts and Decorations
- Cut a natural cotton wick to the right size.
- Dip the metal base of the wick into a tiny bit of melted wax or strong glue.
- Place the cup into a pot of boiling water to melt the wax slowly.
- Hold the cotton wick straight up with your fingers or a wooden peg.
- Pour the liquid soy wax very slowly into the shell.
- Use sharp scissors to trim the cotton wick to a quarter inch.
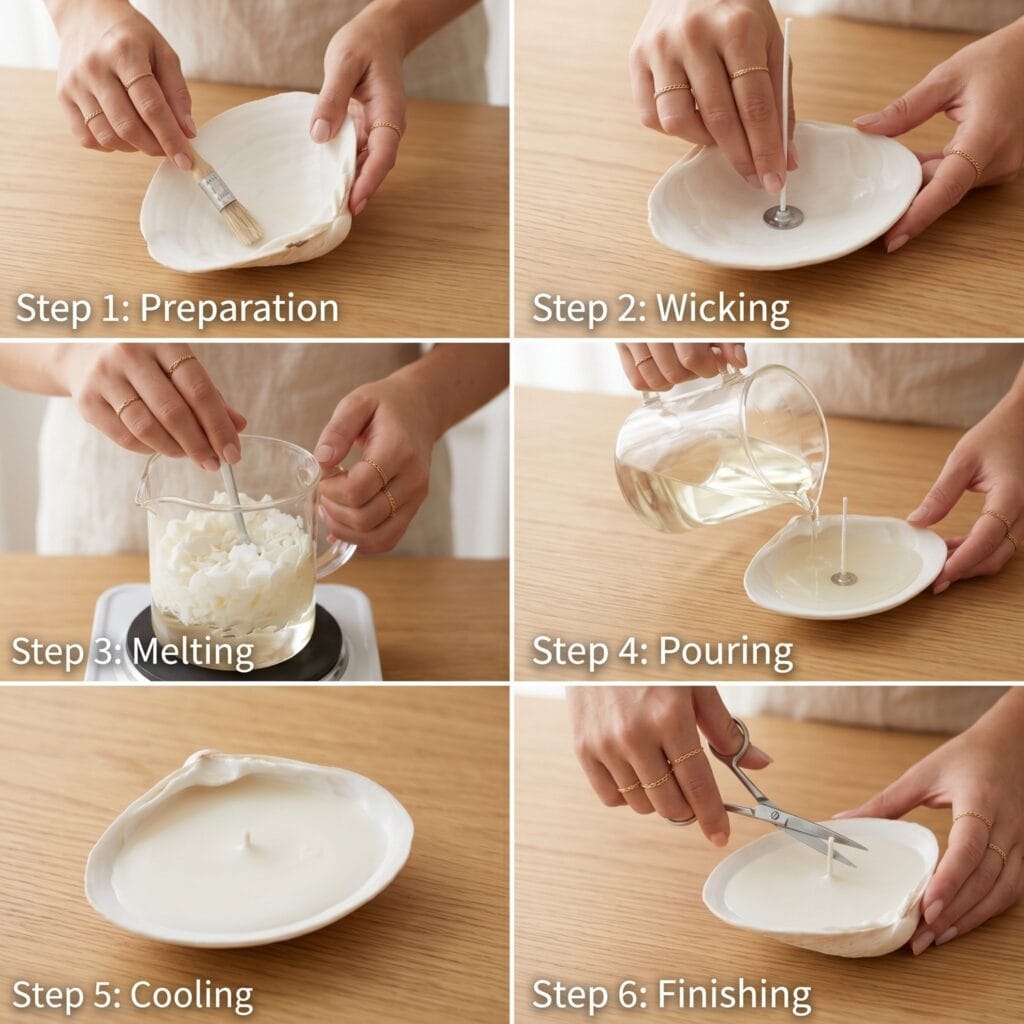
Create beautiful organic lighting with a minimalist coastal candle poured directly into a natural shell. (See our full step-by-step Masterclass below for the complete technique and full supplies list.)
Supplies Needed: Large Clam or Oyster Shell, Cotton Wicks, Natural Soy Wax Flakes.
How to Make Seashell Candles (Step-by-Step Masterclass)
Do you want to try our favorite coastal project? Here, we explain how to build a perfect artisan candle. Because the steps are very detailed, you will finish it smoothly like a professional.
Step 1: Choose the Right Shell. First, find a large, deep clam or oyster shell. Important: The shell must sit perfectly flat on the table so the hot wax does not spill. Pro Tip: Wash the shell with warm soapy water and dry it completely.
Step 2: Prepare the Wick. Cut a natural cotton wick to the right size. Next, dip the metal base of the wick into a tiny bit of melted wax or strong glue. Therefore, you can stick it firmly to the deep center of the shell.
Step 3: Melt the Natural Wax. Put natural soy wax flakes into a glass measuring cup. Then, place the cup into a pot of boiling water to melt the wax slowly. Because soy wax burns clean, it will not leave black smoke in your house.
Step 4: Pour the Wax Carefully. Hold the cotton wick straight up with your fingers or a wooden peg. Next, pour the liquid soy wax very slowly into the shell. Consequently, you avoid making any air bubbles in your beautiful candle.
Step 5: Cool and Cure. Leave the candle on a flat surface. Important: Do not touch or move the shell for at least four hours. As a result, the wax will harden perfectly smooth and turn a solid, creamy white.
Step 6: Artisan Finishing Touches. Finally, use sharp scissors to trim the cotton wick to a quarter inch. Indeed, your artisan seashell candle is now ready. Plus, it looks amazing on a summer dining table!
2. Minimalist Brass Wind Chimes
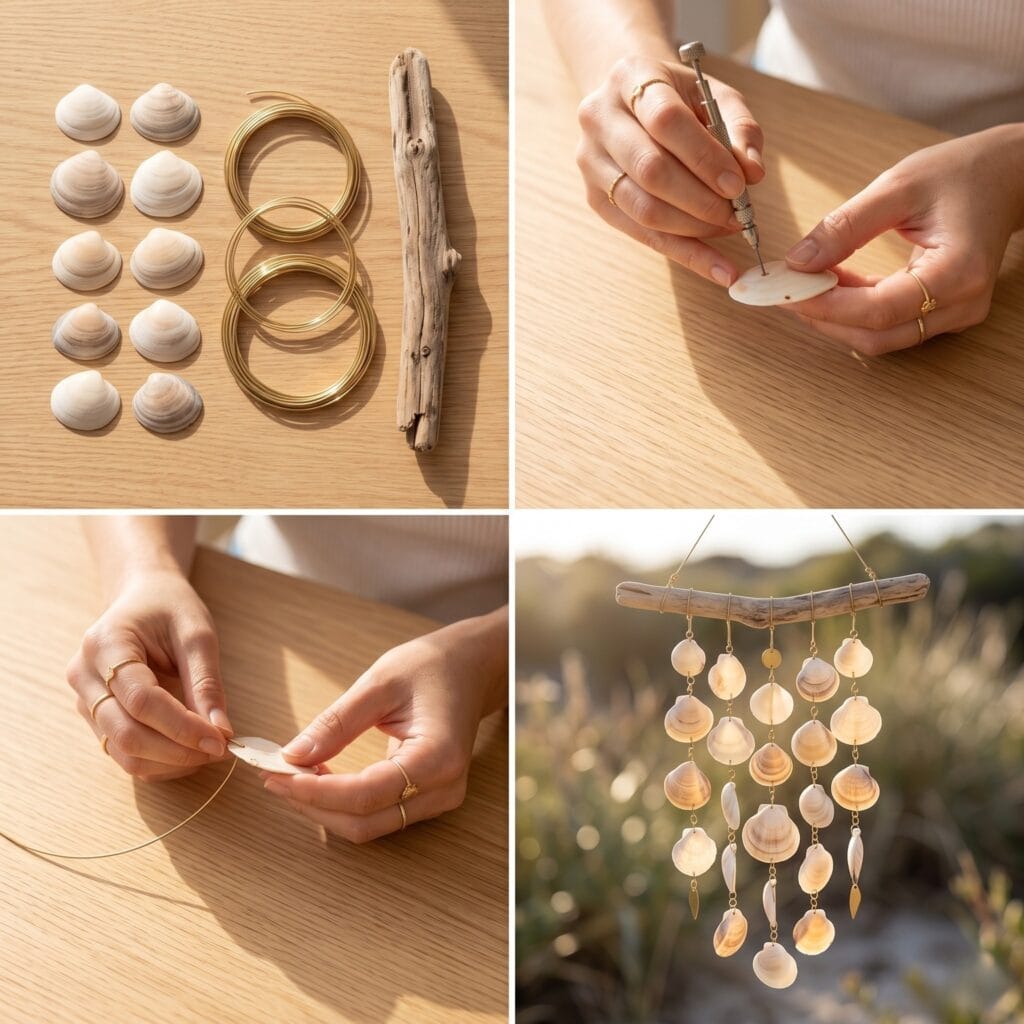
Supplies Needed: Flat seashells, raw brass wire, a piece of driftwood, small craft drill.
Begin by drilling tiny holes into smooth, flat shells (see Technique 1: Drilling Shells Safely above). Next, thread raw brass wire through them (see Technique 2: Wire Wrapping & Spiral Bending above). Then, hang them from a piece of natural driftwood. Therefore, they create a peaceful sound in the wind.
3. Linen Napkin Rings: Seashell Crafts and Decorations
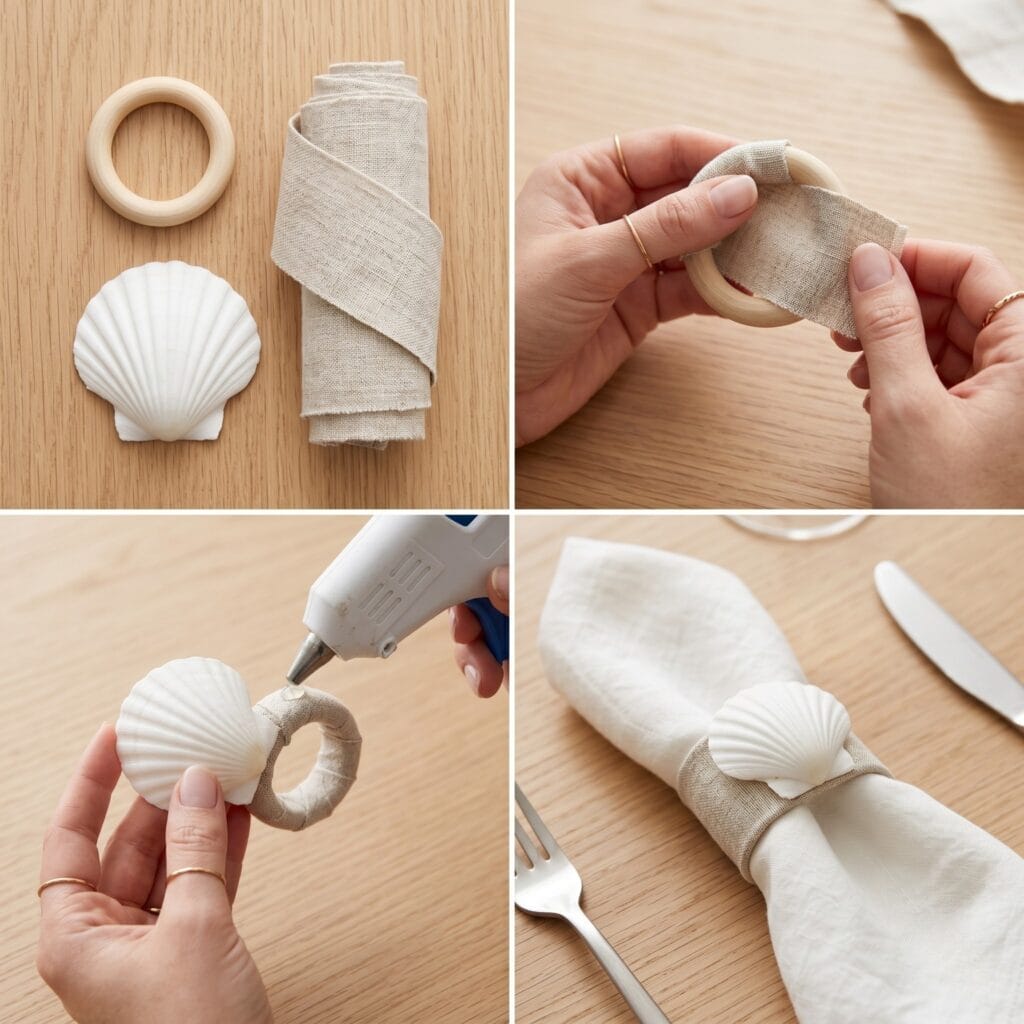
Supplies Needed: Raw linen fabric, small wooden ring, strong craft glue, one small seashell.
Wrap raw linen fabric evenly around a wooden ring to build a soft, textured base (see Technique 3: Wrapping Fabric Around a Base above). Next, use strong glue to attach a perfectly white seashell (see Technique 7: Bonding Shells to Hard Surfaces above). As a result, you add a sophisticated, beachy touch to your dinner party.
4. Gilded Salt Cellars
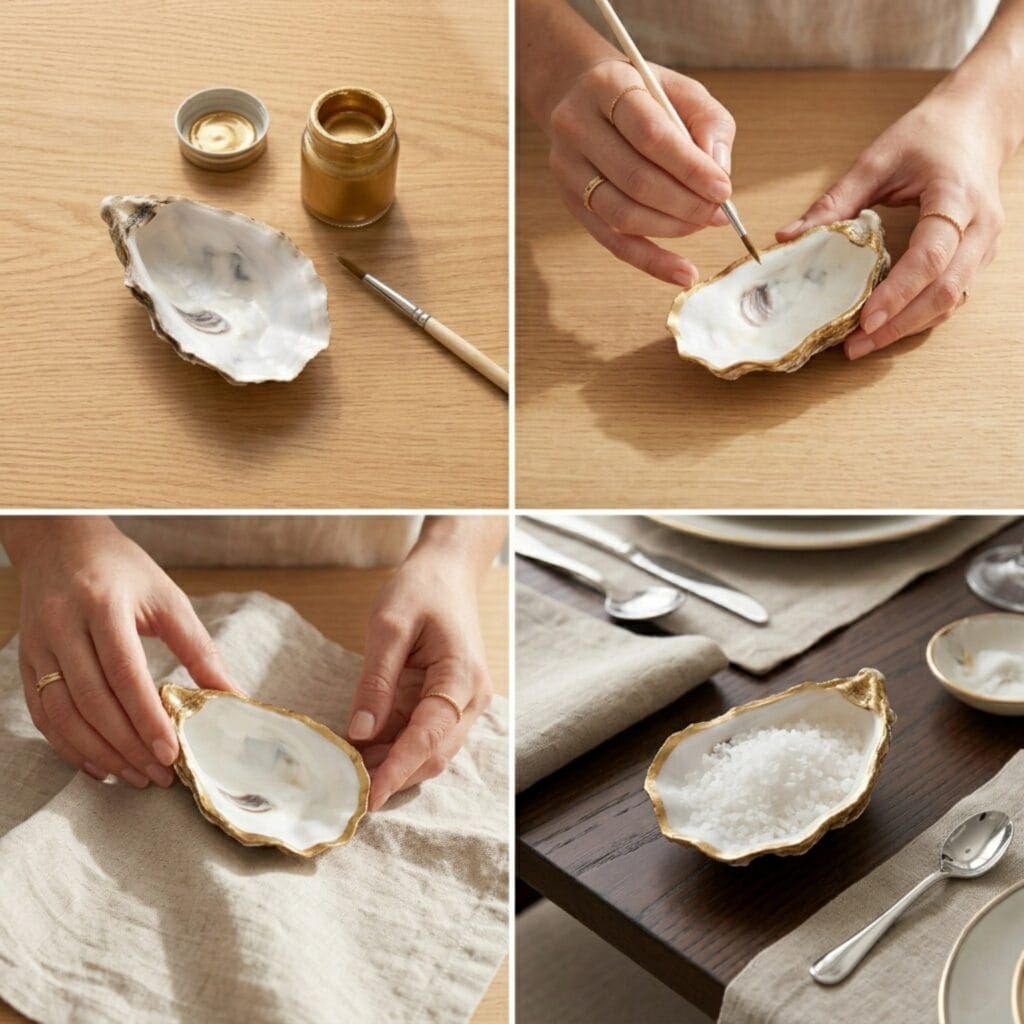
Supplies Needed: One thick oyster shell, liquid gold paint, flaky sea salt.
Start by cleaning a thick oyster shell thoroughly. Next, paint the outer rim with liquid gold (see Technique 4: Gilding with Liquid Gold Paint above). Then, fill it with flaky sea salt. Indeed, it looks like a high-end culinary accessory.
5. Wabi-Sabi Wall Art: Seashell Crafts and Decorations
Supplies Needed: White plaster, small canvas, one beautiful shell.
Spread textured white plaster smoothly across a blank canvas using a palette knife. Next, press a single, beautiful shell into the wet plaster (see Technique 5: Plaster Spreading & Object Pressing above). Because it is unpainted, it offers a calm, sculptural element.
6. Wooden Bead Garlands
Supplies Needed: Raw wood beads, natural cotton rope, one large shell, small craft drill.
Thread oversized raw wood beads onto natural cotton rope in a clean, repeating pattern (see Technique 6: Stringing Wood Beads above). Next, drill a hole in a large shell (see Technique 1: Drilling Shells Safely above). Then, attach the shell to the end of the garland. Therefore, it brings a high-end bohemian touch.
7. Coastal Drawer Pulls: Seashell Crafts and Decorations
Supplies Needed: Flat metal drawer knobs, sturdy seashells, strong craft glue.
Select flat metal drawer knobs to serve as your sturdy mounting base. Next, glue sturdy, beautiful seashells directly onto the metal surface (see Technique 7: Bonding Shells to Hard Surfaces above). Consequently, you transform a basic dresser into a coastal masterpiece.
8. Cement and Shell Ring Holders
Supplies Needed: Fine cement mix, cone silicone mold, one small shell, nitrile gloves.
Pour fine cement carefully into a cone mold until smooth. Next, press a small shell into the base before it dries. Wear gloves while handling wet cement, as it can irritate skin with prolonged contact (see Technique 8: Cement Pouring & Mold Casting above, and our safety note below). As a result, you get a raw, modern ring display stand.
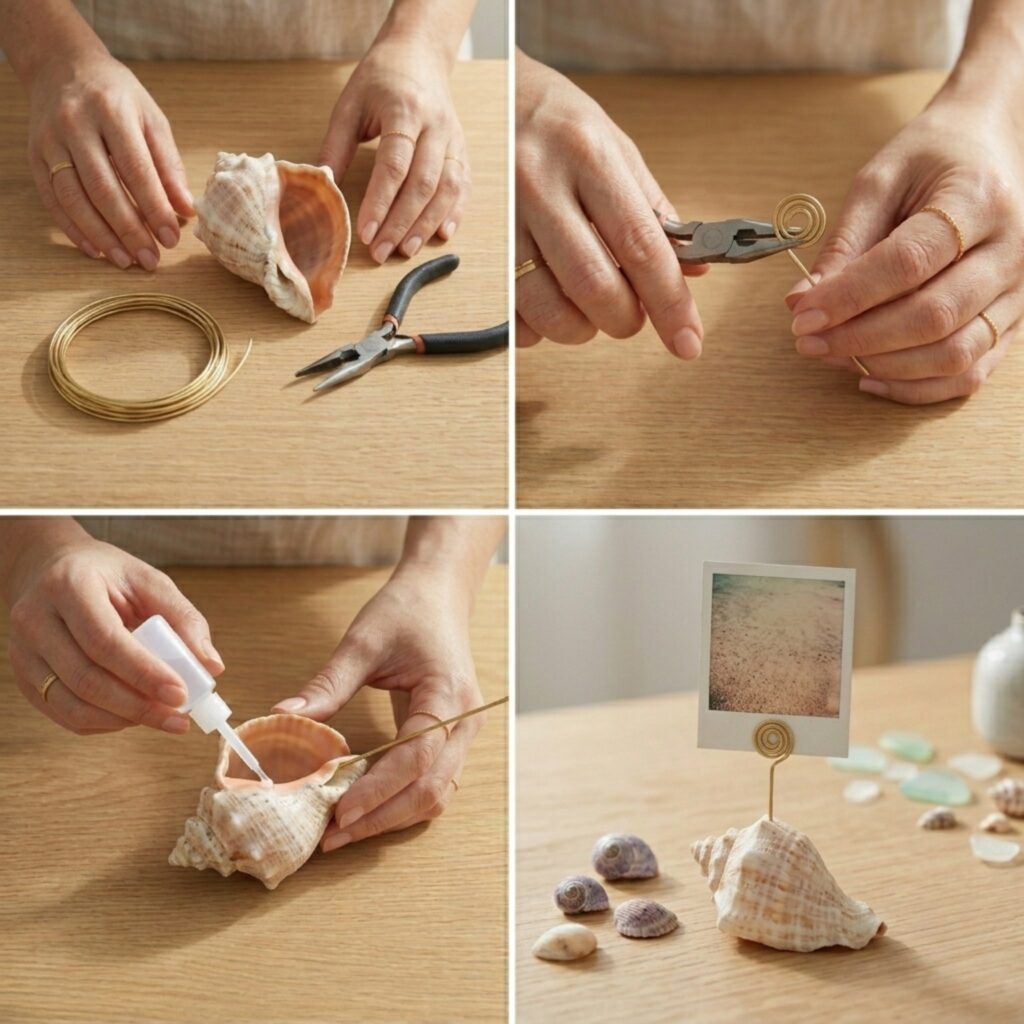
9. Wire Photo Holders
Supplies Needed: One heavy seashell, raw brass wire, strong craft glue.
Take a heavy, thick seashell to act as a solid weight for your desk. Next, bend raw brass wire into a spiral loop (see Technique 2: Wire Wrapping & Spiral Bending above). Then, glue the wire deep inside the shell (see Technique 7: Bonding Shells to Hard Surfaces above). Thus, it securely holds your favorite photos.
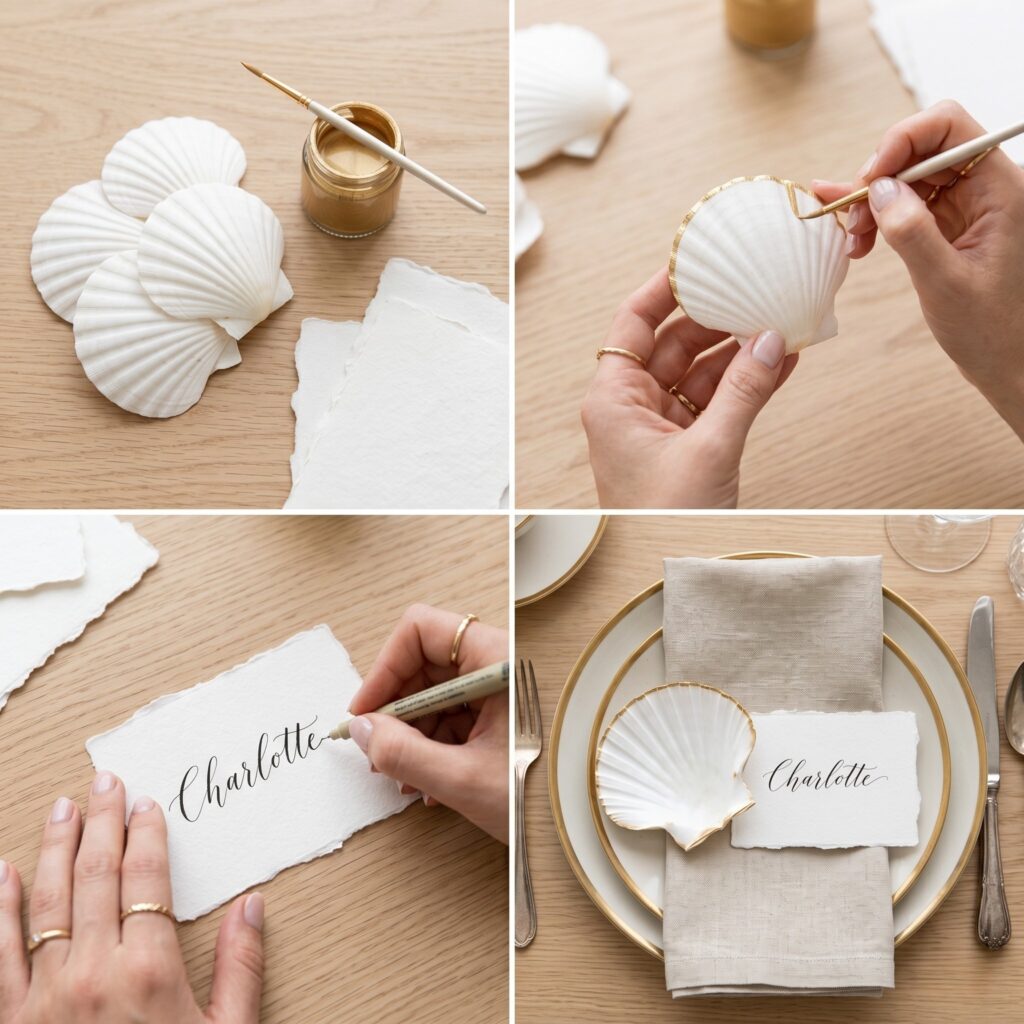
10. Seashell Place Cards: Seashell Crafts and Decorations
Supplies Needed: Flat scallop shells, liquid gold paint, blank paper cards, strong craft glue.
Gild the outer edges of flat scallop shells with liquid gold paint using a fine brush (see Technique 4: Gilding with Liquid Gold Paint above). Next, write your guest’s name on a handmade paper card. Then, attach the card to the shell (see Technique 7: Bonding Shells to Hard Surfaces above). Indeed, your guests will love them.
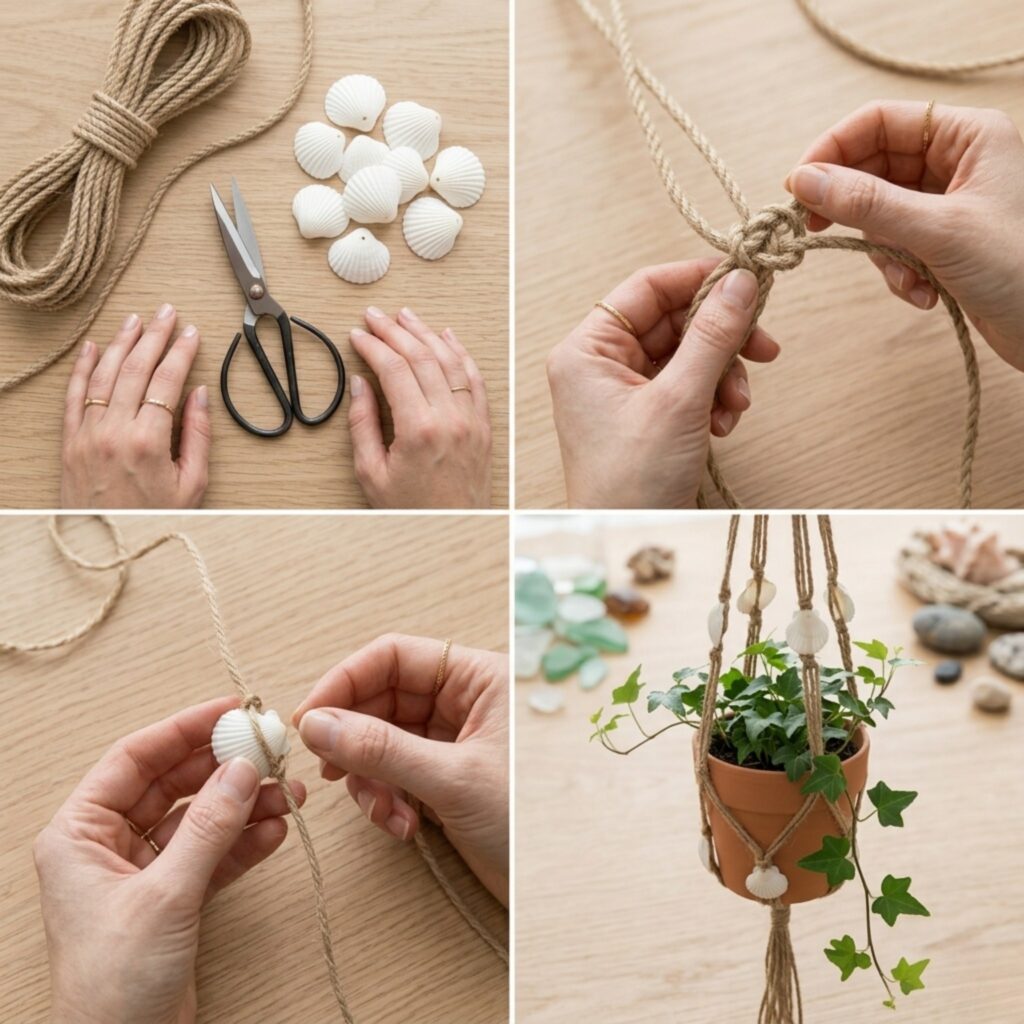
11. Jute Plant Hangers
Supplies Needed: Natural jute rope, several small shells.
Knot natural jute rope into a sturdy net structure using simple macrame techniques (see Technique 9: Macramé Knotting & Weaving-In Accents above). Next, weave small white shells into the knots. Consequently, you add a beautiful coastal detail to your green plants.
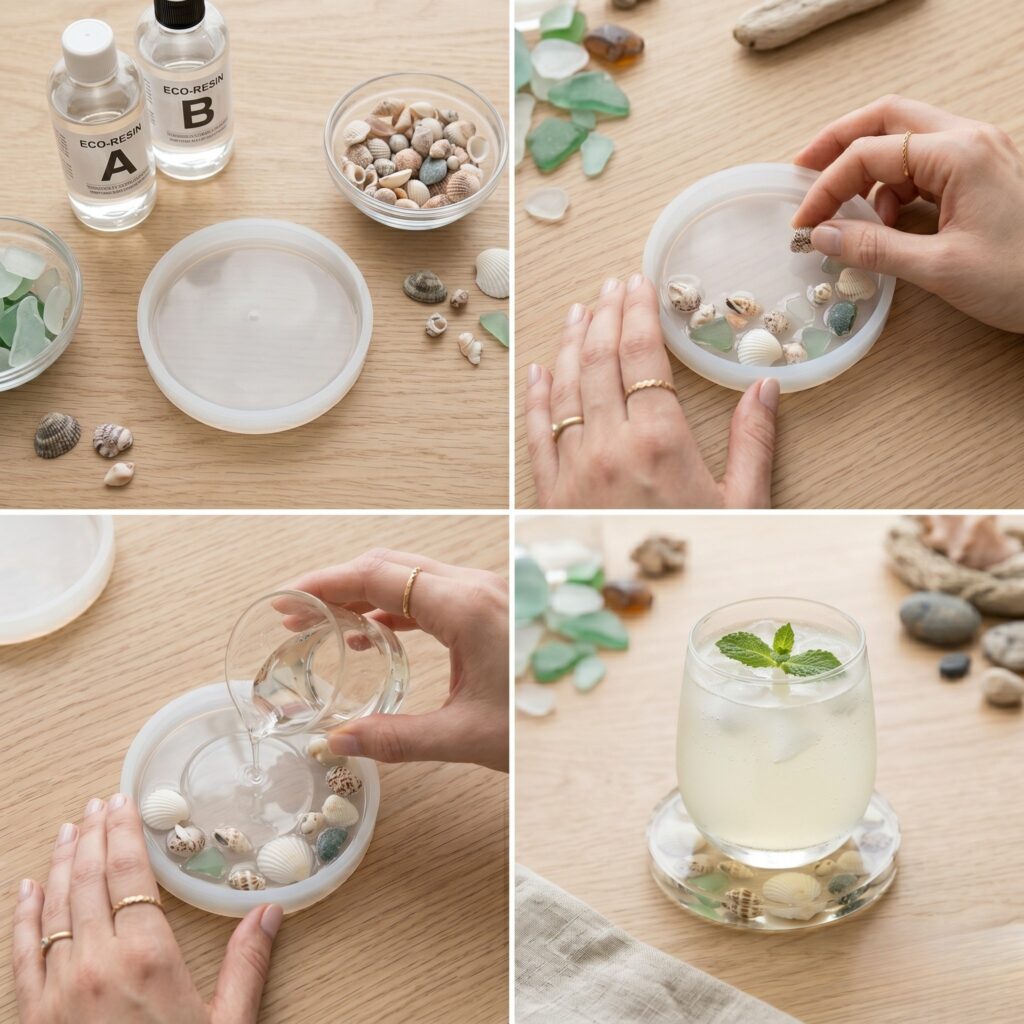
12. Eco-Resin Coasters: Seashell Crafts and Decorations
Supplies Needed: Round silicone mold, clear eco-resin, tiny delicate shells, nitrile gloves.
Arrange tiny, delicate shells inside a round silicone mold in a pleasing arrangement. Next, pour clear eco-resin over them, working in a well-ventilated space and wearing gloves. Let the coasters cure fully for 24–48 hours before handling (see Technique 10: Eco-Resin Casting above, and our safety note below for resin safety guidance). Because the resin is perfectly clear, it looks like a frozen ocean puddle.
Quick Reference: All Supplies at a Glance
Ready to start your first coastal project? Here’s every item mentioned in this guide in one place.
🐚 Natural Shells
- Large Clam Shells | [Check Price on Amazon]
- Oyster Shells | [View Price on Amazon]
- Small Scallop Shells | [Check Price on Amazon]
🪵 Earthy Elements & Bases
- Raw Brass Wire | [Check Price on Amazon]
- Natural Jute Rope | [View Price on Amazon]
- Natural Cotton Rope | [View Price on Amazon]
- Raw Wood Beads | [Check Price on Amazon]
- Driftwood Piece | [See Price on Amazon]
- Small Wooden Ring | [Check Price on Amazon]
- Raw Linen Fabric — wraps neatly around wooden rings for a textured, natural finish | [Check Price on Amazon]
🕯️ Candle Making Supplies
- Natural Soy Wax Flakes | [Check Price on Amazon]
- Cotton Wicks | [View Price on Amazon]
🎨 Paint & Finishing
- Liquid Gold Paint | [Check Price on Amazon]
- White Plaster | [View Price on Amazon]
- Small Canvas | [Check Price on Amazon]
🧱 Casting & Molding
- Fine Cement Mix | [Check Price on Amazon]
- Cone Silicone Mold | [View Price on Amazon]
- Clear Eco-Resin | [Check Price on Amazon]
- Round Silicone Mold | [See Price on Amazon]
🔩 Hardware & Extras
- Flat Metal Drawer Knobs | [Check Price on Amazon]
- Flaky Sea Salt | [View Price on Amazon]
- Blank Paper Cards | [Check Price on Amazon]
🛠️ Essential Tools & Safety
- Small Craft Drill | [Check Price on Amazon]
- Strong Craft Glue | [View Price on Amazon]
- Nitrile Gloves | [Check Price on Amazon]
- Dust Mask | [See Price on Amazon]
Important Crafting Safety Note:
Creating beautiful items is a very relaxing activity. However, safety must always come first. Therefore, please be careful when using a craft drill on shells. Because small shell dust can be sharp, always wear a mask. Finally, keep hot wax and strong glue away from children!
A note on working with resin: Eco-resin gives off fumes while curing, so always work in a well-ventilated room or outdoors, and wear gloves to protect your skin from direct contact. Avoid touching or moving your resin project until it has fully cured — typically 24 to 48 hours, though always check your specific product’s instructions for exact timing.
A note on working with cement: Wet cement can irritate or dry out skin with prolonged contact, so wear gloves while mixing and pouring. Try to avoid inhaling cement dust when handling the dry mix, and work in a ventilated space.
Trim brass wire ends carefully and file down any sharp points before handling.
Finally, as with any casting or molding project, keep uncured resin and wet cement well out of reach of children and pets until fully set.
Final Thoughts on Coastal Decor
Upgrading your home for the summer is very rewarding. Therefore, try these seashell crafts and decorations this weekend. Also, they are perfect activities for sunny afternoons. So, which artisan coastal craft will you create first? Please, leave a comment below!



[…] you enjoy making coordinated collections, check out our post on seashell crafts and decorations. It uses a similar small-piece, unified-set format with an entirely different material, and the […]