

Disposable fall decor looks flat and forgettable. These diy fall decorations bring warm wood, amber citrus, tactile foliage, and matte painted surfaces into your home with the kind of layered texture that feels collected over time.
Each project uses accessible materials and measured assembly so you can build a mantel, entryway, table, or shelf display with confidence. Pair these ideas with our easy pumpkin painting ideas, or carry the handmade season into October with these cute DIY Halloween decoration ideas.
Affiliate Disclosure: This post contains affiliate links. As an Amazon Associate, I earn from qualifying purchases. If you buy through these links, I may earn a commission at no additional cost to you.
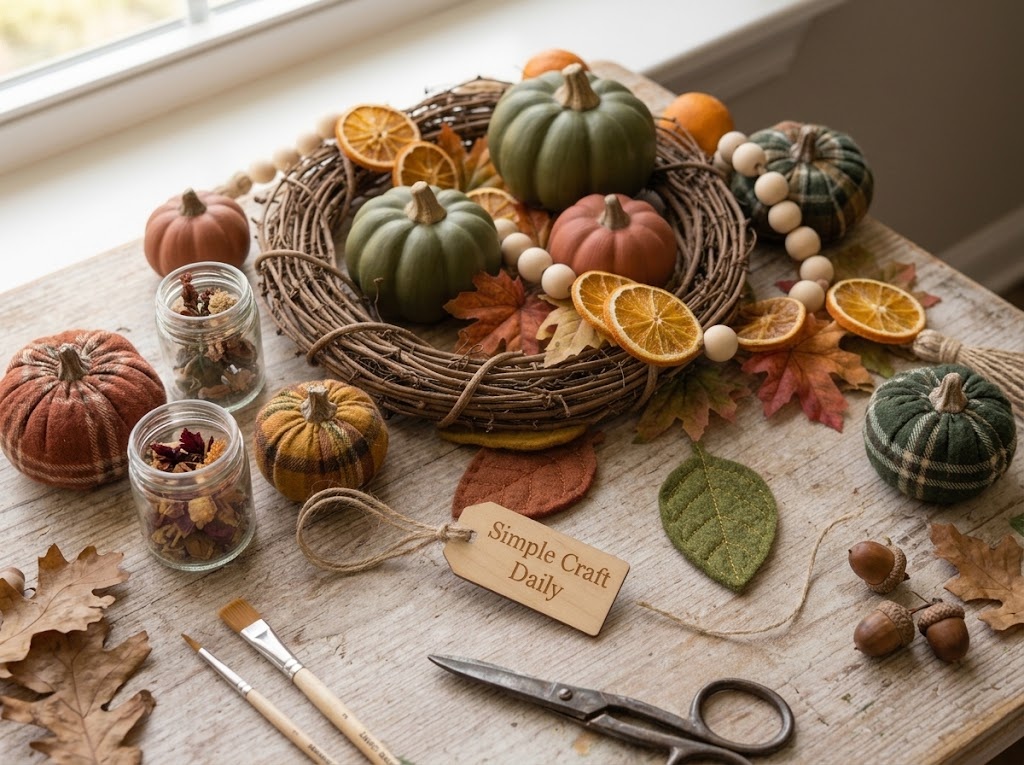
Essential Materials & Tools
wp:paragraphBuild your supply bin around reusable basics, then add seasonal pieces as each project calls for them. In addition, paint must dry fully before varnish goes on, so plan a clean, level drying space before starting painted projects.
/wp:paragraph✨ Consumable Raw Materials
- Assorted Artificial Autumn Maple Leaves and Berry Picks — Wired stems hold their shape in wreaths, baskets, garlands, and centerpieces | Check Assorted Artificial Autumn Maple Leaves and Berry Picks on Amazon
- Natural Dried Orange Slices — Whole slices provide translucent amber color for threadable garlands and lightweight hanging accents | Check Price on Amazon
- Natural Jute Twine — Ties garlands, bows, jar wraps, tassels, and hangers across the fall projects | Check Natural Jute Twine on Amazon
- Cotton Macrame Cord — Bead-garland base for project 5 — kept separate so each product gets its own link | Check Cotton Macrame Cord on Amazon
- Unfinished Wood Beads, 20 mm — Smooth large-hole beads thread easily onto cord and add warm, rounded texture | Find Unfinished Wood Beads, 20 mm on Amazon
- Mini Craft Pumpkins and Gourds — Dense paintable forms work for shelf clusters, place settings, and tiered trays | See Price on Amazon
- ACMI AP-Certified Acrylic Paint Set in Autumn Colors — Warm earth tones cover foam, wood, and clean acorns in controlled thin coats | See ACMI AP-Certified Acrylic Paint Set in Autumn Colors on Amazon
- Grapevine Wreath Forms, 12 inch — The 12-inch form for the door wreath (project 1); the separate 6-inch ring (project 4) is linked below | View on Amazon
- Natural Cinnamon Sticks — Warmly scented sticks add natural texture to candle rings and hanging mobiles. | Check Natural Cinnamon Sticks on Amazon
- Natural Pinecones — Textural pinecones fill out candle rings and seasonal tabletop arrangements. | Check Price on Amazon
- Pressed Fall Leaves — Flat preserved leaves for the framed botanical composition (project 10) | View Pressed Fall Leaves on Amazon
- Clear Glass Jars — Transparent jars display pressed leaves and hold herb vase cuttings. | Find Clear Glass Jars on Amazon
- Unfinished Wood Sign Board — Blank with pre-drilled holes so twine threads straight through for hanging (project 7) | See Unfinished Wood Sign Board on Amazon
- Plaid Cotton Fabric — Soft plaid fabric creates cozy layered runners and stuffed fabric pumpkins. | Explore Plaid Cotton Fabric on Amazon
- Clean Natural Acorns — Clean acorns provide small paintable bowl-filler accents for tabletop displays. | Find on Amazon
- Dried Wheat Stems — Golden stems create a full harvest-style bundle for a simple door hanger. | Check Dried Wheat Stems on Amazon
- Air Dry Clay — Soft clay can be rolled, leaf-stamped, and shaped into a small trinket dish. | Check Price on Amazon
- Polyester Fiberfill — Lightweight stuffing gives sewn plaid fabric pumpkins a rounded shape. | Find Polyester Fiberfill on Amazon
- Polyester Sewing Thread — Project 14’s construction thread — concrete spec instead of a needle-thread bundle (cvl) | Check Polyester Sewing Thread on Amazon
- Natural Wall Basket — A woven basket provides a lightweight base for a leafy vertical arrangement. | See Natural Wall Basket on Amazon
- Unfinished Wood Slice Blanks — Smooth wood rounds provide rustic surfaces for stenciled place-card names. | Explore Unfinished Wood Slice Blanks on Amazon
- Wool Felt Sheets — Soft felt cuts cleanly into durable leaf shapes for an embroidered garland. | Find on Amazon
- Embroidery Floss — Colored floss adds stitched veins and hanging details to felt leaves. | Check Embroidery Floss on Amazon
- Linen Fabric for Table Runner — The 14-by-72-inch linen layer anchors the table runner (project 8) | Check Linen Fabric for Table Runner on Amazon
- Cotton Gauze Fabric — The 10-by-60-inch cotton gauze layer softens the runner top (project 8) | Check Cotton Gauze Fabric on Amazon
- Archival Adhesive Dots — Lifts and sets pressed leaves onto the ivory cardstock backing (project 10) | Check Archival Adhesive Dots on Amazon
- Faux Eucalyptus Stems — Greenery that holds its shape for the swag and basket projects (projects 12 and 16) | Check Faux Eucalyptus Stems on Amazon
- 2-Inch Wired Ribbon — Covers the wire connection with a bow on the fall swag (project 12) | Check 2-Inch Wired Ribbon on Amazon
- Wooden Craft Hoop, 12 inch — Plain wood hoop that frames the hanging fall-leaf mobile (project 17) | Check Wooden Craft Hoop, 12 inch on Amazon
- Ivory Cardstock, 8×10 — Backing behind the pressed leaves inside the floating frame (project 10) | Check Ivory Cardstock, 8×10 on Amazon
- Cloth Napkins, Set of 4 — Four cloth napkins seat inside the finished rings (project 9) | Check Cloth Napkins, Set of 4 on Amazon
- Shallow Wood Bowl — Holds the cured painted acorns as a table display (project 11) | Check Shallow Wood Bowl on Amazon
- Tiered Tray — Display base for the finished pumpkin arrangement (project 19) | Check Tiered Tray on Amazon
- Small Wood Stems — Stems for the sewn fabric pumpkins (project 14) | Check Small Wood Stems on Amazon
- Grapevine Wreath Ring, 6 inch — The 6-inch ring for the candle centerpiece (project 4) | Check Grapevine Wreath Ring, 6 inch on Amazon
- Dried Rosemary — Herb sprigs for the mason-jar vases (project 15) | Check Dried Rosemary on Amazon
- Dried Eucalyptus Stems — Dried stems for the herb vases (project 15) — separate from the faux eucalyptus in projects 12 and 16 | Check Dried Eucalyptus Stems on Amazon
- Mini Floating Frame — Small frame for the mini botanical print in the tray display (project 19) | Check Mini Floating Frame on Amazon
🧰 Core Crafting Tools & Equipment
- Low-Temperature Mini Hot Glue Gun with Glue Sticks — A narrow glue bead secures lightweight leaves and trim after wired elements are stable | Find on Amazon
- Wire Cutters — Required wherever floral wire is cut — projects 1, 4, 9, and 12 | Check Wire Cutters on Amazon
- Wood Burning Tool Set with Lettering Tips — A proper pyrography tool creates controlled lettering and leaf outlines on unfinished wood | Check Price on Amazon
- Large-Eye Sewing Needles — Large eyes make it easier to thread jute through dried orange slices and wood beads. | Explore Large-Eye Sewing Needles on Amazon
- Craft Scissors — Useful for cutting cord, fabric, felt, and lightweight decorative materials cleanly. | View on Amazon
- Flat Paintbrush Set — Flat brushes apply smooth thin coats of acrylic paint and matte varnish to pumpkins, acorns, and wood. | Find on Amazon
- Acrylic Clay Roller — A smooth roller produces an even clay slab before pressing leaf texture and shaping the dish. | View Acrylic Clay Roller on Amazon
- Hand-Sewing Needles — Close the fabric-pumpkin seams and felt-leaf embroidery by hand | Check Hand-Sewing Needles on Amazon
- Letter Stencil Set — Reusable letter stencils help create neat, readable names on wood slice place cards. | View on Amazon
- Small Embroidery Needles — Fine needles pass easily through felt and embroidery floss for detailed leaf stitching. | Check Price on Amazon
- 220-Grit Sandpaper — Sands wood smooth before burning or stenciling (projects 7 and 18) | Check 220-Grit Sandpaper on Amazon
- Safety Glasses — Project 7 says to put them on before wood burning | Check Safety Glasses on Amazon
- Smooth-Jaw Pliers — Turns wire ends inward without scratching (project 9) | Check Smooth-Jaw Pliers on Amazon
- Fabric Clips — Holds the layered runner pieces aligned while you position them — no sewing needed (project 8) | Check Fabric Clips on Amazon
- Precision Tweezers — Lifts one pressed leaf at a time without disturbing the layout (project 10) | Check Precision Tweezers on Amazon
- Clay Bowl Form, 4 inch — Shapes the clay over a 4-inch bowl — any clean kitchen bowl works just as well (project 13) | Check Clay Bowl Form, 4 inch on Amazon
- Graphite Pencil — Draws the lettering and leaf outline before wood burning (project 7) | Check Graphite Pencil on Amazon
- Heat-Safe Tool Stand — Gives the hot wood-burning tool a stable resting spot between passes (project 7) | Check Heat-Safe Tool Stand on Amazon
- Stencil Brush — Pounces paint through the fall stencils (project 18) | Check Stencil Brush on Amazon
- Detail Paint Brushes — Small tips paint the acorn cap dots and fine lines (project 11) | Check Detail Paint Brushes on Amazon
- Clay Roller Guide Rings — Sets an even 6 mm slab under the acrylic roller (project 13) | Check Clay Roller Guide Rings on Amazon
- Wooden Skewers — Opens a threading hole in dried orange slices that are not pre-punched (projects 2 and 17) | Check Wooden Skewers on Amazon
- Clear Quilting Ruler — Measures and guides the 10-by-60-inch gauze trim without stretching the fabric (project 8) | Check Clear Quilting Ruler on Amazon
💎 Hardware, Fasteners & Finishing
- Water-Based Matte Acrylic Varnish — Brush this protective finish over completely dry acrylic paint for a low-sheen surface | Explore Water-Based Matte Acrylic Varnish on Amazon
- Floral Wire, 22 Gauge — Bends cleanly around stems, pinecones, cinnamon sticks, and wreath forms without bulky wraps | Check Floral Wire, 22 Gauge on Amazon
- Battery Tea Lights — Flameless lights safely illuminate decorated glass jar lanterns. | See Price on Amazon
- Copper Craft Wire, 22 Gauge — 22-gauge copper wire for the napkin-ring bases — bends around a jar form and secures leaf accents (project 9) | Check Copper Craft Wire, 22 Gauge on Amazon
- Water-Based Decoupage Medium — Adheres and seals artificial autumn leaves on glass jars (project 6) | Check Water-Based Decoupage Medium on Amazon
- Flameless LED Pillar Candle — Project 4’s flameless pillar — the tea lights cover project 6’s lanterns | Check Flameless LED Pillar Candle on Amazon
- Floating Frame, 8×10 — Displays the pressed-leaf piece (project 10) | Check Floating Frame, 8×10 on Amazon
Optional Studio Upgrades
Never required to finish the projects above — convenience upgrades for makers who want them.
📦 Beginner Project Kits & Coordinated Bundles
For beginners or makers starting from scratch, these coordinated bundles and all-in-one project packs bring together the core supplies in one convenient order.
- Fall Wreath and Table Centerpiece Starter Kit — A coordinated option for beginners who want compatible foliage, ribbon, and wire in one bundle | View Fall Wreath and Table Centerpiece Starter Kit on Amazon
⚡ Studio Tools & Workshop Equipment
Optional studio upgrades — every project above can be completed without these.
- Large Self-Healing Rotary Cutting Mat, Rotary Cutter, and Acrylic Ruler Set — Optional for project 8: trims the linen and gauze square when fabric is bought by the yard — pre-cut panels make it unnecessary | Find Large Self-Healing Rotary Cutting Mat, Rotary Cutter, and Acrylic Ruler Set on Amazon
- Daylight LED Magnifying Craft Lamp with Desk Clamp — This optional studio light makes lettering, wire wraps, and painted details easier to inspect | See Price on Amazon
- Heavy-Duty Three-Tier Rolling Craft Cart with Wood Top — This optional mobile workstation keeps active supplies and drying projects organized | See Heavy-Duty Three-Tier Rolling Craft Cart with Wood Top on Amazon
20 DIY Fall Decorations for Every Cozy Corner
Supplies Needed: Wool Felt Sheets, Embroidery Floss, Small Embroidery Needles, Jute Twine and Natural Cotton Macrame Cord, Craft Scissors
Start at the entryway, then move toward mantel, shelf, tabletop, and dining details. Each project stands on its own, so choose one small make or combine several finishes into a coordinated autumn display. Let hot glue cool before moving any piece, and let paint dry completely before sealing.
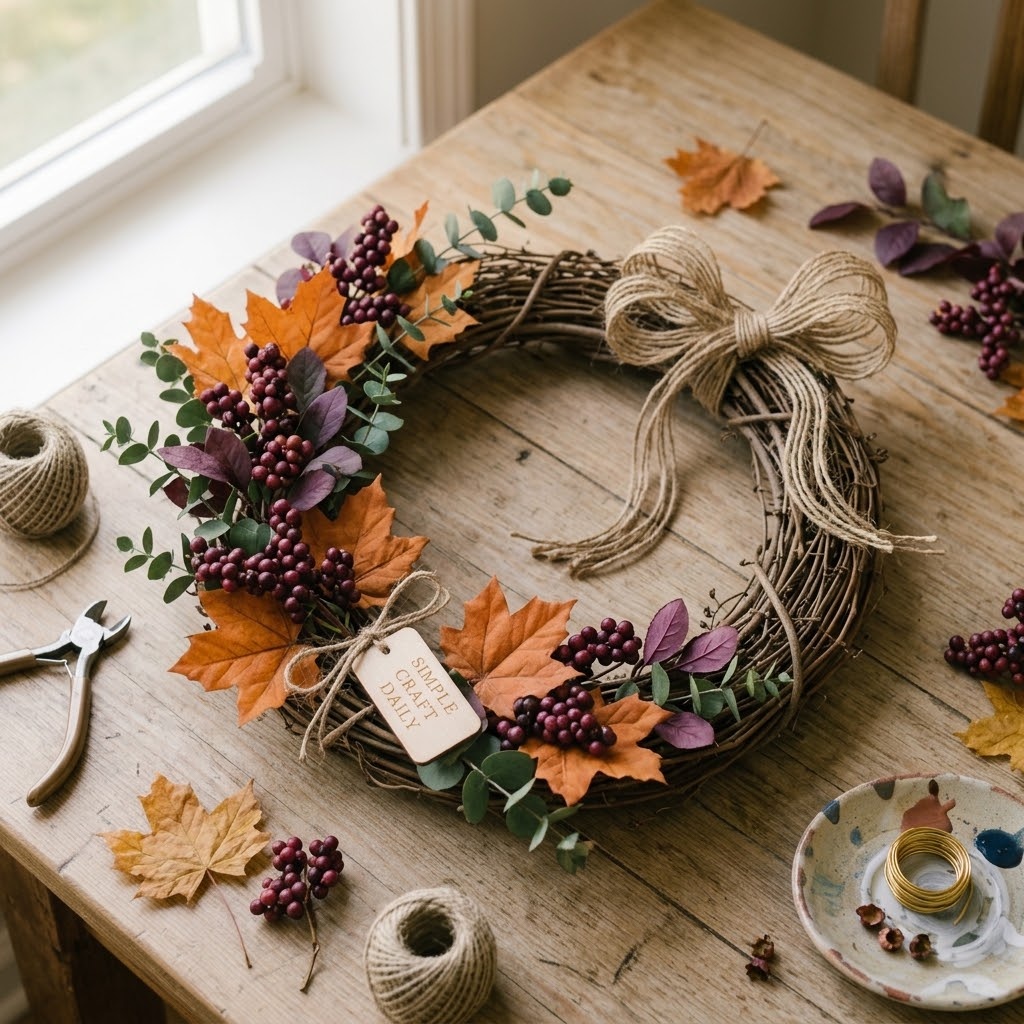
1. DIY Fall Decorations: Harvest Grapevine Door Wreath
Supplies Needed: 12-inch grapevine wreath form, artificial maple leaves and berry picks, 22-gauge floral wire, wire cutters, jute twine, low-temperature hot glue gun.
First, cut four 8-inch lengths of 22-gauge floral wire with wire cutters. Arrange maple leaves and berry picks across the lower-left third of the 12-inch grapevine wreath form, then wrap each wire around the weighted stems and through the vines. Twist the wire ends at the back and tuck the cut ends inward. Next, use small low-temperature hot-glue dots only to secure loose lightweight leaves. Tie a 10-inch jute-twine bow, glue it over the wired stems, and allow the glue to cool for 10 minutes before hanging this diy fall decoration.
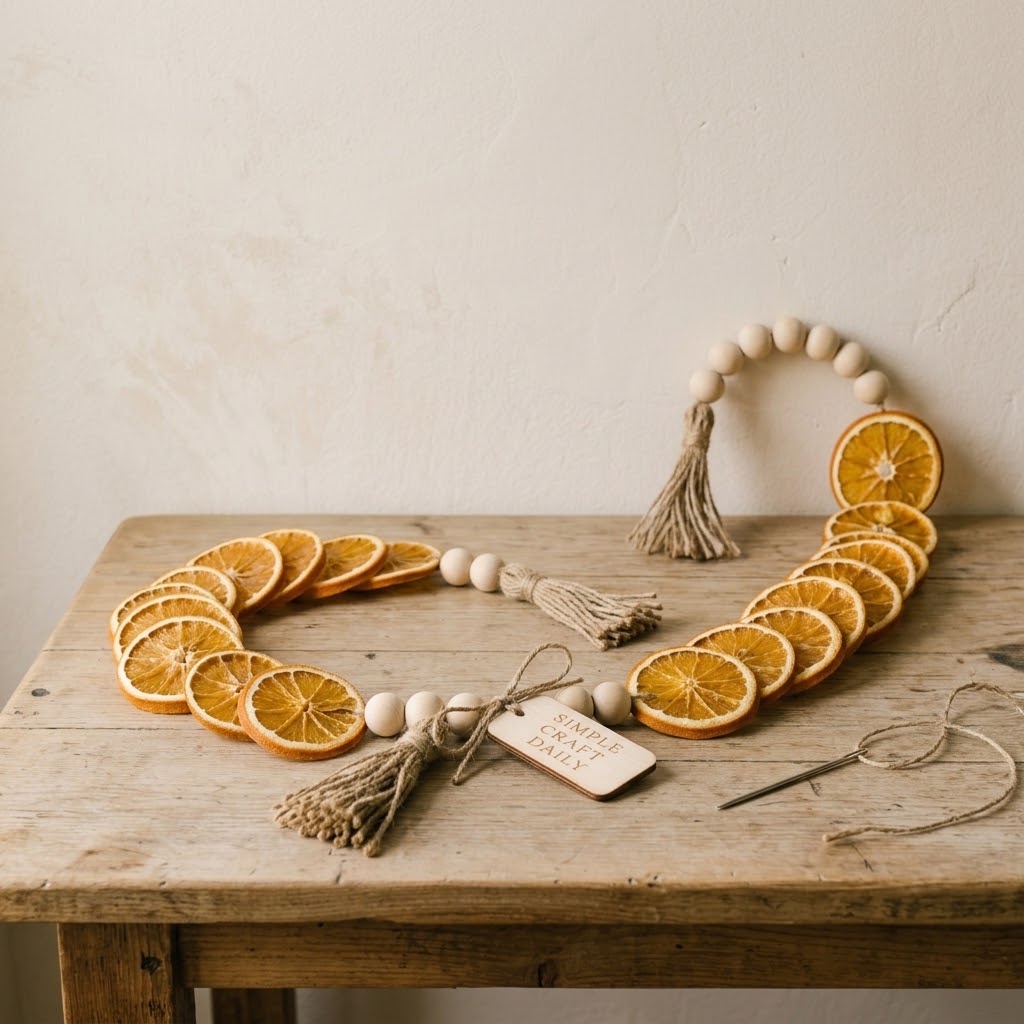
2. DIY Fall Decorations: Amber Citrus Garland
Supplies Needed: 12 dried orange slices, 14 unfinished 20-mm wood beads, 60-inch jute twine, large-eye needle, wooden skewers, scissors.
Cut a 60-inch length of jute twine with scissors; the extra length creates two secure end loops. Thread one end through a large-eye needle. If your orange slices are not pre-punched, pierce a threading hole first with an awl or a skewer. Then alternate 12 dried orange slices and 14 unfinished 20-mm wood beads across the center 48 inches, leaving roughly 2 inches between orange slices. Keep the bead pattern even by placing one or two beads between each citrus slice. Finally, knot a 3-inch hanging loop at each end and trim the tails to 1 inch. Keep this amber garland away from open flame and damp outdoor areas.
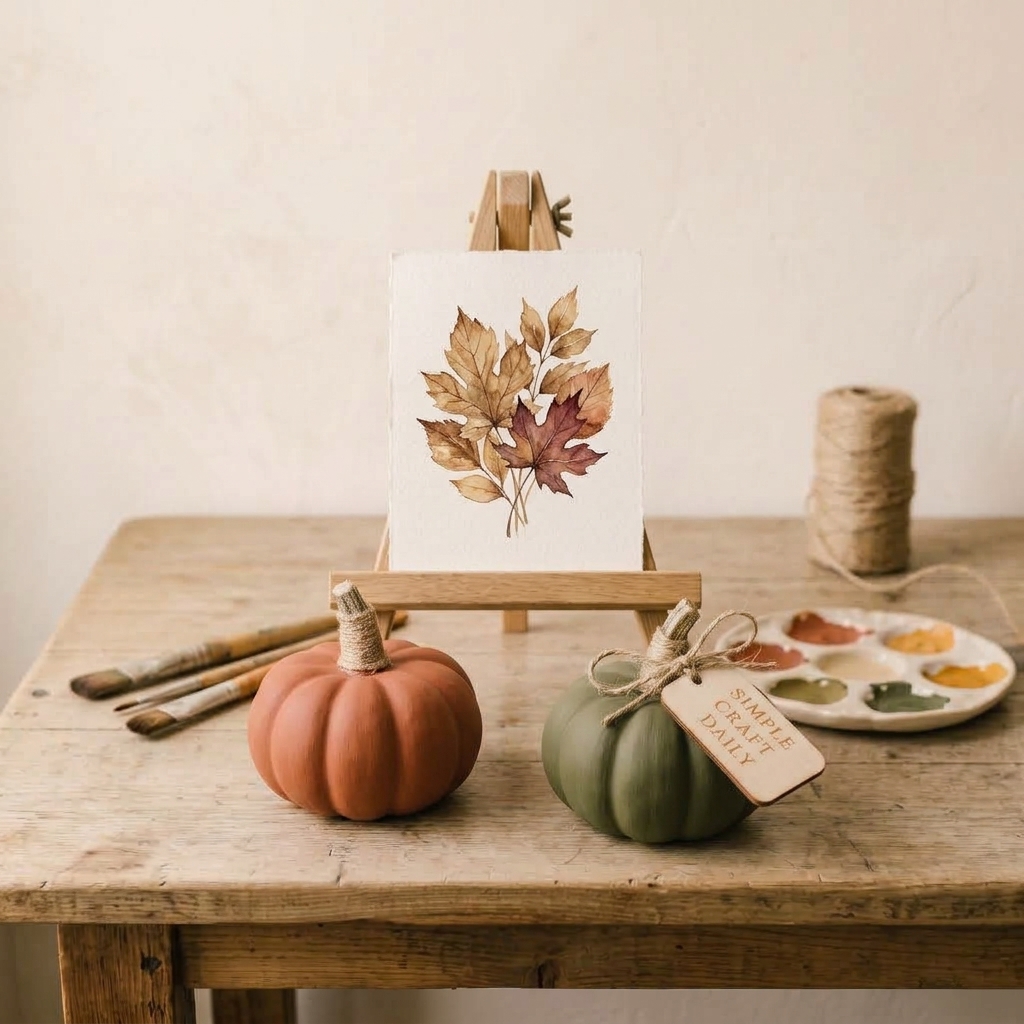
3. Matte Painted Mini Pumpkin Cluster
Supplies Needed: 3 mini foam pumpkins, ACMI AP-certified acrylic paint, paintbrushes, water-based matte acrylic varnish, jute twine.
Paint one mini foam pumpkin terracotta, one cream, and one deep olive with paintbrushes and ACMI AP-certified acrylic paint. Apply two thin coats to each pumpkin, allowing 30 to 60 minutes of drying time between coats. After the final coats have dried for 24 hours, brush on a thin layer of water-based matte acrylic varnish. Allow the varnish to cure according to its label. Then wrap jute twine around each dry pumpkin stem or replace the stem with a small wood piece. These diy fall decorations look especially polished when grouped at three different heights. Find more finish ideas in our easy pumpkin painting ideas.
4. DIY Fall Decorations: Cinnamon and Pinecone Candle Ring
Supplies Needed: 6-inch grapevine ring, pinecones, cinnamon sticks, artificial foliage, 22-gauge floral wire, flameless LED pillar.
Set a flameless LED pillar in the center of a 6-inch grapevine ring to check the open space. Remove the pillar, then bind small pinecones and cinnamon-stick pairs to the ring with 22-gauge floral wire. Tuck artificial foliage under the wire wraps until the ring looks full but remains low. Next, return the flameless LED pillar to the center, leaving at least 4 inches between the light source and every botanical material. Never use this arrangement around a real flame. The wired construction keeps the ring stable when you move it between table settings.
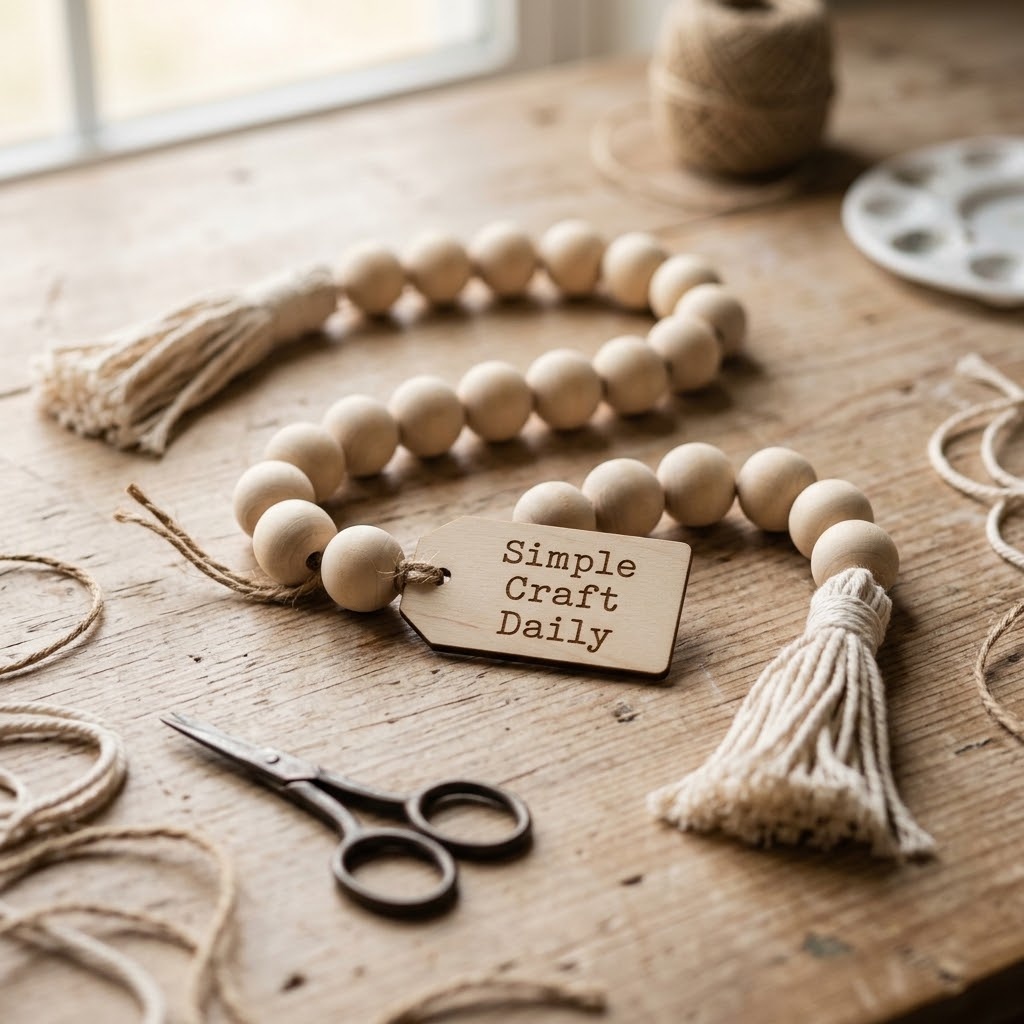
5. DIY Fall Decorations: Wood Bead Tassel Garland
Supplies Needed: 18 unfinished 20-mm wood beads, 48-inch cotton macrame cord, jute twine, scissors, large-eye needle.
Cut cotton macrame cord to 48 inches and thread it through a large-eye needle. Slide on 18 unfinished 20-mm wood beads, arranging them in six groups of three with 1 inch of exposed cord between each group. Knot the cord after the first and last bead group. Next, cut two 10-inch lengths of jute twine, fold each length in half, and wrap its folded end 10 times with a separate 8-inch piece of jute. Knot each tassel head twice, trim the fringe with scissors, and tie one tassel to each garland end.
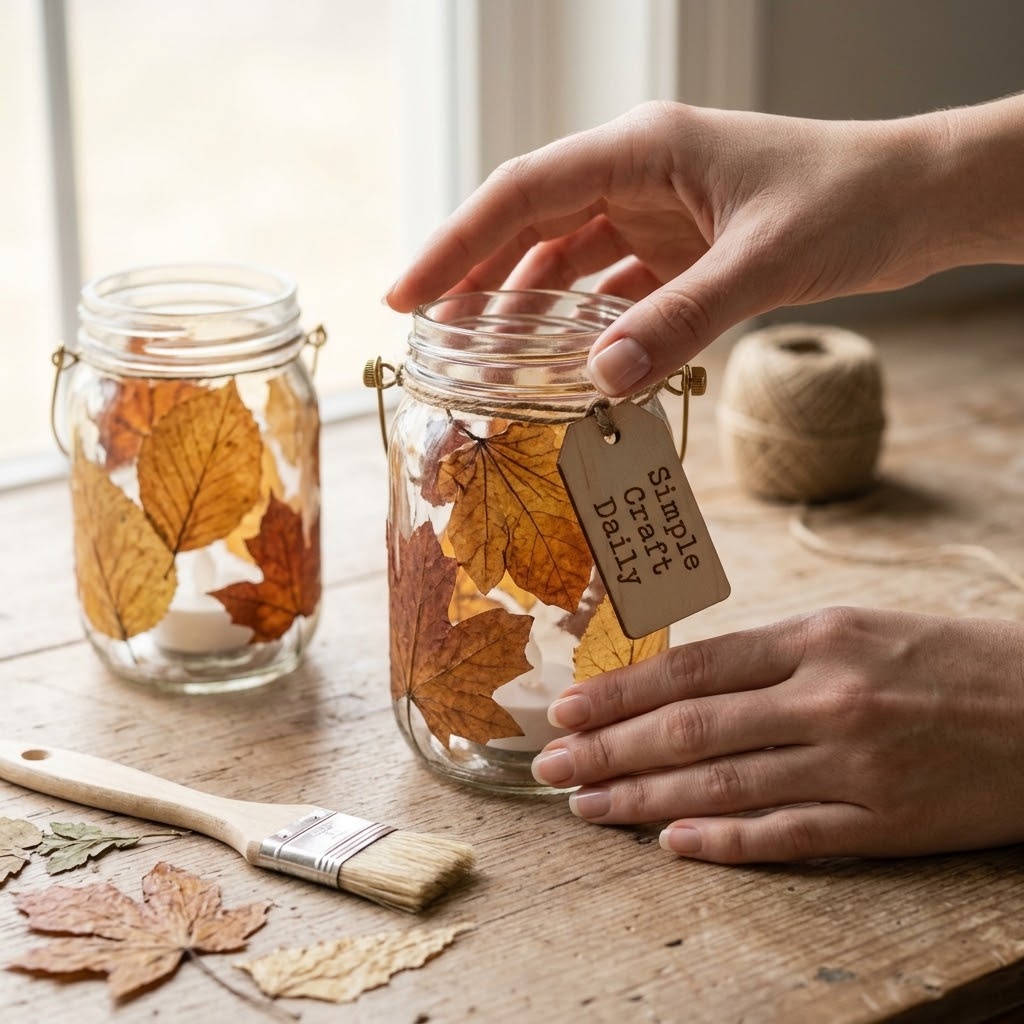
6. Pressed Leaf Glass Jar Lanterns
Supplies Needed: clean glass jars, artificial autumn leaves, water-based decoupage medium, soft flat brush, jute twine, LED tea lights.
Wash the glass jars, rinse them thoroughly, and dry them completely before applying anything. Brush a thin coat of water-based decoupage medium onto one area with a soft flat brush, press an artificial autumn leaf flat against it, then brush a second thin coat over the leaf from center to edge. Repeat with spaced leaves rather than overlapping heavy layers. Subsequently, tie jute twine around each dry jar neck after the medium has set. Allow 24 hours of drying before inserting LED tea lights. For another glass-based seasonal project, explore these glass painting and decoration ideas.
Wood Burning Tool Set with Lettering Tips
Burns names, veins and wood-sign lettering straight into unfinished boards and slices.
I earn a commission if you make a purchase, at no additional cost to you.
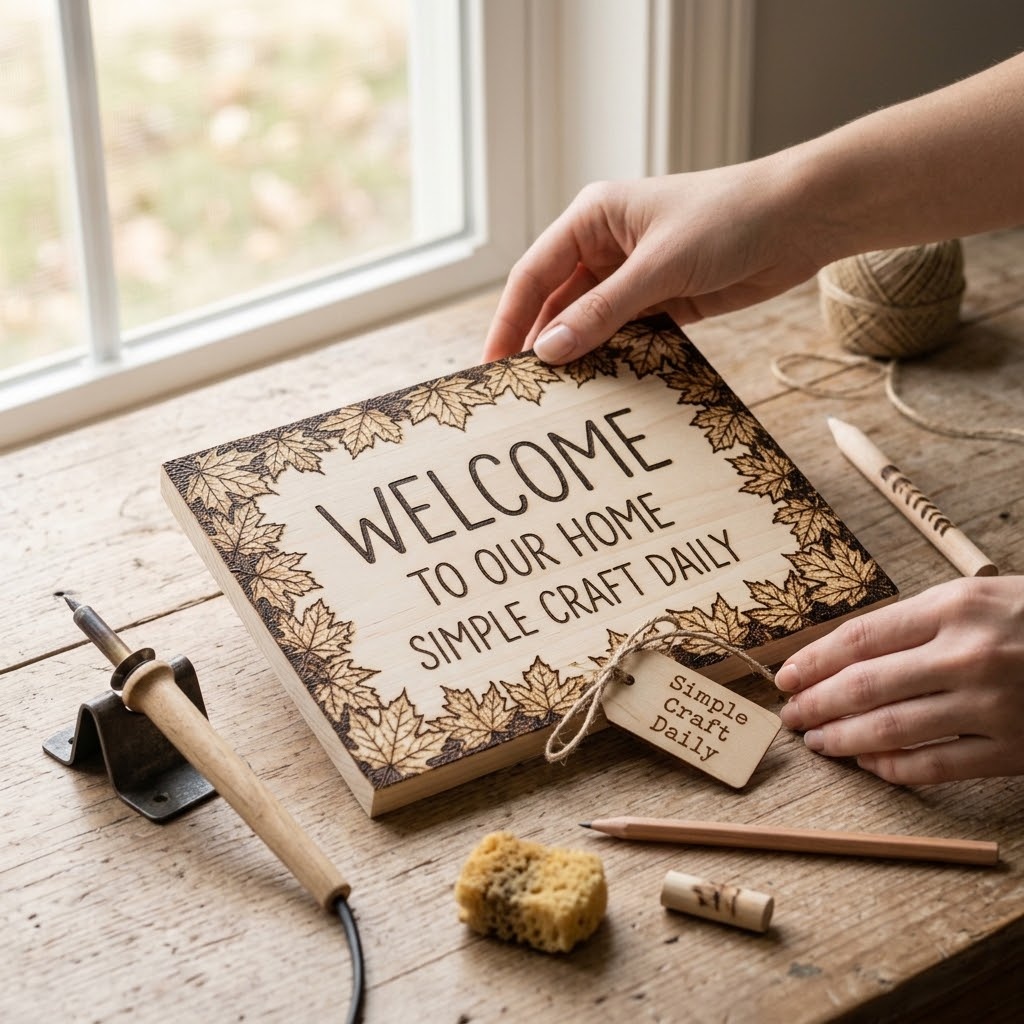
7. Rustic Wood-Burned Welcome Sign
Supplies Needed: unfinished wood plaque, wood burning tool with lettering tips, pencil, 220-grit sandpaper, jute twine, safety glasses.
Sand the unfinished wood plaque with 220-grit sandpaper until the surface feels even, then remove every trace of dust. Use a pencil to draw a simple leaf outline and a short welcome phrase. Put on safety glasses, place the wood burning tool on its stable stand, and work in a ventilated area. Trace the pencil lines slowly with the appropriate lettering tip, allowing the heated tip to make the mark rather than pressing hard. Let the plaque cool completely on a heat-safe surface such as a ceramic tile or a wooden table shielded with cardboard. Let the tool cool fully on its stand before storing it, and keep the hot tip away from skin, children, and flammable materials. Finally, thread and knot a jute-twine hanger through the plaque holes.
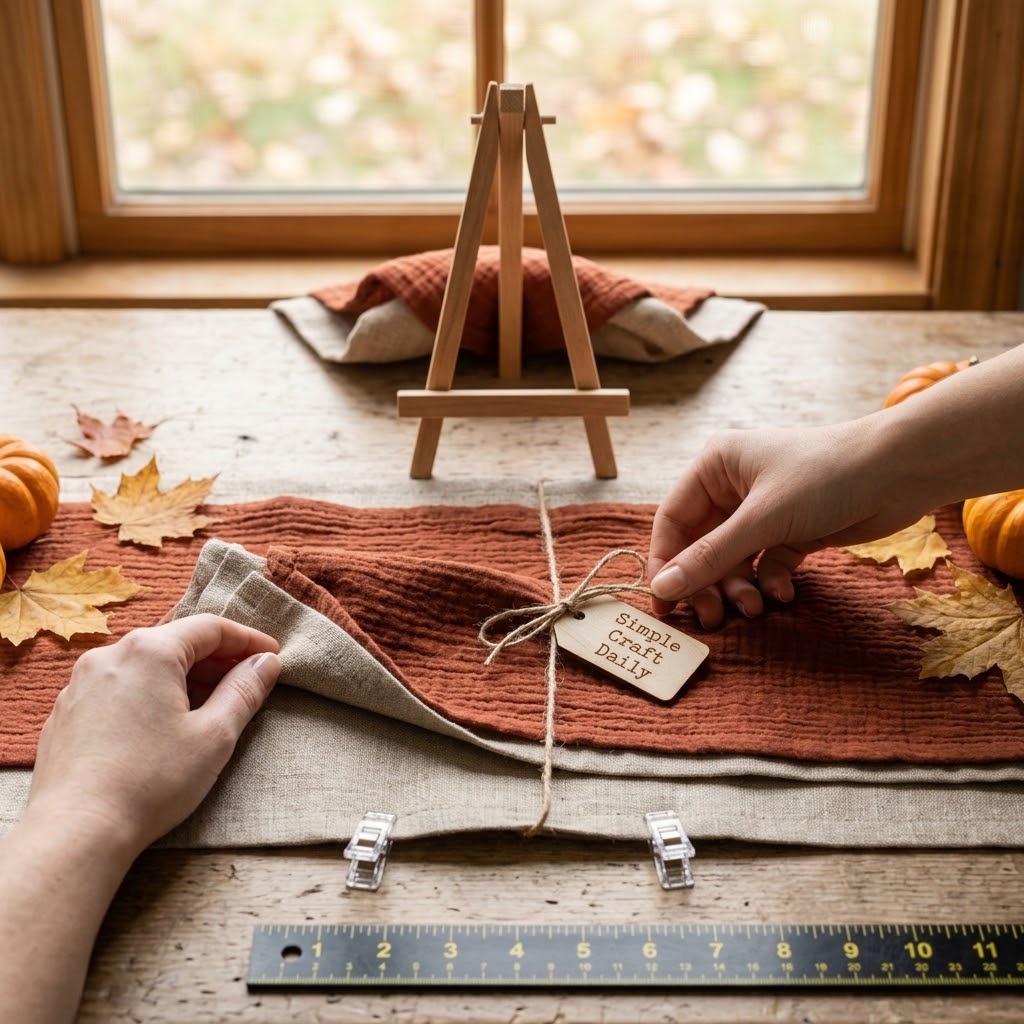
8. DIY Fall Decorations: Layered Table Runner
Supplies Needed: 14-by-72-inch linen runner, 10-by-60-inch cotton gauze, artificial leaves, fabric clips.
Lay the 14-by-72-inch linen runner on the table first. On a protected cutting surface — a rotary cutting mat if you have one, or cardboard covered with a towel — use a ruler to trim cotton gauze to 10 by 60 inches if needed. Center the gauze over the linen and gather it loosely through the middle. Secure the folds with fabric clips placed beneath the visible top layer so the display stays removable and washable. Then arrange artificial leaves down the center in small, spaced clusters. This diy fall decoration works under a bowl, a lantern group, or a row of small serving dishes.
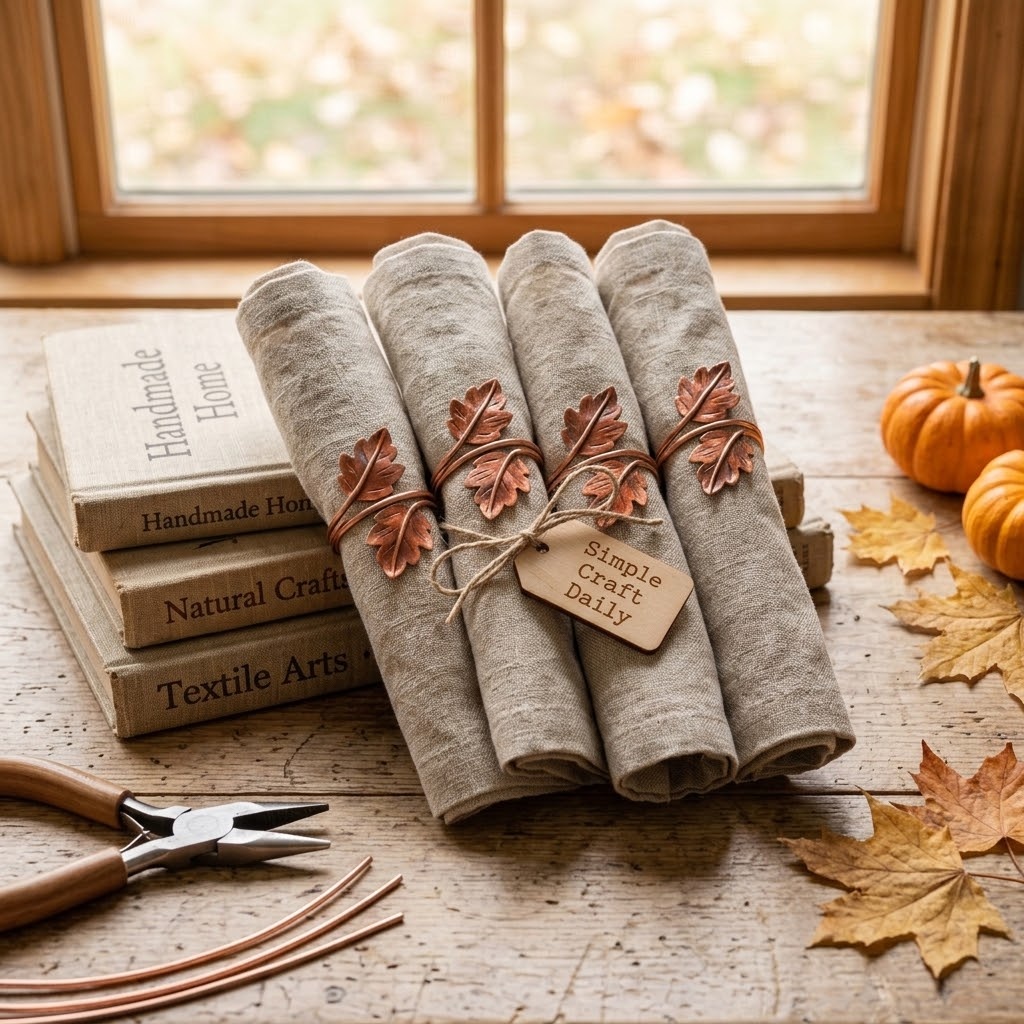
9. Copper-Toned Leaf Napkin Rings
Supplies Needed: 4 artificial leaves, 22-gauge copper floral wire, smooth-jaw pliers, wire cutters, 4 cloth napkins.
First, fold each of the four cloth napkins into a 2-inch-wide rectangle and set them aside so you can test the finished rings. Cut four 12-inch lengths of 22-gauge copper floral wire with wire cutters. Wrap each length once around a 1.5-inch diameter jar, leaving 1 inch of overlap. Remove the wire ring and use smooth-jaw pliers to tuck both cut ends inward so no sharp point touches a cloth napkin. Shape each ring into a gentle oval. After the ring shape is complete, wrap the stem of one lightweight artificial leaf around the overlap point and press the wrap closed with the pliers. Finally, slide each finished ring over one folded cloth napkin.
10. Framed Botanical Fall Print
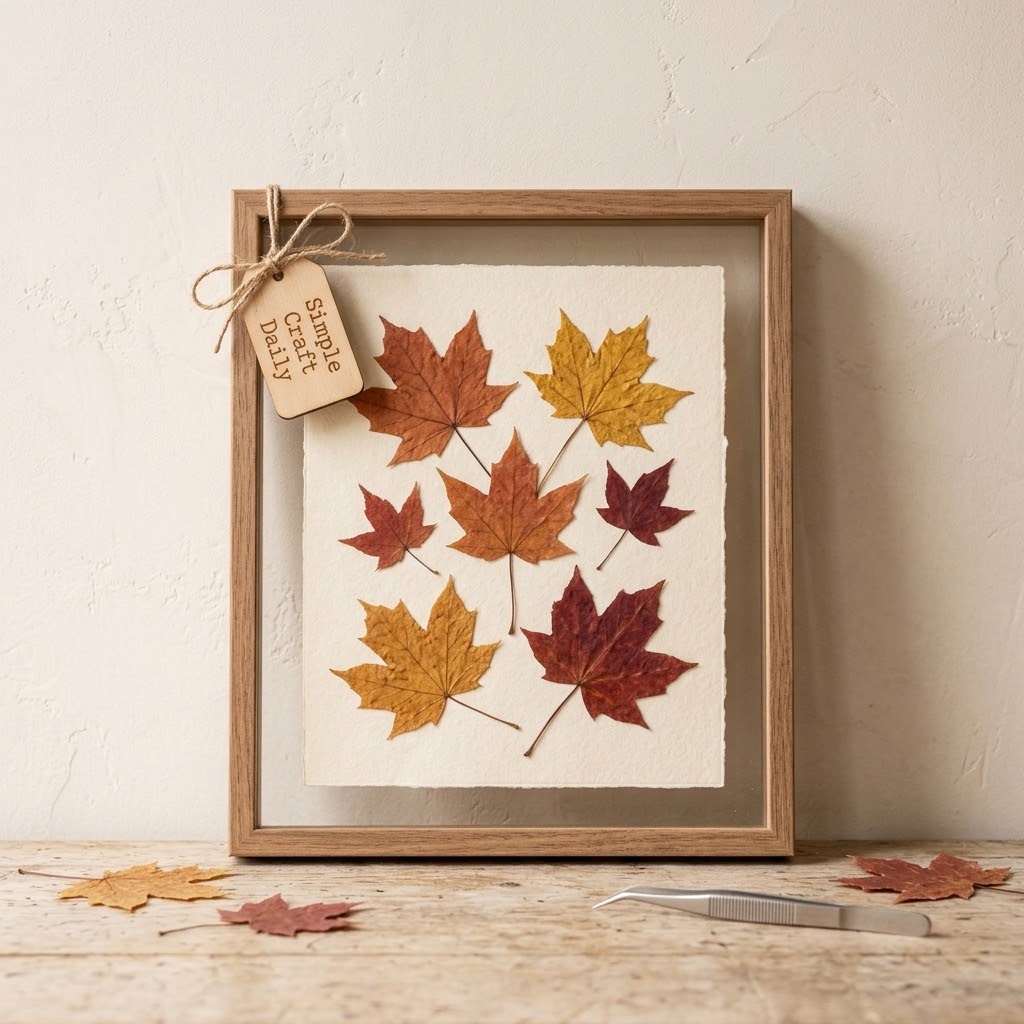
Supplies Needed: pressed leaves, 8-by-10-inch ivory cardstock, archival adhesive dots, 8-by-10-inch floating frame, precision tweezers.
Place the 8-by-10-inch ivory cardstock inside the open floating frame and arrange pressed leaves without adhesive first. Once the composition feels balanced, use precision tweezers to lift one leaf at a time. Apply two small archival adhesive dots to the back of each leaf, then press it onto the cardstock without flattening the delicate veins. Allow the adhesive to set for 30 minutes before closing the 8-by-10-inch floating frame. For another textured wall project, try these creative mosaic art ideas for home and garden.
11. DIY Fall Decorations: Painted Acorn Bowl Fillers
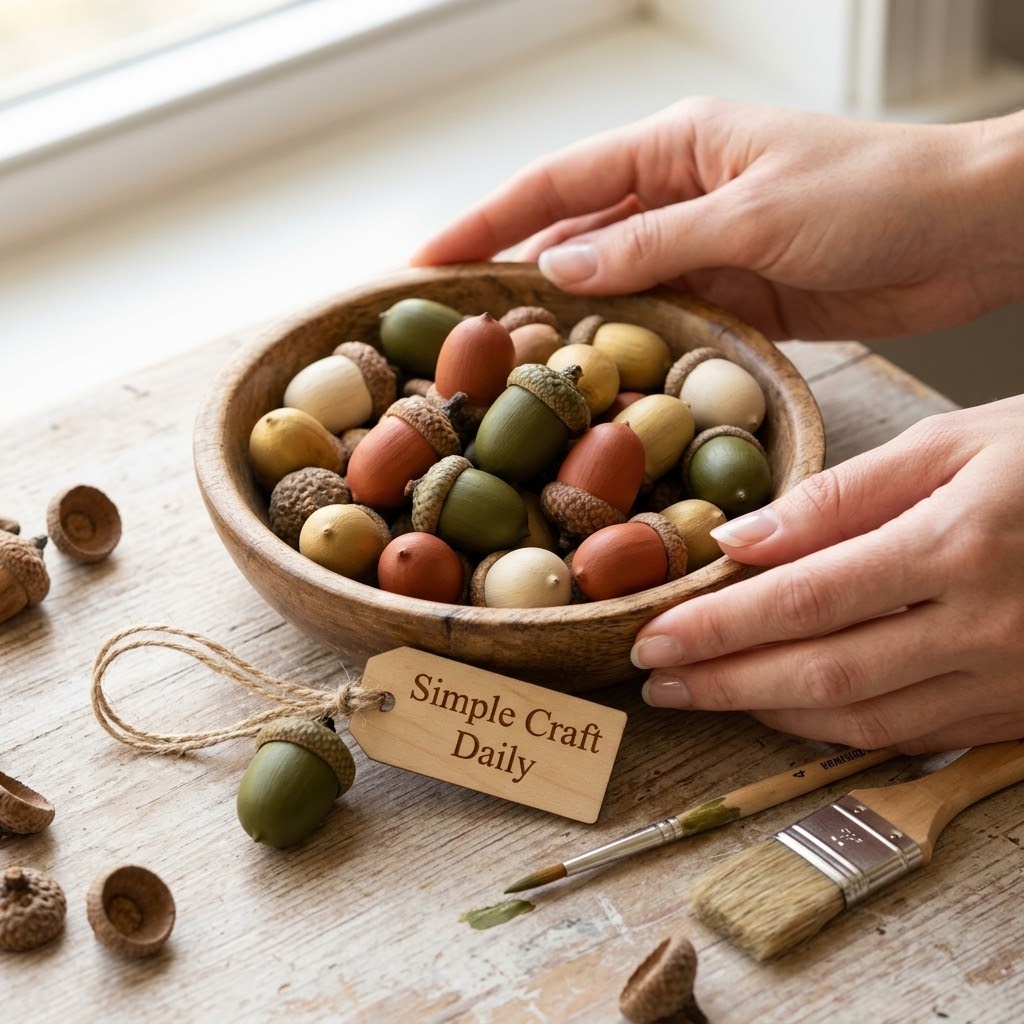
Supplies Needed: 18 clean acorns, acrylic paint, small detail brushes, water-based matte acrylic varnish, shallow wood bowl.
Choose 18 clean, intact acorns and let them air-dry fully before painting. Inspect each one for cracks, insect holes, or loose caps, then discard damaged acorns. Use small detail brushes to apply two thin coats of acrylic paint in cream, olive, rust, and muted gold, allowing 30 minutes between coats. After 24 hours of dry time, brush on water-based matte acrylic varnish and allow it to cure according to the label. Then place the fully cured acorns in a shallow wood bowl, mixing colors rather than creating separate blocks.
12. Wheat Bundle Door Hanger
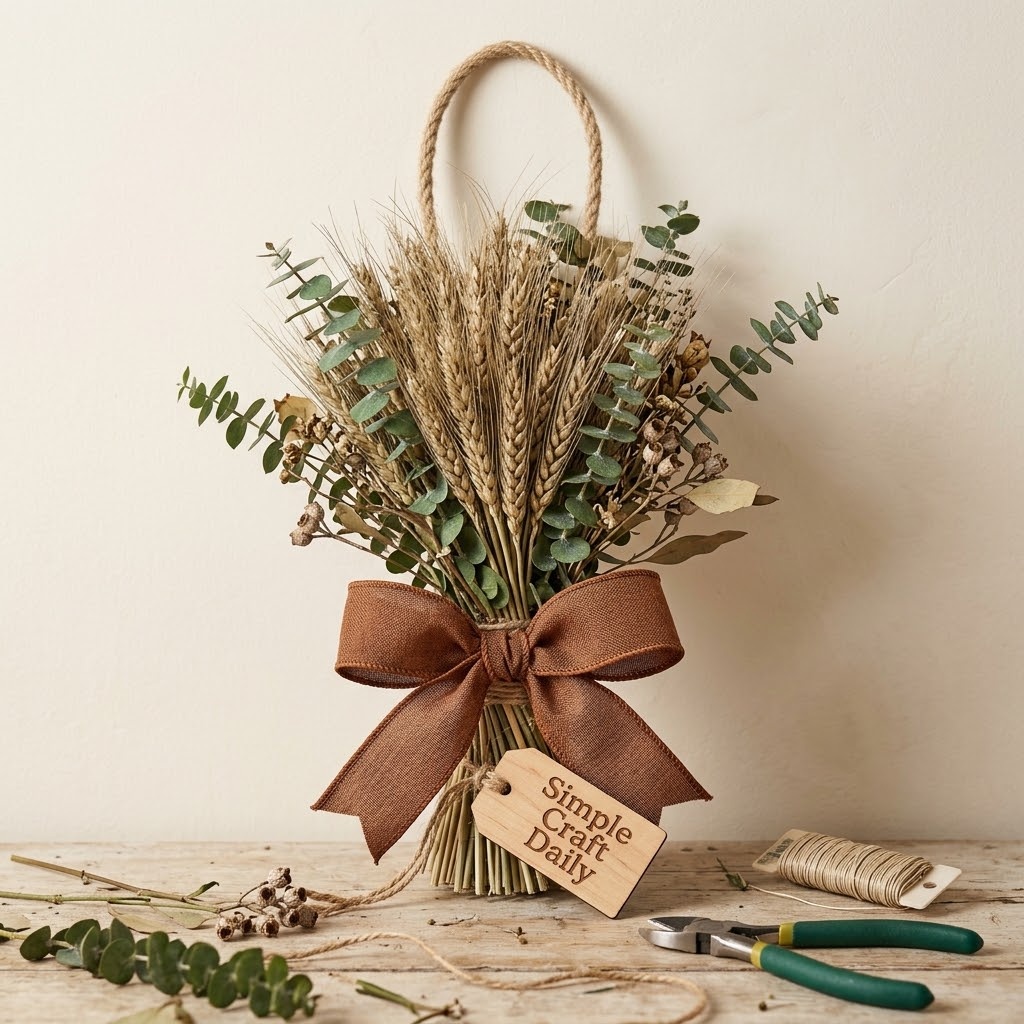
Supplies Needed: 25 to 30 dried wheat stems, faux eucalyptus stems, 22-gauge floral wire, wire cutters, 2-inch wired ribbon, jute hanging loop.
Gather 25 to 30 dried wheat stems into a full bundle, keeping the seed heads aligned. Add several faux eucalyptus stems around the outer edge. Cut an 8-inch length of 22-gauge floral wire with wire cutters, bind the bundle tightly at its midpoint, and twist the wire ends at the back. Cover the wire with a 2-inch wired-ribbon bow. Then tie the jute hanging loop around the covered midpoint and hang the finished piece from a protected indoor door hook. Keep dry wheat indoors and away from heat sources.
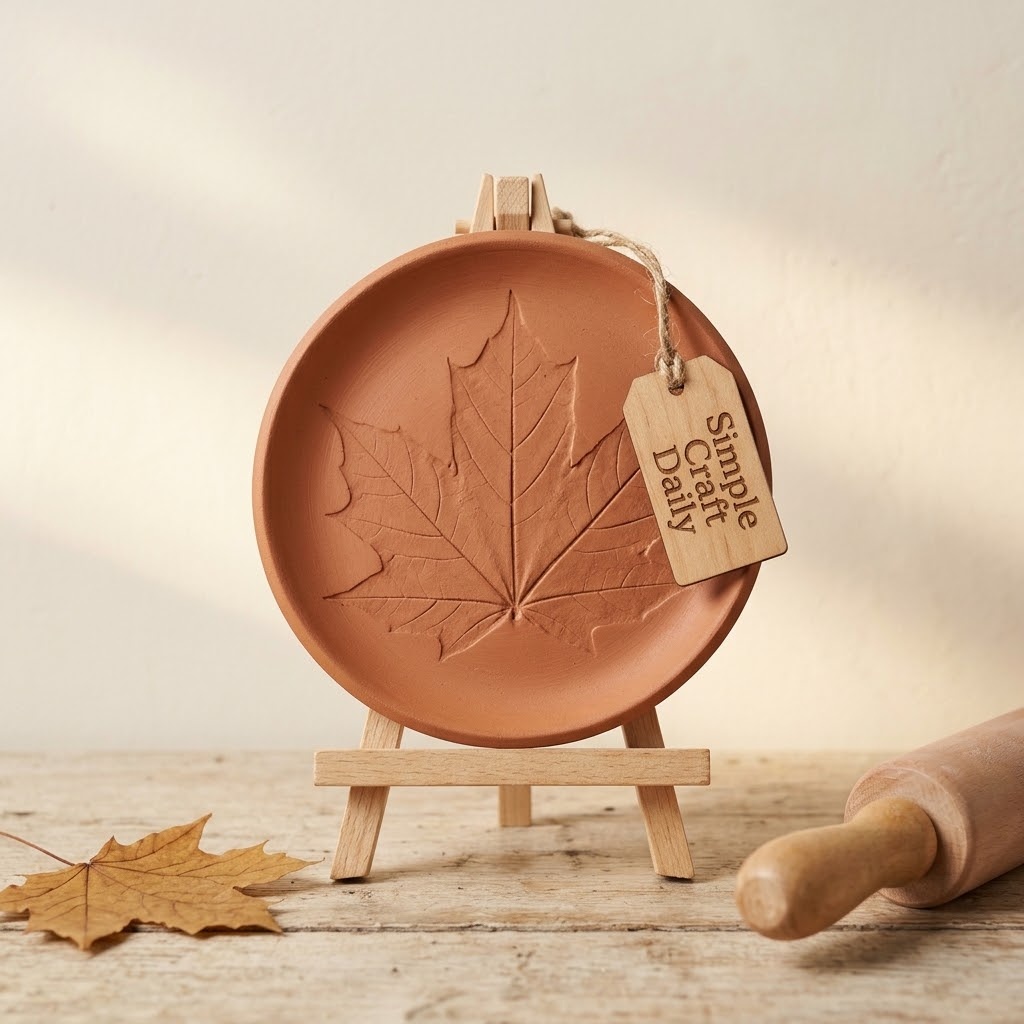
13. Leaf-Stamped Clay Trinket Dish
Supplies Needed: air-dry clay, acrylic roller with guide rings, fresh or artificial veined leaf, 4-inch bowl form, acrylic paint, water-based varnish.
Condition a palm-sized piece of air-dry clay, then roll it with an acrylic roller and guide rings until it reaches 6 mm thickness. Press a fresh veined leaf firmly into the clay and peel it away slowly — a real leaf with pronounced veins gives the most dependable impression; use an artificial leaf only if its veins are deeply raised. Cut or pinch the clay into a loose 4-inch circle, then drape it over the outside of a 4-inch bowl form. Dry the dish on the bowl for 24 hours. Next, remove it carefully and dry it flat until completely hard; drying time varies with humidity and clay thickness. Only then paint the dry surface with acrylic paint and apply water-based varnish after the paint has dried for 24 hours.
Tiered Tray
The finished display for several projects: pumpkins, acorns and taper candles in one tier.
I earn a commission if you make a purchase, at no additional cost to you.
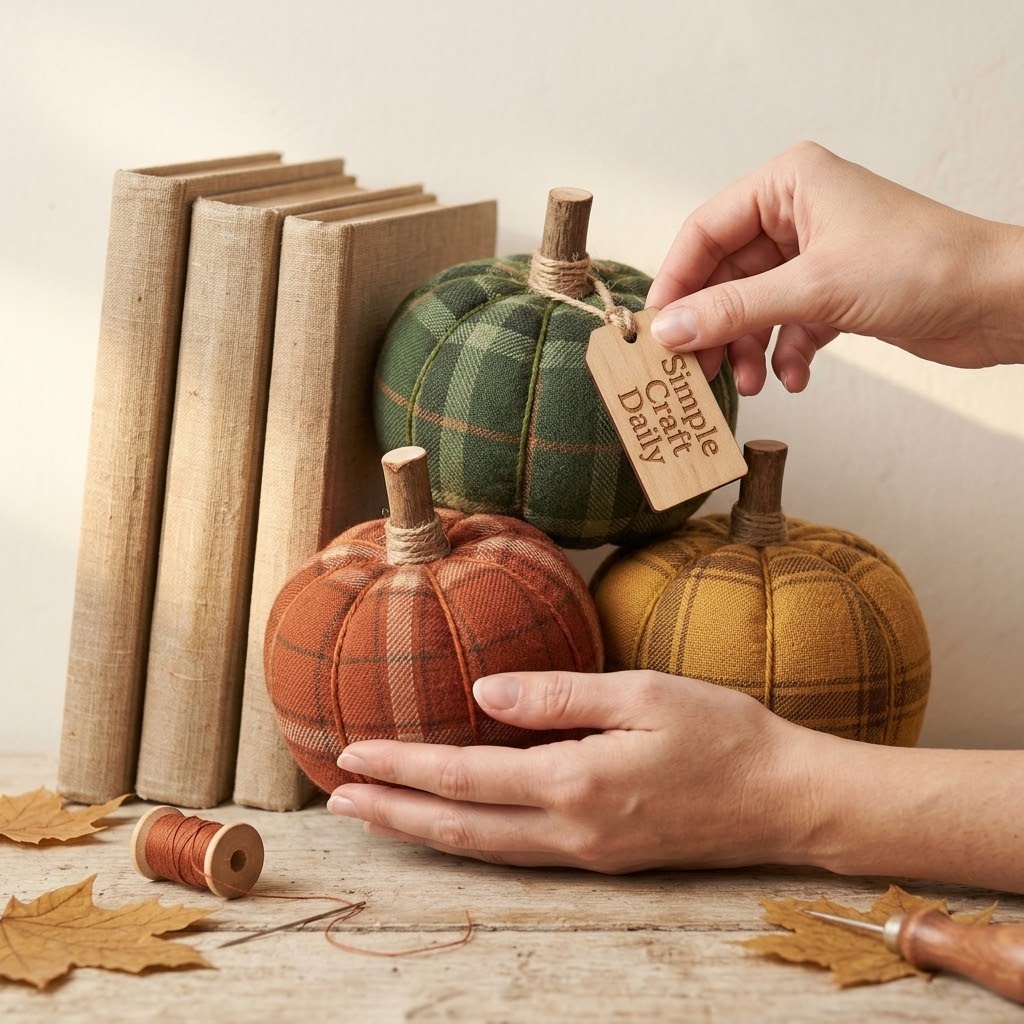
14. Cozy Plaid Fabric Pumpkins
Supplies Needed: plaid cotton fabric, polyester fiberfill, polyester sewing thread, hand-sewing needle, embroidery floss, small wood stems.
Cut three 8-by-18-inch rectangles from plaid cotton fabric. With polyester sewing thread and a hand-sewing needle, sew the long edges of each rectangle together using a 1/4-inch seam allowance to form a tube. Gather one open end with a running stitch, pull it closed, and knot the thread twice. Turn the tube right side out, fill it firmly with polyester fiberfill, then gather and close the top. Next, thread embroidery floss through the center, wrap it around the stuffed form six times to make six deep segments, and knot the floss at the top. Finally, stitch or glue a small wood stem onto the closed top.
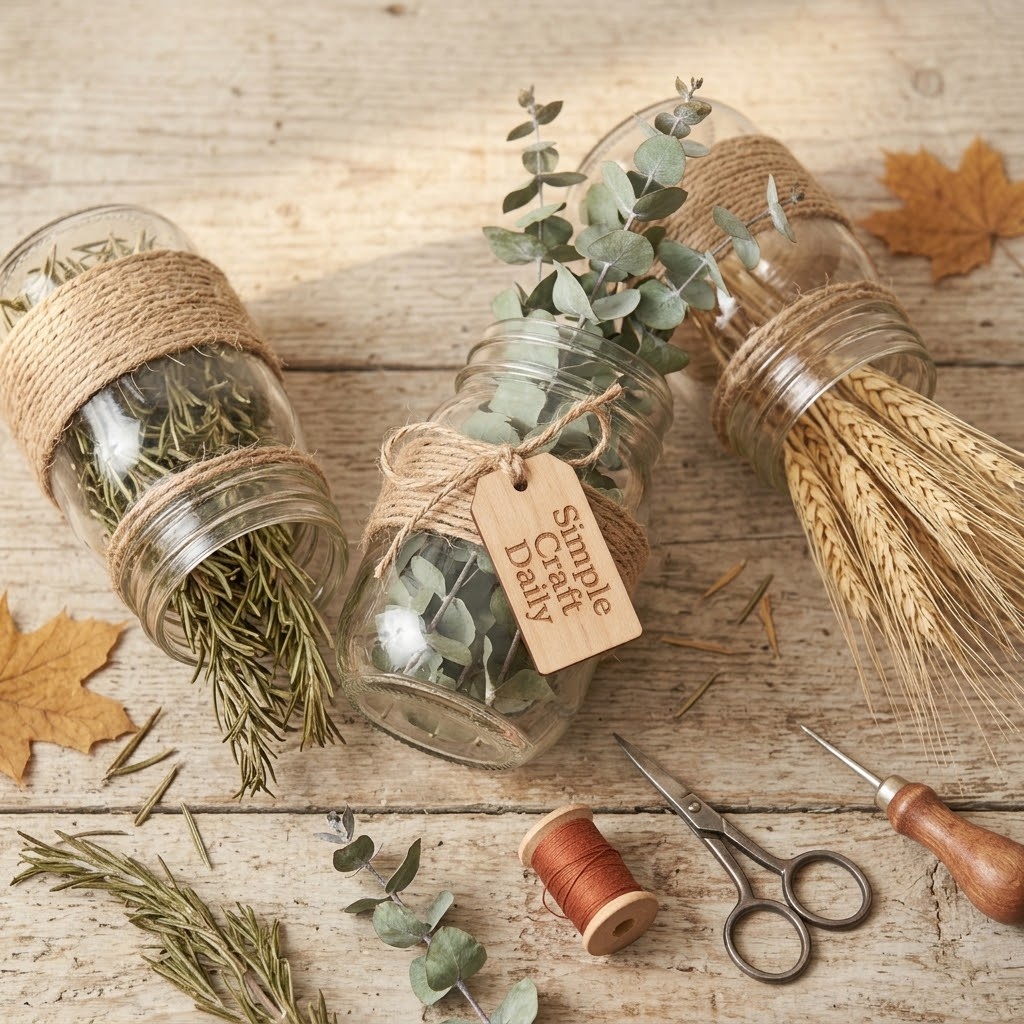
15. DIY Fall Decorations: Mason Jar Herb Vases
Supplies Needed: 3 clean mason jars, 72 inches jute twine, low-temperature hot glue gun, dried rosemary, dried eucalyptus, wheat stems.
Clean and dry three mason jars. Cut the 72 inches of jute twine into three 24-inch lengths. Wrap one length around the neck of each jar three times, then secure the back seam with a small bead from a low-temperature hot glue gun. Hold the twine in place until the glue grips, and allow each seam to cool for 10 minutes. Subsequently, insert dried rosemary, dried eucalyptus, and wheat stems after the glue has cooled. These diy fall decorations work best as dry displays, since moisture can stain jute and soften the glue bond.
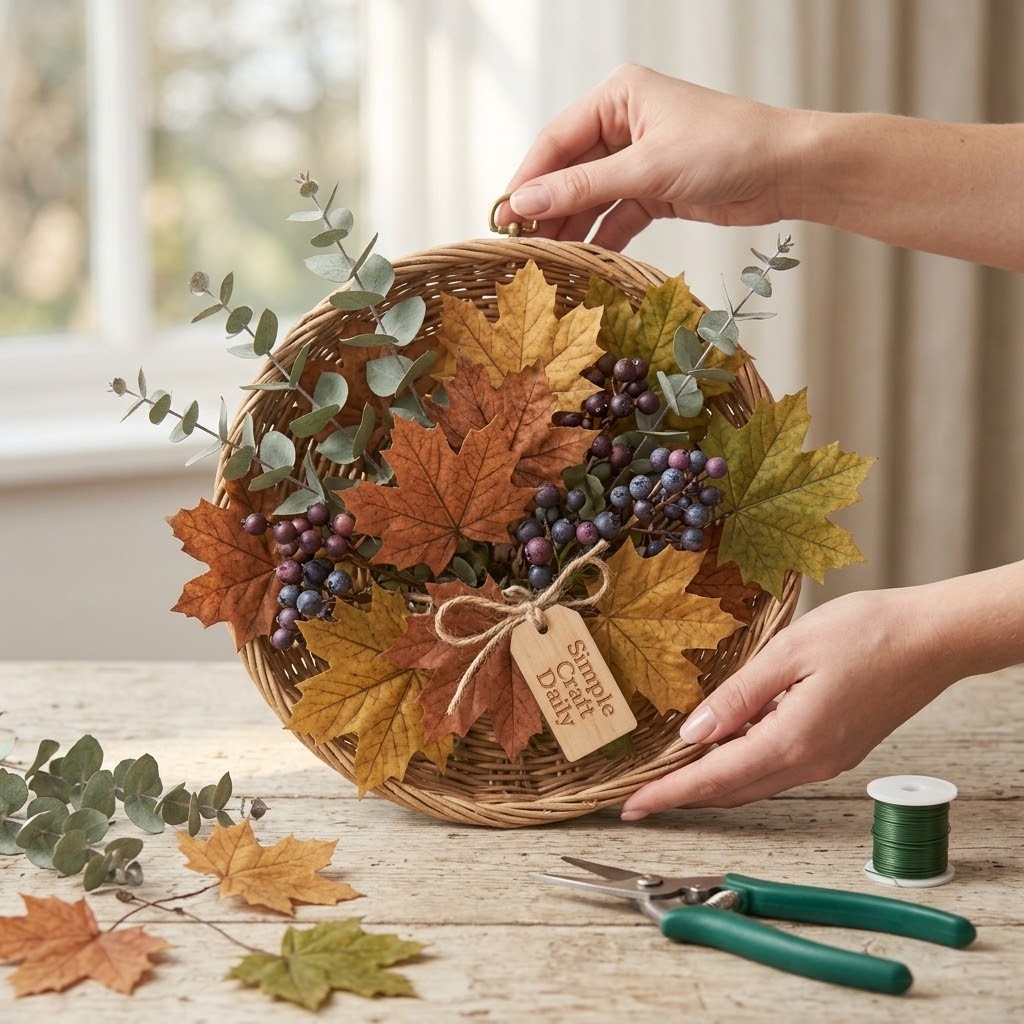
16. Leafy Wall Basket Arrangement
Supplies Needed: woven wall basket, artificial maple leaves, berry picks, faux eucalyptus, 22-gauge floral wire, low-temperature hot glue gun.
Begin with the woven wall basket on a flat work surface. Insert the longest faux eucalyptus stems at the back, then wire their bases to the basket handle or weave with 22-gauge floral wire. Add artificial maple leaves through the middle layer and secure their weighted stems with more wire. Place berry picks near the center as the focal point. Finally, add a few lightweight leaves at the front with small dots of low-temperature hot glue. Let the glue cool for 10 minutes before hanging the basket upright.
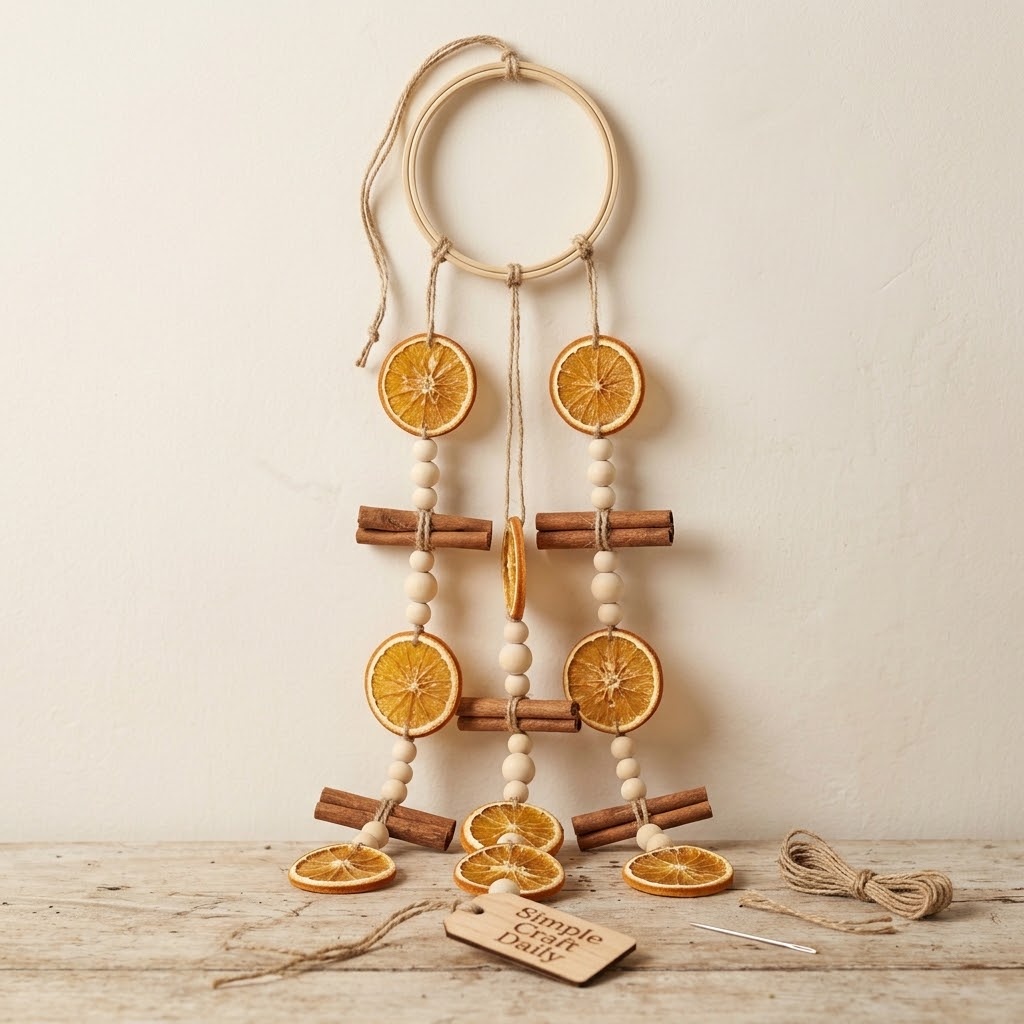
17. Cinnamon Stick and Orange Slice Mobile
Supplies Needed: 12-inch wood hoop, 3 dried orange slices, 6 cinnamon sticks, 72 inches jute twine, large-eye needle, wooden skewers, scissors.
Cut three equal 20-inch lengths and one 12-inch length from the jute twine. Knot the three lengths evenly around a 12-inch wood hoop, spacing them into a triangle. Tie the 12-inch length to the hoop at two opposite points to form a balanced hanging handle. Thread a large-eye needle onto each strand, then add one dried orange slice per strand — pierce it with an awl or skewer first if it is not pre-punched. Cinnamon sticks are solid and cannot be threaded, so lash each one to its strand by wrapping the twine twice around the middle of the stick and knotting firmly. Position the pieces at matching heights before tying final double knots below each component. Hold the hoop up and check its balance. If one side dips, slide a cinnamon stick or orange slice slightly toward the center before tightening the final knots. Hang the mobile where it will stay dry and clear of open flame.
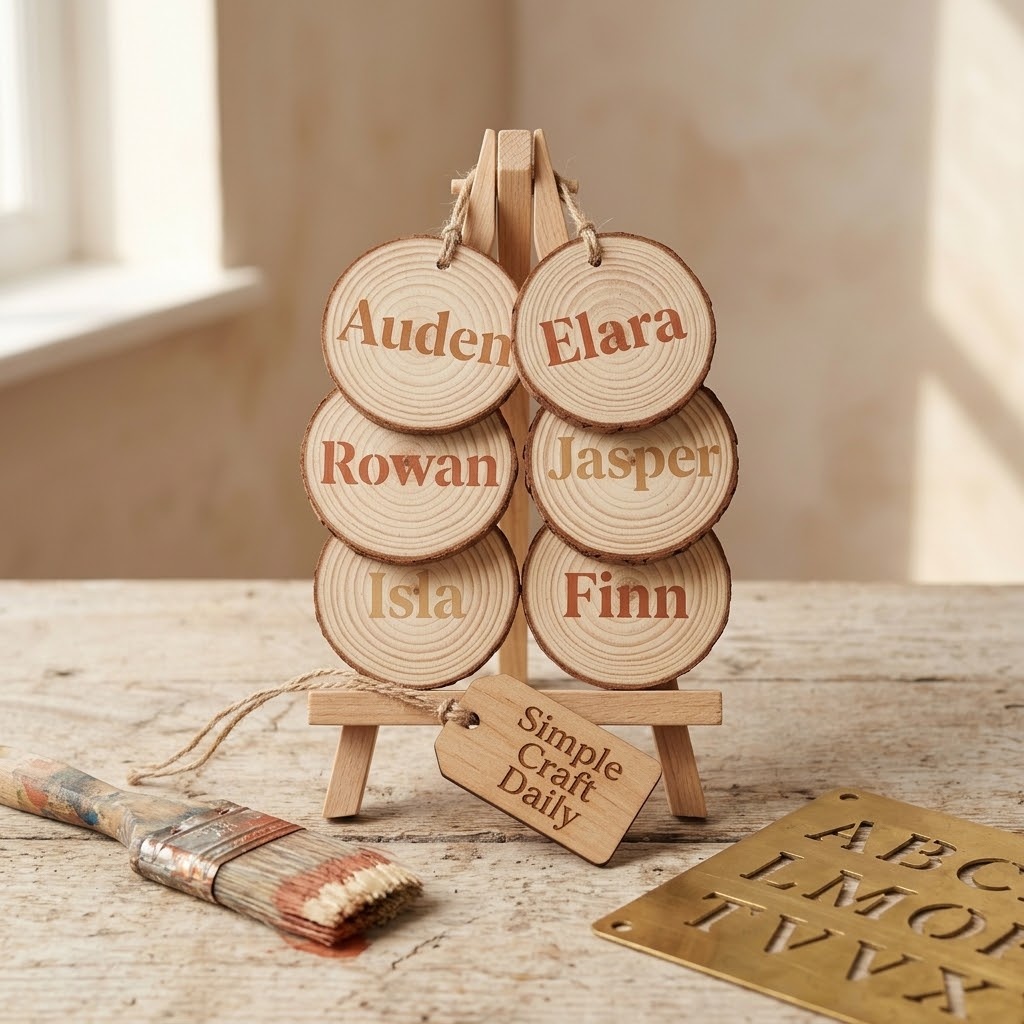
18. Stenciled Wood Slice Place Cards
Supplies Needed: 6 wood slices, 2.5-inch diameter, letter stencils, acrylic paint, stencil brush, 220-grit sandpaper, water-based matte varnish.
Lightly sand the face of each 2.5-inch wood slice with 220-grit sandpaper and wipe away dust. Position letter stencils on six slices, one name per slice. Load a stencil brush with acrylic paint, then remove most of the paint onto scrap paper until the brush feels nearly dry. Dab color through the stencil with short vertical taps to prevent paint bleed. Lift the stencil straight up and allow the lettering to dry for 24 hours. Finally, brush on one thin coat of water-based matte varnish and cure it according to the label before placing the cards at the table.
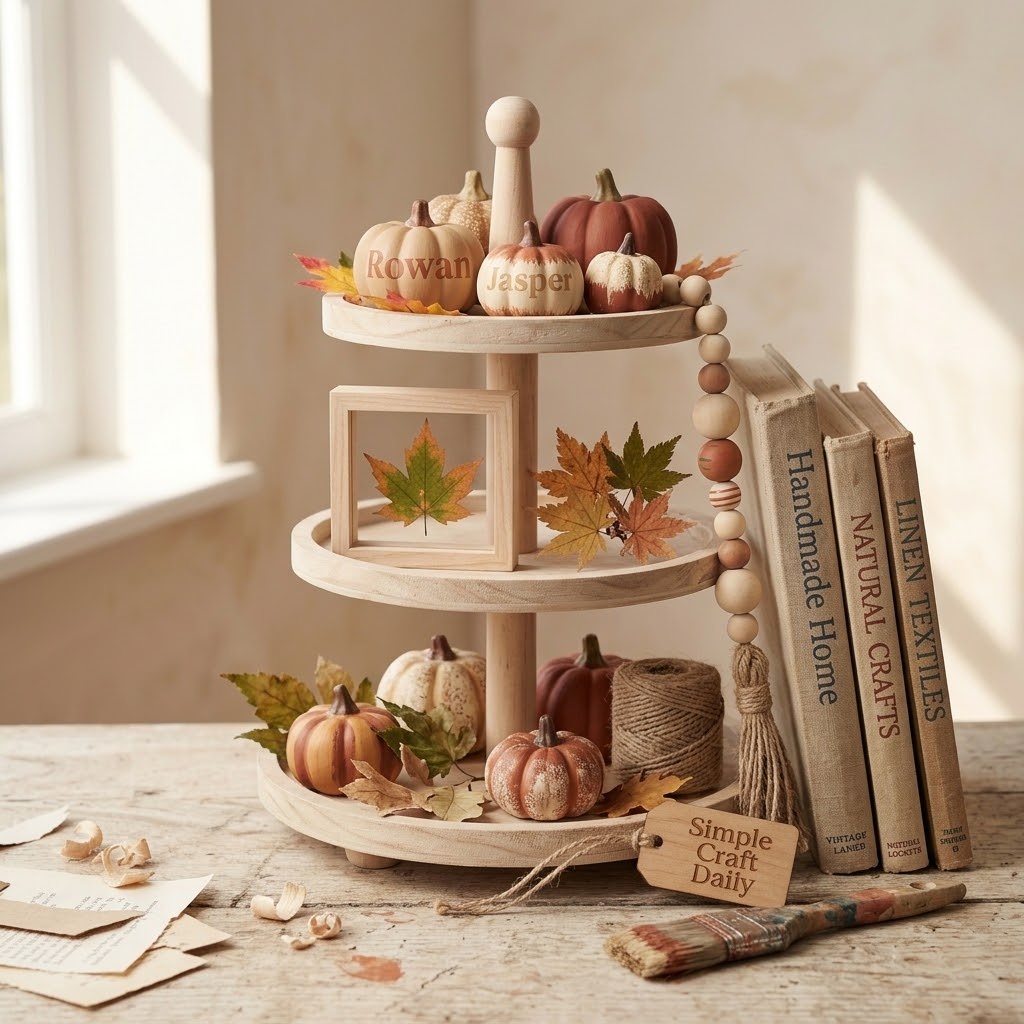
19. DIY Fall Decorations: Pumpkin Tiered Tray Set
Supplies Needed: tiered tray, 3 mini painted pumpkins, small wood bead garland, mini framed botanical print, artificial leaves.
Confirm that the three mini painted pumpkins are fully dry and that any paint or adhesive on the small wood bead garland and mini framed botanical print has cured. Place the largest painted pumpkin on the bottom tier first. Add the smaller pumpkins on the upper tiers, using odd-numbered groupings and leaving 1 to 2 inches of visible tray surface around each cluster. Then loop the small wood bead garland loosely around one tier and lean the mini framed botanical print against the back edge. Tuck artificial leaves into open spaces without covering the tray’s functional edges.
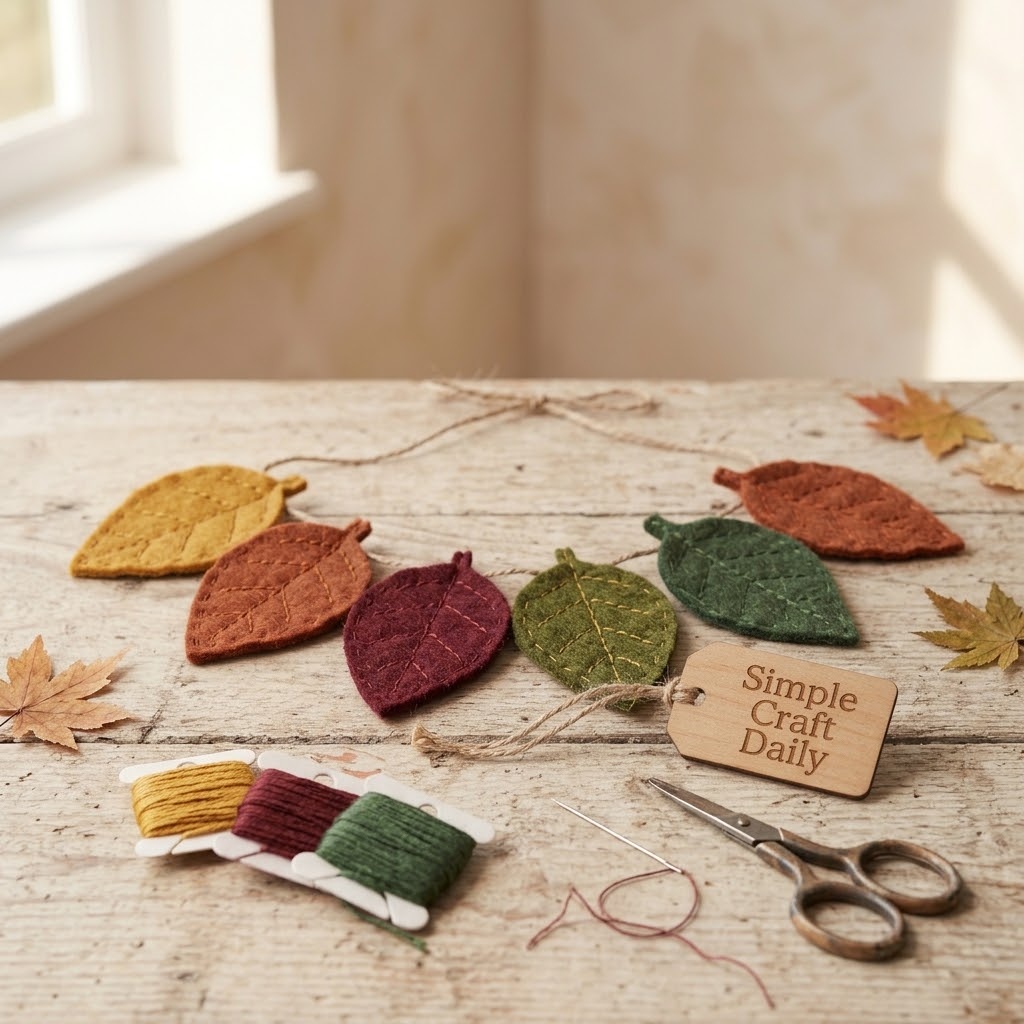
20. Embroidered Felt Leaf Garland
Supplies Needed: wool-blend felt in autumn colors, embroidery floss, embroidery needle, fabric scissors, 54-inch cotton cord, and scrap paper for the leaf template.
Draw or trace a simple leaf on scrap paper, then use fabric scissors to cut eight felt leaves measuring about 3 by 4 inches from wool-blend felt in autumn colors. Thread an embroidery needle with two strands of embroidery floss. Stitch a center vein with a running stitch, then add three or four short angled veins on each side of every leaf. Cut cotton cord to 54 inches. Next, thread each leaf onto the cord through its stitched center, leaving 4 to 5 inches between leaves. Knot the cord on both sides of each leaf so the spacing remains fixed. This soft diy fall decoration hangs well across a mantel or shelf.
DIY Fall Decorations FAQ
How long do painted DIY fall decorations need to dry before sealing?
Allow acrylic paint to dry for 24 hours before applying water-based matte varnish. Thin coats may feel dry sooner; however, the full day gives moisture beneath the surface time to escape. After varnishing, follow the product label for cure time before stacking, arranging, or storing pieces.
Can DIY fall decorations safely use real candles?
Use flameless LED candles around dried oranges, cinnamon, wheat, foliage, fabric, paper, jute, and wood. Real flames can ignite nearby decorative materials, even when the arrangement appears spacious. Therefore, keep candle rings and jar lanterns for LED lights only.
How do I keep a fall wreath from shedding or loosening?
Wire every weighted stem, pinecone, and berry pick directly to the grapevine base before adding glue. Hot glue works best for final lightweight leaves and the finishing bow rather than load-bearing pieces. Then store the wreath flat in a covered box or hang it on a wide hook to avoid crushing the foliage.
Which DIY fall decorations store well for next year?
Painted pumpkins, fabric pumpkins, wood bead garlands, wood signs, felt garlands, and faux-foliage wreaths store especially well in dry labeled bins. Wrap framed prints and clay dishes in plain tissue paper. Avoid storing natural citrus, untreated acorns, or dried botanicals in damp areas because humidity can cause discoloration or mold.
Grapevine Wreath Forms, 12 inch
The base structure for the wreath projects: natural vine holds pins and wire without splitting.
I earn a commission if you make a purchase, at no additional cost to you.
Quick Reference: All Supplies at a Glance
For your convenience, here is a quick summary of all materials and tools used in this tutorial:
✨ Consumable Raw Materials
- Assorted Artificial Autumn Maple Leaves and Berry Picks | Check Assorted Artificial Autumn Maple Leaves and Berry Picks on Amazon
- Natural Dried Orange Slices | Check Price on Amazon
- Natural Jute Twine | Check Natural Jute Twine on Amazon
- Cotton Macrame Cord | Check Cotton Macrame Cord on Amazon
- Unfinished Wood Beads, 20 mm | Find Unfinished Wood Beads, 20 mm on Amazon
- Mini Craft Pumpkins and Gourds | See Price on Amazon
- ACMI AP-Certified Acrylic Paint Set in Autumn Colors | See ACMI AP-Certified Acrylic Paint Set in Autumn Colors on Amazon
- Grapevine Wreath Forms, 12 inch | View on Amazon
- Natural Cinnamon Sticks | Check Natural Cinnamon Sticks on Amazon
- Natural Pinecones | Check Price on Amazon
- Pressed Fall Leaves | View Pressed Fall Leaves on Amazon
- Clear Glass Jars | Find Clear Glass Jars on Amazon
- Unfinished Wood Sign Board | See Unfinished Wood Sign Board on Amazon
- Plaid Cotton Fabric | Explore Plaid Cotton Fabric on Amazon
- Clean Natural Acorns | Find on Amazon
- Dried Wheat Stems | Check Dried Wheat Stems on Amazon
- Air Dry Clay | Check Price on Amazon
- Polyester Fiberfill | Find Polyester Fiberfill on Amazon
- Polyester Sewing Thread | Check Polyester Sewing Thread on Amazon
- Natural Wall Basket | See Natural Wall Basket on Amazon
- Unfinished Wood Slice Blanks | Explore Unfinished Wood Slice Blanks on Amazon
- Wool Felt Sheets | Find on Amazon
- Embroidery Floss | Check Embroidery Floss on Amazon
- Linen Fabric for Table Runner | Check Linen Fabric for Table Runner on Amazon
- Cotton Gauze Fabric | Check Cotton Gauze Fabric on Amazon
- Archival Adhesive Dots | Check Archival Adhesive Dots on Amazon
- Faux Eucalyptus Stems | Check Faux Eucalyptus Stems on Amazon
- 2-Inch Wired Ribbon | Check 2-Inch Wired Ribbon on Amazon
- Wooden Craft Hoop, 12 inch | Check Wooden Craft Hoop, 12 inch on Amazon
- Ivory Cardstock, 8×10 | Check Ivory Cardstock, 8×10 on Amazon
- Cloth Napkins, Set of 4 | Check Cloth Napkins, Set of 4 on Amazon
- Shallow Wood Bowl | Check Shallow Wood Bowl on Amazon
- Tiered Tray | Check Tiered Tray on Amazon
- Small Wood Stems | Check Small Wood Stems on Amazon
- Grapevine Wreath Ring, 6 inch | Check Grapevine Wreath Ring, 6 inch on Amazon
- Dried Rosemary | Check Dried Rosemary on Amazon
- Dried Eucalyptus Stems | Check Dried Eucalyptus Stems on Amazon
- Mini Floating Frame | Check Mini Floating Frame on Amazon
🧰 Core Crafting Tools & Equipment
- Low-Temperature Mini Hot Glue Gun with Glue Sticks | Find on Amazon
- Wire Cutters | Check Wire Cutters on Amazon
- Wood Burning Tool Set with Lettering Tips | Check Price on Amazon
- Large-Eye Sewing Needles | Explore Large-Eye Sewing Needles on Amazon
- Craft Scissors | View on Amazon
- Flat Paintbrush Set | Find on Amazon
- Acrylic Clay Roller | View Acrylic Clay Roller on Amazon
- Hand-Sewing Needles | Check Hand-Sewing Needles on Amazon
- Letter Stencil Set | View on Amazon
- Small Embroidery Needles | Check Price on Amazon
- 220-Grit Sandpaper | Check 220-Grit Sandpaper on Amazon
- Safety Glasses | Check Safety Glasses on Amazon
- Smooth-Jaw Pliers | Check Smooth-Jaw Pliers on Amazon
- Fabric Clips | Check Fabric Clips on Amazon
- Precision Tweezers | Check Precision Tweezers on Amazon
- Clay Bowl Form, 4 inch | Check Clay Bowl Form, 4 inch on Amazon
- Graphite Pencil | Check Graphite Pencil on Amazon
- Heat-Safe Tool Stand | Check Heat-Safe Tool Stand on Amazon
- Stencil Brush | Check Stencil Brush on Amazon
- Detail Paint Brushes | Check Detail Paint Brushes on Amazon
- Clay Roller Guide Rings | Check Clay Roller Guide Rings on Amazon
- Wooden Skewers | Check Wooden Skewers on Amazon
- Clear Quilting Ruler | Check Clear Quilting Ruler on Amazon
💎 Hardware, Fasteners & Finishing
- Water-Based Matte Acrylic Varnish | Explore Water-Based Matte Acrylic Varnish on Amazon
- Floral Wire, 22 Gauge | Check Floral Wire, 22 Gauge on Amazon
- Battery Tea Lights | See Price on Amazon
- Copper Craft Wire, 22 Gauge | Check Copper Craft Wire, 22 Gauge on Amazon
- Water-Based Decoupage Medium | Check Water-Based Decoupage Medium on Amazon
- Flameless LED Pillar Candle | Check Flameless LED Pillar Candle on Amazon
- Floating Frame, 8×10 | Check Floating Frame, 8×10 on Amazon
Important Crafting Safety Notes
Crafting is a rewarding creative activity, but maintaining a safe workshop environment is essential for yourself, your family, and your pets. Please review these vital safety precautions before starting:
• Personal Protective Equipment (PPE) & Safe Handling: Always wear safety glasses or protective eyewear when cutting metal wire, clipping jump rings, trimming hard findings, or using power tools to prevent flying shards. Use heat-resistant work mats and exercise caution around high-temperature glue guns, irons, or heating tools to avoid burns. Wear disposable nitrile gloves and a particle dust mask when sanding wood or working with clays, resins, and solvent-based sealants to protect your skin and lungs.
• Room Ventilation & Fume Safety: Always craft in a well-ventilated space with open windows, cross-ventilation, or active exhaust whenever using solvent-based adhesives, instant bonders, aerosol sprays, epoxy resins, or heat-curing materials. Never inhale chemical fumes directly, and allow finished pieces to off-gas and cure completely in an airy area away from everyday living spaces.
• Child & Pet Safety (Choking & Swallowing Prevention): Small craft components—including safety eyes, split rings, clasps, jump rings, beads, bells, small magnets, unbaked clay scraps, and loose polyester fiberfill—present severe choking, intestinal obstruction, and ingestion hazards for babies, toddlers, and pets. Keep all unattached hardware, yarn cutoffs, and stuffing strictly out of reach. For handmade gifts intended for infants or young children, omit plastic washer eyes and detachable findings entirely in favor of securely stitched, double-knotted embroidered details.
• Sharp Tool Storage & Clean Work Area: Store sharp tools—such as rotary cutters, craft knives, bent-tip yarn needles, snips, scissors, and jewelry pliers—in secure, latching cases or high cabinets immediately after use. Thoroughly inspect, sweep, or vacuum your craft area and floor after finishing to ensure no dropped needles, pins, wire clippings, or small findings remain where curious pets or bare feet could step on or swallow them.
• Certified, Quality & Non-Toxic Supplies: Always choose verified non-toxic craft supplies (such as ACMI AP-certified paints and adhesives, lead-free and nickel-free jewelry findings, and skin-safe materials). Follow manufacturer label guidelines for curing durations, safe operating temperatures, and proper product disposal. Never use food preparation utensils or kitchen cookware for craft chemicals.
For more detailed guidance on safe crafting practices, liability disclosures, and website usage, please review our Terms and Conditions.
“Which of these DIY Fall Decor Ideas You’ll Absolutely Love for a Cozy Home ideas are you excited to try first, or do you have a creative tip of your own to share? Drop a comment below—I’d love to hear your thoughts and see what you create!”



[…] your own with paint, texture, and restrained metallic detail. If you enjoy seasonal makes, our 20 cozy DIY fall decorations offer warm color ideas, while these easy decorative clay magnets pair beautifully with the daisy […]