Every sewist knows the familiar struggle of a constantly growing pile of leftover textiles. Instead of throwing these beautiful offcuts away, you can transform them into incredibly useful tools for your workspace. Tackling easy fabric scrap projects is a fantastic way to practice sustainable crafting while keeping your creative area perfectly organized. Furthermore, these tiny handmade tools will make your future sewing sessions much more efficient.

If you enjoyed organizing your daily essentials with our recent upcycled denim wallets, you will certainly love organizing your craft desk next. Indeed, creating your own bespoke sewing equipment adds a wonderful personal touch to your studio. Therefore, diving into easy fabric scrap projects is the perfect weekend activity.
Here are 10 brilliant easy fabric scrap projects you can sew to upgrade your sewing room today.
Top 10 Easy Fabric Scrap Projects for Your Workspace
1. Pattern Weight Doughnuts: Fun Easy Fabric Scrap Projects
Pinning delicate fabrics can sometimes leave permanent holes. Therefore, pattern weights are an essential tool for cutting out garments smoothly. Making them in the shape of colorful doughnuts turns a basic utility item into a delightful desk accessory. Undoubtedly, this is one of the most playful easy fabric scrap projects available.
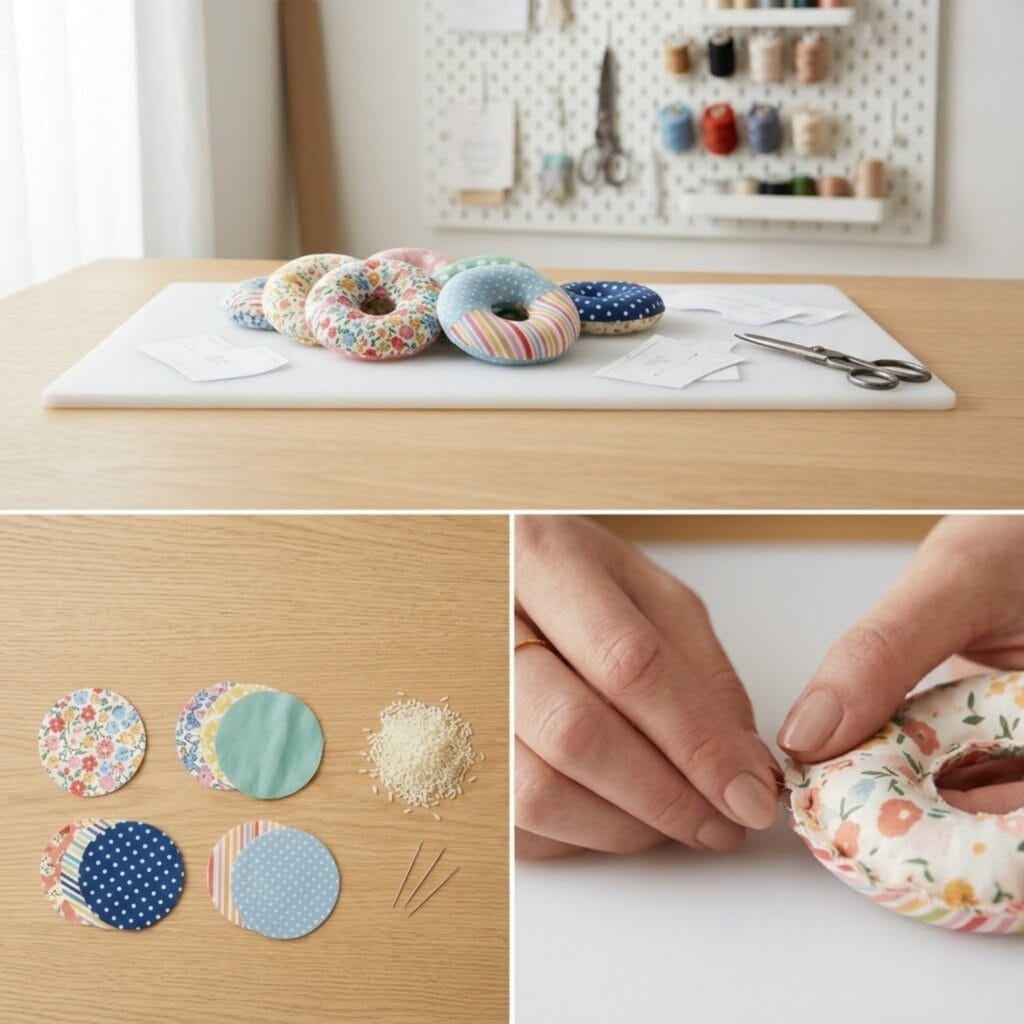
- Special Supplies: Bright cotton fabric leftovers, washed dry rice or small metal washers for weight, and a basic hand-sewing needle.
- How to Make It: First, cut two identical circles from your fabric and cut a smaller hole in the exact center of each. Next, place the right sides together and sew around the outer edge. Then, turn the fabric right side out. Carefully fold the raw edges of the inner center hole inward and hand-stitch them halfway closed. Afterward, fill the inside cavity tightly with dry rice. Finally, blind-stitch the remaining gap perfectly shut.
Pro-Tip: Interestingly, using a small paper funnel makes pouring the dry rice into the curved fabric tube much easier and prevents a messy workspace.
2. The Hexagon Pattern Needle Book
Keeping track of loose hand-sewing needles is incredibly difficult. Consequently, a dedicated needle book is a must-have for any crafter. This design uses the classic English paper piecing method to create a stunning honeycomb cover. As a result, it ranks highly among beautiful easy fabric scrap projects.
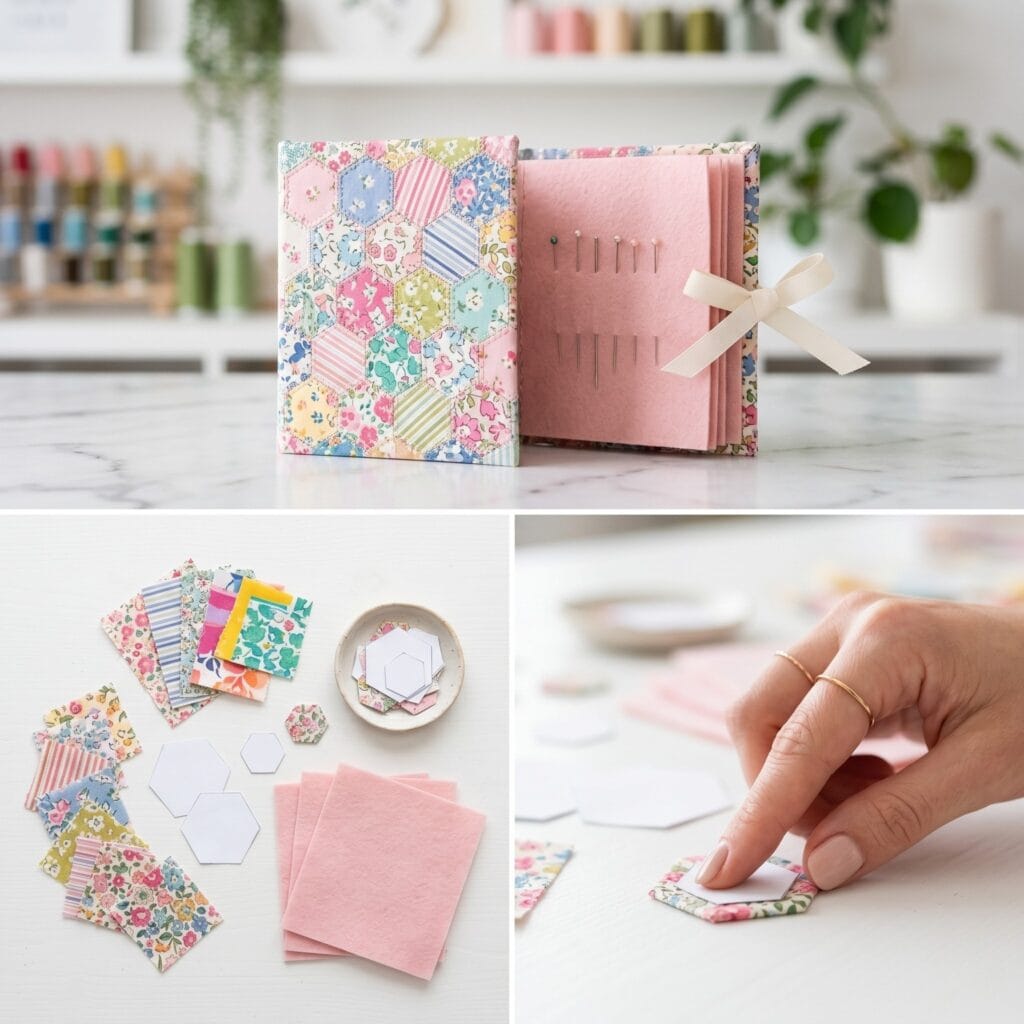
- Special Supplies: Tiny assorted fabric scraps, paper hexagon templates, soft wool felt for the interior pages, and a ribbon closure.
- How to Make It: First, wrap your tiny fabric pieces around the paper hexagon templates and baste them in place. Next, whipstitch the edges of the hexagons together to form a solid rectangular cover. Then, carefully remove the paper backings once the cover is secure. Afterward, cut your wool felt into rectangles slightly smaller than the cover. Finally, stack the felt pages inside the cover and sew a single straight line down the center spine to bind the book together.
Pro-Tip: Always use pure wool felt or high-quality wool blend felt for the interior pages. Synthetic craft felt can easily dull your sharp needles over time.
3. The Wrist Pin Cushion: A Classic Easy Fabric Scrap Project
Reaching across the cutting table for your pins interrupts your workflow constantly. Specifically, a wrist pin cushion solves this problem by keeping your pins exactly where your hands are. It is undoubtedly one of the most practical easy fabric scrap projects you can try.
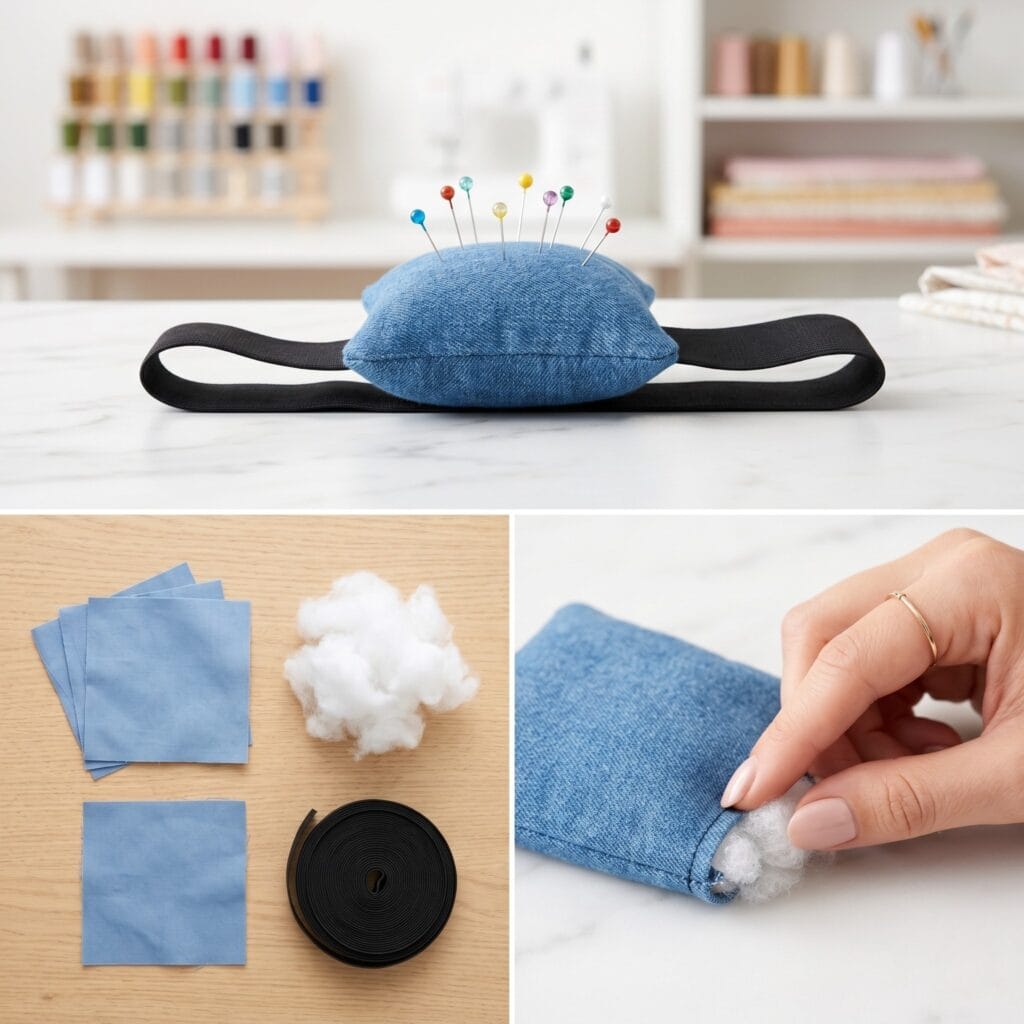
- Special Supplies: Soft cotton scraps, a wide elastic band, and premium polyester fiberfill stuffing.
- How to Make It: First, cut a fabric square for the top and a matching square for the bottom. Next, sew the right sides together, leaving a small opening. Subsequently, turn it right side out and stuff it firmly with the fiberfill. Then, sew the opening closed securely. Afterward, measure the elastic band to fit comfortably around your wrist. Finally, hand-stitch the ends of the elastic band directly to the bottom of the stuffed cushion.
Pro-Tip: To keep your pins extra sharp, add a small handful of steel wool into the very center of the cushion before adding the polyester stuffing.
4. The Fabric Scrap Pattern Scissors Pouch
High-quality fabric shears are expensive investments that require proper protection. Dropping them or letting them scratch against other tools can ruin their precise calibration. Thus, a padded triangular pouch is the perfect protective home for your scissors. Moreover, creating one is a staple among easy fabric scrap projects.
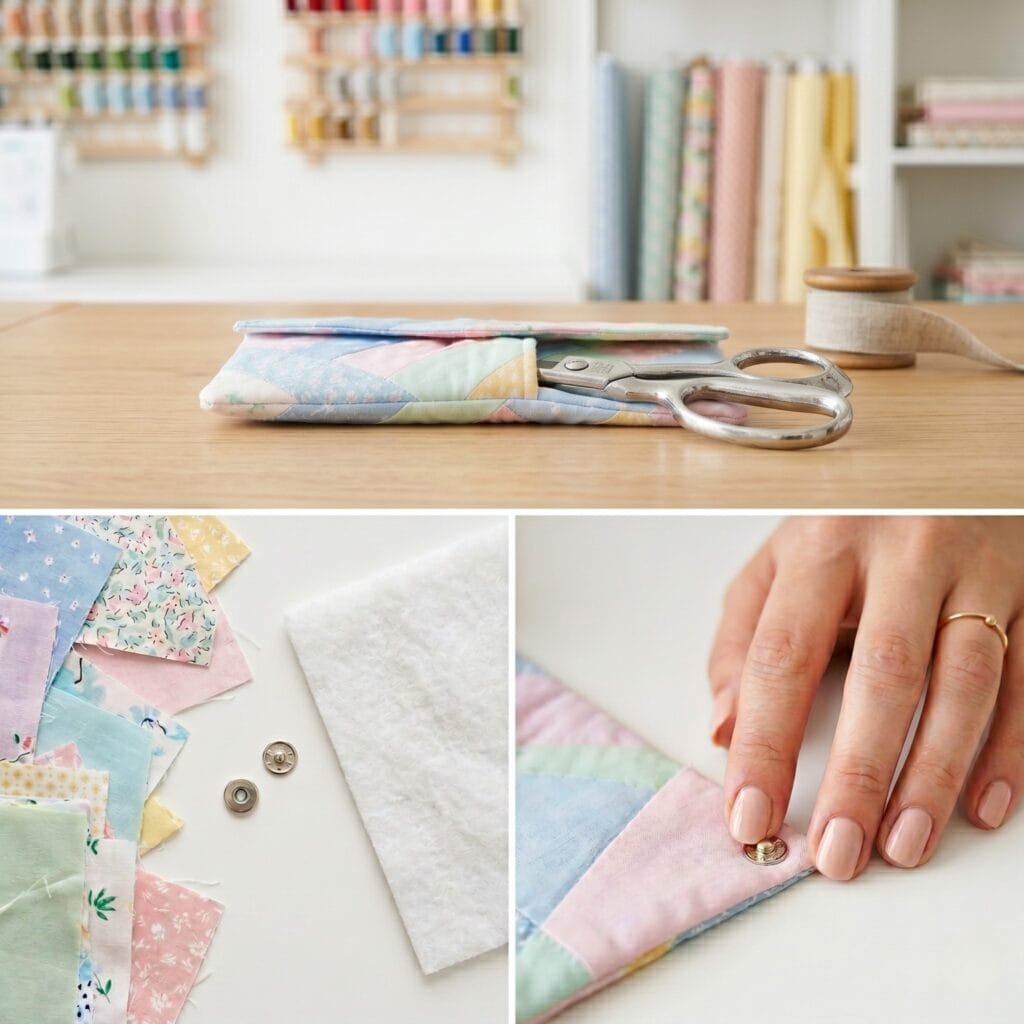
- Special Supplies: Canvas or thick cotton scraps, fusible fleece interfacing, and a single metal snap closure.
- How to Make It: Initially, iron the fusible fleece to the back of your main exterior fabric to provide protective padding. Next, cut the padded fabric and a matching lining piece into a tall asymmetrical triangle shape. Then, place the right sides together and sew the edges, leaving a turning gap. Afterward, turn the pouch right side out, press it flat, and topstitch the perimeter. Finally, fold the bottom point upward to create the pocket, sew the sides securely, and attach a snap to the top folding flap.
Pro-Tip: Measure your specific fabric shears before cutting your fabric template. Heavy-duty tailor shears will require a significantly wider pouch base than standard craft scissors.
5. Cord Keepers for Easy Fabric Scrap Projects
Sewing machines, irons, and sergers create a tangled mess of cables on any crafting table. Additionally, loose measuring tapes tend to unroll and cause clutter. These minimalist cord keepers wrap around your items to maintain ultimate tidiness. Therefore, they are essential easy fabric scrap projects for organization.
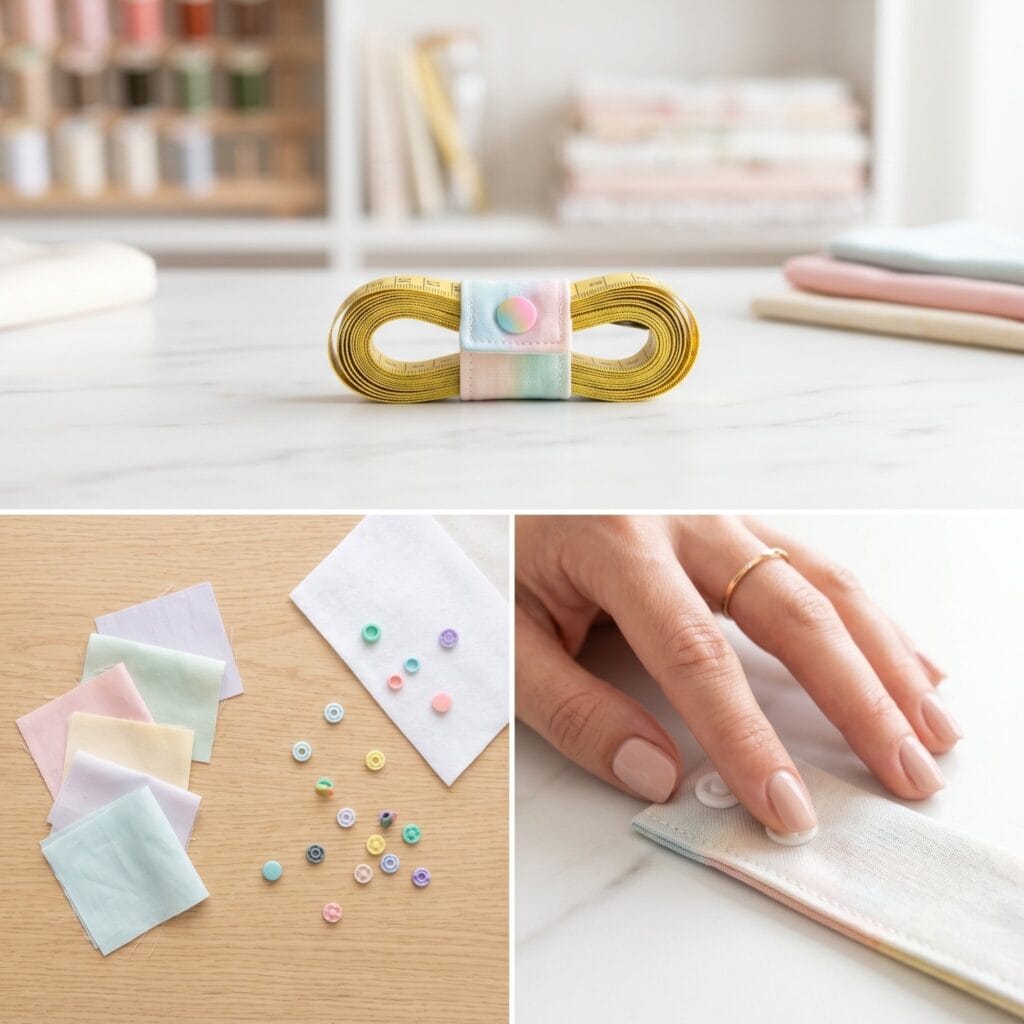
- Special Supplies: Stiff rectangular fabric leftovers, medium-weight interfacing, and plastic kam snaps.
- How to Make It: First, apply the interfacing to one rectangular fabric piece for stiffness. Next, place a second fabric piece on top with the right sides facing each other. Then, sew around the four edges, leaving a tiny gap. Afterward, turn the rectangle right side out and push the corners out sharply. Subsequently, topstitch around the entire edge to close the gap. Finally, install one side of the plastic snap on the left end and the matching side on the far right end.
Pro-Tip: You can color-code your cord keepers. For instance, use blue scraps for sewing machine cables and red scraps for hot tools like irons.
6. The Quilted Sewing Machine Mat
Heavy sewing machines can easily vibrate, scratch wooden tables, and generate annoying noise. Placing a padded mat beneath your machine instantly dampens the sound. Furthermore, adding front pockets gives you immediate access to your most used notions. This mat is one of the most functional easy fabric scrap projects.
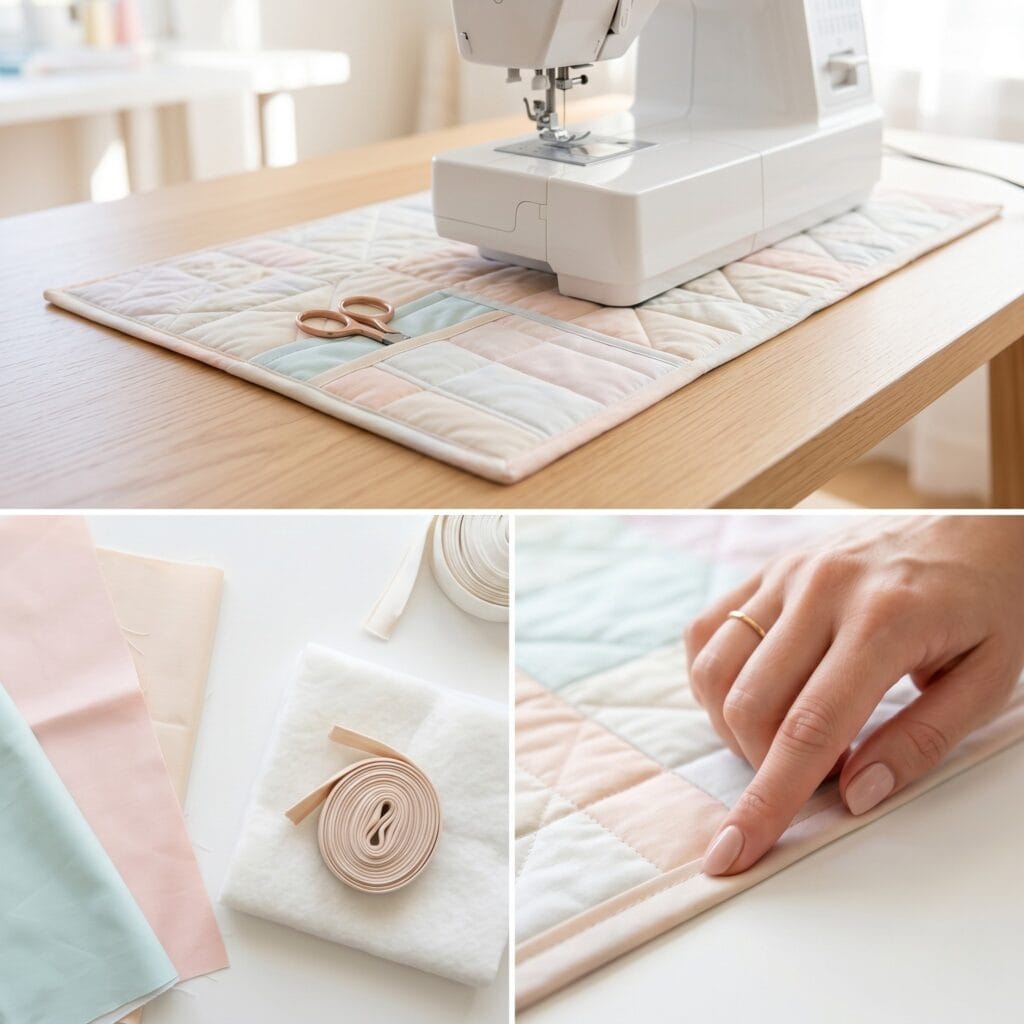
- Special Supplies: Large fabric offcuts, quilt batting, and bias tape for the edges.
- How to Make It: First, layer your main fabric, the quilt batting, and a backing fabric to create a sandwich. Next, quilt straight diagonal lines across the entire piece to secure the layers together. Then, take a smaller rectangular piece of fabric, fold the top edge down, and sew it to the bottom front of your quilted mat to create a long pocket. Afterward, sew vertical dividing lines across this pocket. Finally, wrap and sew bias tape around the entire outer edge of the mat to finish the raw edges cleanly.
Pro-Tip: Attach small pieces of non-slip rubber shelf liner to the bottom of the mat. This entirely prevents your sewing machine from sliding backward while you work.
7. The Tailor’s Ham: The Ultimate Easy Fabric Scrap Project
Pressing curved garment seams properly is impossible on a flat ironing board. A tailor’s ham is a firm, curved cushion designed specifically for pressing darts, collars, and sleeves. Because it requires heavy stuffing, it is the absolute best way to utilize hundreds of tiny, unsewable fabric shreds. Indeed, it perfectly represents zero-waste easy fabric scrap projects.
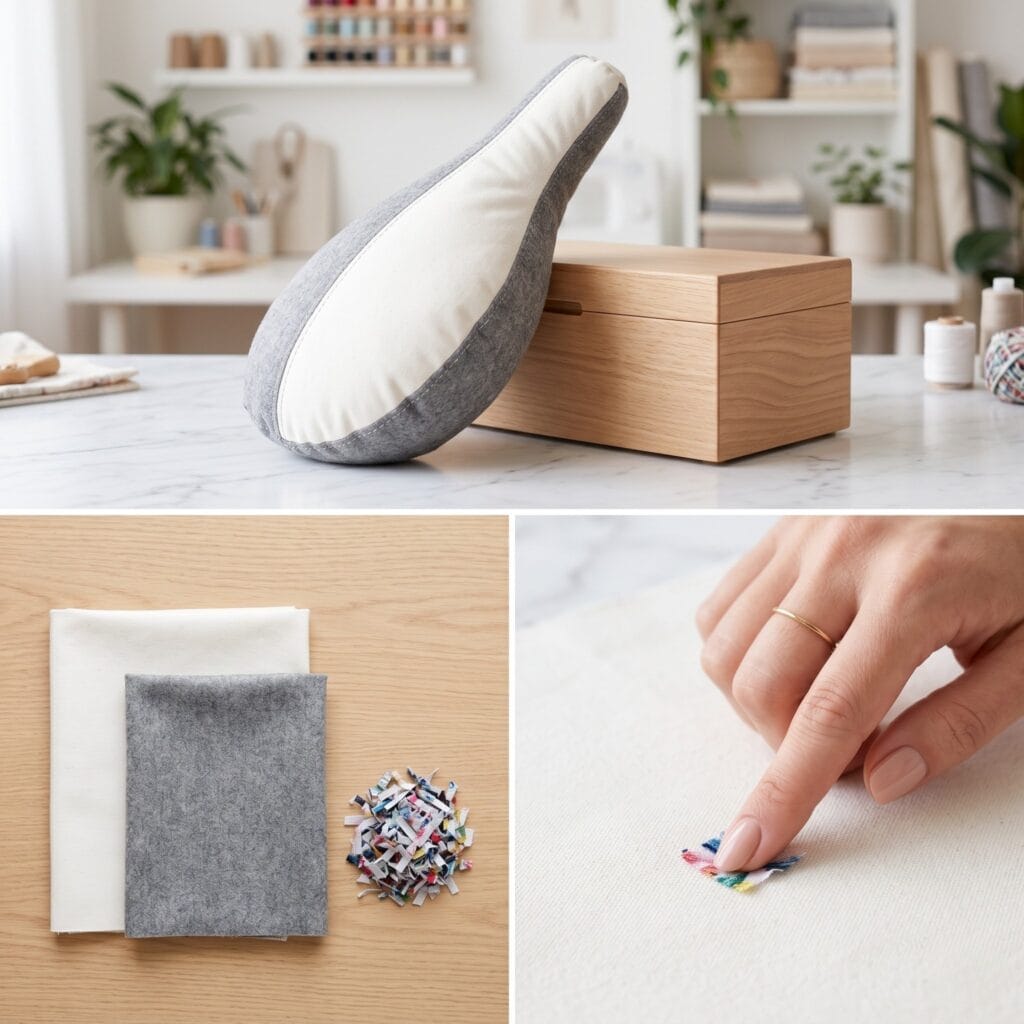
- Special Supplies: One piece of thick cotton canvas, one piece of wool fabric, and a massive amount of tiny shredded fabric scraps.
- How to Make It: First, cut an oval shape from the canvas and an identical oval from the wool fabric. Next, place the right sides together and sew around the curve, leaving a two-inch gap. Then, turn the oval right side out. Now, begin stuffing the shape with your tiniest fabric scraps. Importantly, you must pack the scraps incredibly tight until the cushion is rock hard. Use a strong needle to hand-stitch the opening shut.
Pro-Tip: The dual-fabric design is intentional. Use the cotton canvas side when pressing fabrics at high heat, and flip to the wool side when pressing delicate garments that require lower temperatures.
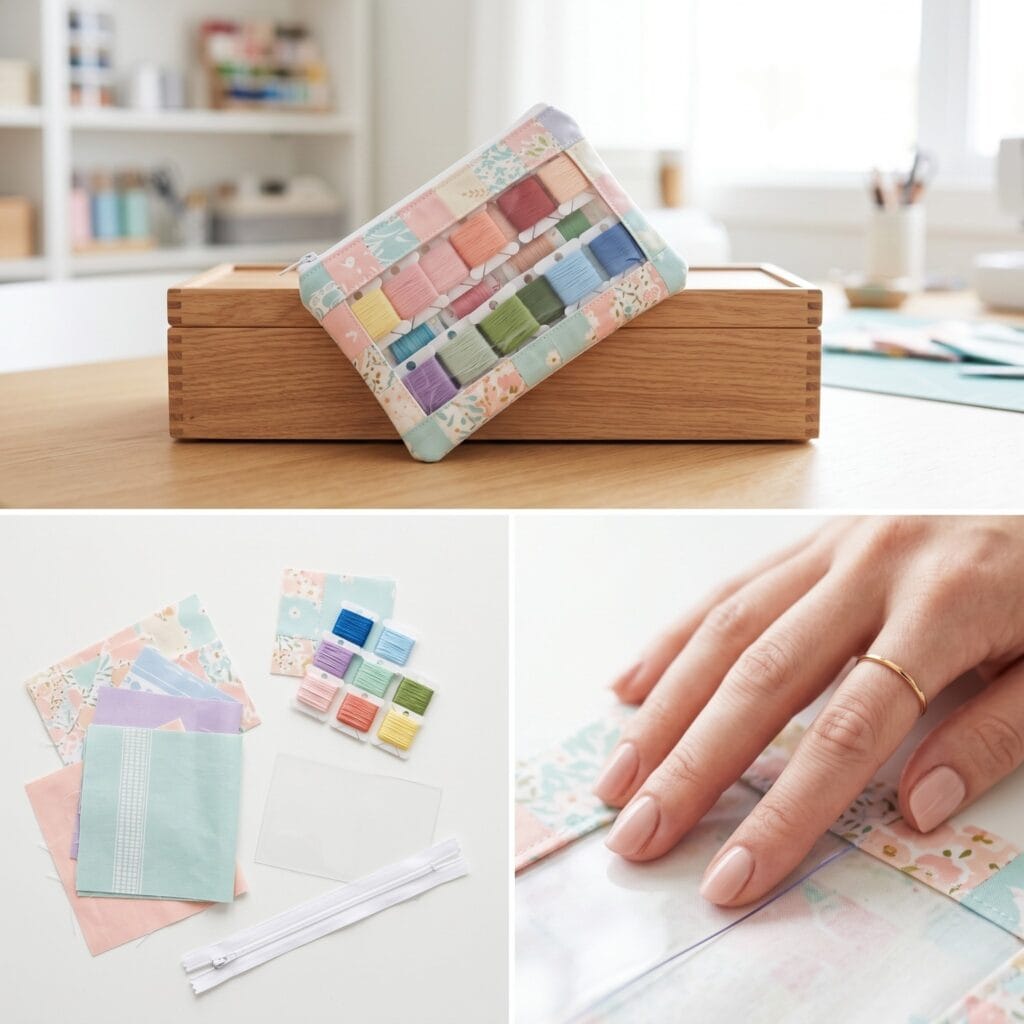
8. The Patterned Bobbin Organizer Pouch
Keeping bobbins from unwinding and tangling into a giant knot is a universal struggle. A dedicated zipper pouch with a transparent window helps you find the exact thread color you need instantly. For this reason, adding this to your list of easy fabric scrap projects is highly recommended.
If you enjoy making functional zippered pouches like this one, you should also try sewing our easy DIY reusable snack bags for a zero-waste kitchen.
- Special Supplies: Sturdy cotton scraps, a piece of clear vinyl, and a nylon zipper.
- How to Make It: First, cut a rectangular frame out of your cotton fabric. Next, sew the clear vinyl directly behind the cutout window to create a transparent front panel. Then, attach the nylon zipper to the top edge of this front panel. Sew a solid fabric rectangle to the other side of the zipper for the back panel. Open the zipper halfway, place the front and back right sides together, and sew around the remaining three sides before turning the pouch right side out.
Pro-Tip: Place a small piece of tissue paper over the clear vinyl while sewing it to the fabric. This prevents the sticky plastic from jamming under your presser foot.
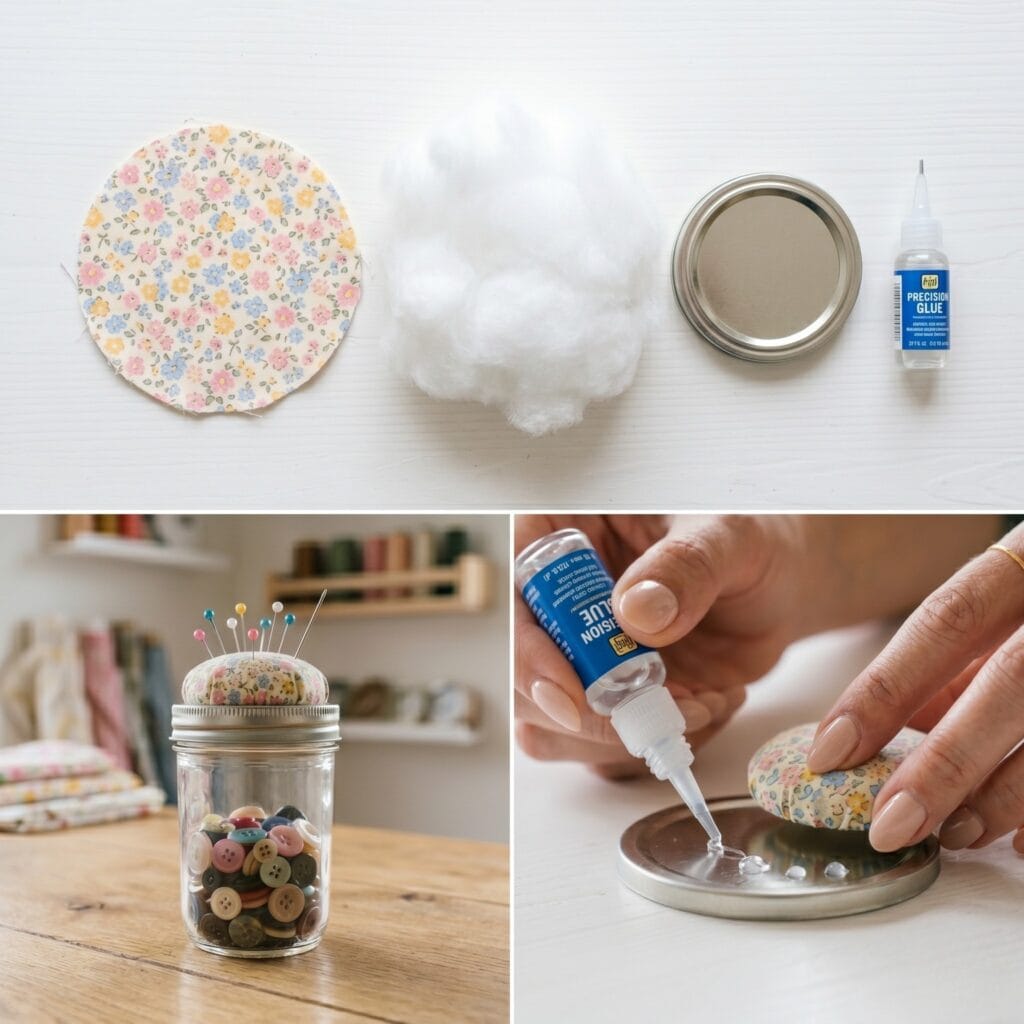
9. The Recycled Jar Pincushion: Beautiful Easy Fabric Scrap Projects
Storing tiny sewing notions like spare buttons, snap fasteners, or safety pins can be quite challenging. Any standard empty glass jar from your kitchen is perfect for visibility, but transforming its basic metal lid into a padded pincushion creates the ultimate dual-purpose storage solution. You get a secure container and a handy place to rest your pins simultaneously. It is an incredibly clever, budget-friendly addition to your easy fabric scrap projects.
If you need even more stylish storage solutions, check out our favorite upcycled glass jar crafts.
- Special Supplies: Small cotton fabric leftovers, any standard clean glass jar with a one-piece metal lid (like an empty jam jar), a handful of polyester stuffing, and strong craft glue.
- How to Make It: First, cut a circle of fabric and sew a simple running stitch around the outer edge. Next, place a small mound of stuffing in the center and pull the thread tight to create a little padded fabric puff. Then, tie off the thread securely. Apply a generous amount of strong craft glue directly to the top of your standard metal jar lid. Press the flat bottom of your stuffed fabric puff firmly onto the glued lid and let it dry completely before screwing it onto your jar.
Pro-Tip: To give your project a seamless, professional finish, use a drop of glue to wrap a thin scrap of ribbon or jute twine around the outer edge of the metal lid. This beautifully hides the transition line between the fabric puff and the metal.
10. The Fabric Scrap Spool Huggers
Loose thread tails constantly unwind, creating a tangled and frustrating mess inside your storage box. Spool huggers are tiny fabric bands that wrap snugly around your spools to keep the thread locked firmly in place. Adding this to your list of easy fabric scrap projects will instantly clean up your thread collection.
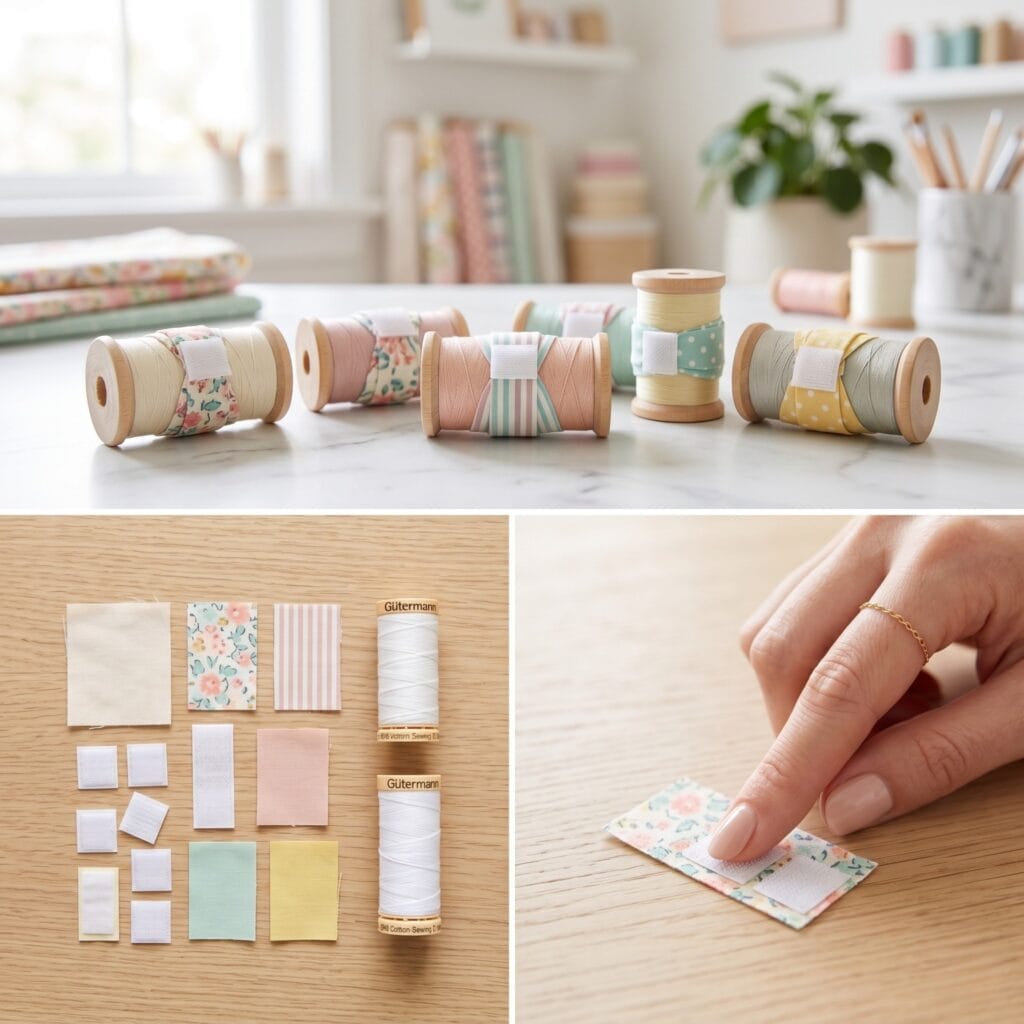
- Special Supplies: Tiny rectangular fabric scraps, lightweight interfacing, and small pieces of sew-on hook and loop tape (Velcro).
- How to Make It: First, cut two tiny rectangles of fabric and one matching piece of interfacing. Next, sew the right sides together, leaving a turning gap, and turn it right side out. Then, topstitch the perimeter flat. Sew a small square of the hook tape to one end and the loop tape to the opposite end. Finally, wrap the fabric hugger tightly around a thread spool and press the fastener shut.
Pro-Tip: Measure your most commonly used thread spools before cutting. You will need slightly longer fabric strips for bulky serger cones compared to standard home sewing machine spools.
Important Crafting Safety Note:
Working on easy fabric scrap projects often involves sharp tools like rotary cutters, fabric shears, and tiny hand-sewing needles. Therefore, always use a self-healing cutting mat to protect your surfaces and your blades. Furthermore, be extremely mindful of stray pins hidden among your fabric scraps to avoid accidental punctures, and always unplug your hot iron when stepping away from your sewing station.