

Are you looking for chic room accents to tidy your vanity? First of all, creating a custom diy earring holder is deeply rewarding. many store-bought jewelry trees look cluttered or cheap. we designed these ten modern organization projects. we use premium raw materials, they look like high-end boutique displays. the making process is highly satisfying. As a result, your dresser will look highly stylish. For instance, you can easily pair these new organizational displays with our 10 Epic DIY Wall Art Decor Ideas to Try Now for a complete room makeover. Let’s start crafting!
Affiliate Disclosure: This post contains affiliate links. As an Amazon Associate, I earn from qualifying purchases. If you buy through these links, I may earn a commission at no additional cost to you.
Key Facts:
- Technique: Jewelry making
- Makes: 10 project ideas
- Total time: A few hours
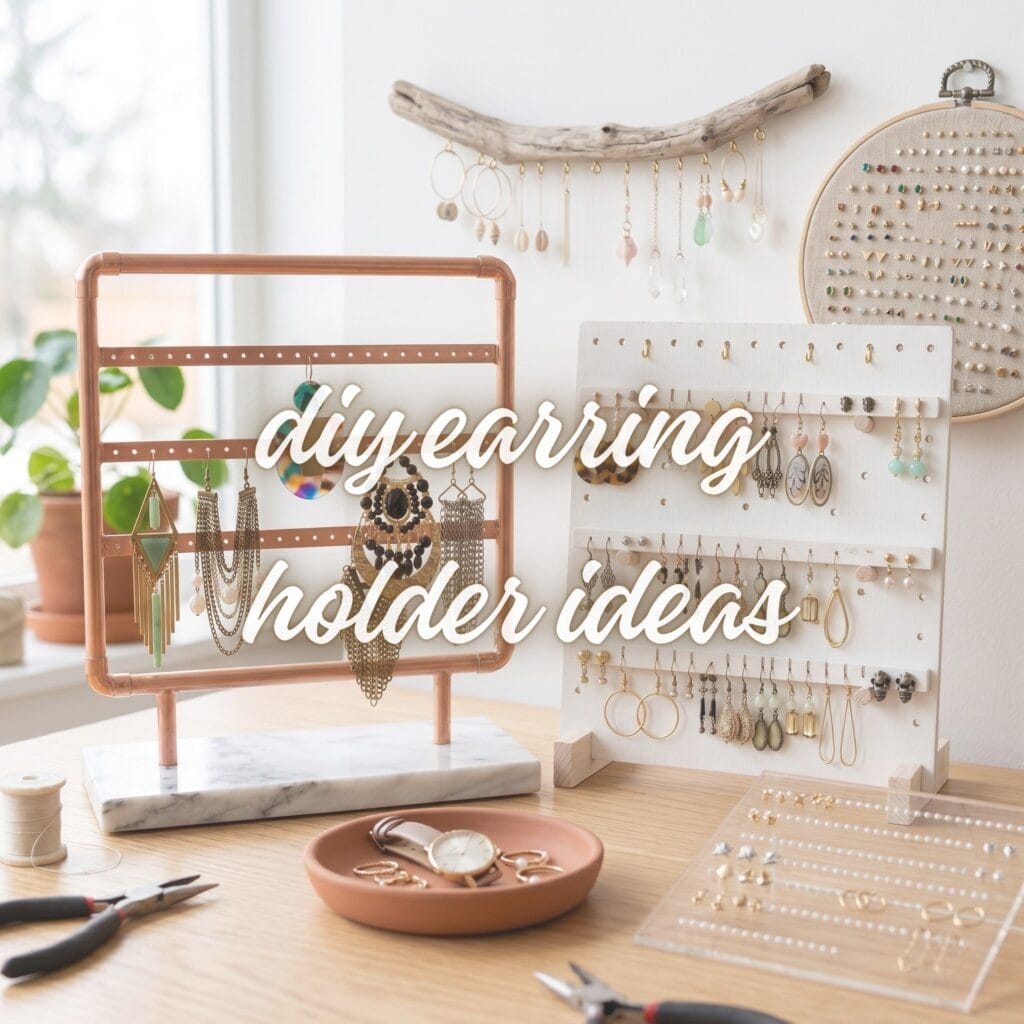
Essential Materials & Tools
| Supply | Spec / Size | Used For |
|---|---|---|
| Unfinished Wood Picture Frames | Open-back wood frames provide a clean, sturdy perimeter for the… | |
| Brass Wire Mesh Screen | Fine brass mesh creates closely spaced openings that securely hold… | |
| Unfinished Hardwood Craft Blocks | Dense, smooth wood blocks are suitable for cutting display slots and… | |
| Raw Vegetable-Tanned Leather Strips | Firm natural leather strips make durable ladder-style hanging rows… | |
| Unfinished Wood Dowels | Slim wooden dowels form lightweight crossbars for leather ladders and… | |
| Small Ceramic Trinket Dishes | A shallow ceramic dish gives the T-bar organizer a stable base and… |
✨ Consumable Raw Materials
- Unfinished Wood Picture Frames — Open-back wood frames provide a clean, sturdy perimeter for the framed brass mesh organizer. | Check Price on Amazon
- Brass Wire Mesh Screen — Fine brass mesh creates closely spaced openings that securely hold fishhook earrings while adding warm metallic texture. | See Price on Amazon
- Unfinished Hardwood Craft Blocks — Dense, smooth wood blocks are suitable for cutting display slots and drilling neat grids for stud earrings. | Check Unfinished Hardwood Craft Blocks on Amazon
- Raw Vegetable-Tanned Leather Strips — Firm natural leather strips make durable ladder-style hanging rows that develop a richer patina over time. | See Raw Vegetable-Tanned Leather Strips on Amazon
- Unfinished Wood Dowels — Slim wooden dowels form lightweight crossbars for leather ladders and other custom display stands. | View Unfinished Wood Dowels on Amazon
- Small Ceramic Trinket Dishes — A shallow ceramic dish gives the T-bar organizer a stable base and catches rings, backs, and small accessories. | Find Small Ceramic Trinket Dishes on Amazon
- Solid Brass T-Bar Components — Brass T-bars create a polished horizontal rail for displaying hoops and dangling earrings above a dish base. | Check Latest Price on Amazon
- Clear Cast Acrylic Sheets — Cast acrylic is clearer and more workable than thin plastic sheet for a minimal drilled earring screen. | View on Amazon
- Natural Driftwood Branches — Clean, dry driftwood adds organic texture and naturally irregular hanging points for a rustic ladder display. | Check Price on Amazon
- Embroidery Linen Fabric — Tightly woven linen supports embroidery and provides a soft, refined background for studs and lightweight earrings. | See Price on Amazon
- Wood Embroidery Hoops — Wood hoops tension linen evenly and create an instant circular frame for the embroidered linen display. | Check Wood Embroidery Hoops on Amazon
- Unfinished Pegboard Panels — Pre-drilled pegboard panels make flexible modular layouts for earring hooks, posts, and small shelf accessories. | See Unfinished Pegboard Panels on Amazon
- Copper Pipe and Fittings — Copper tubing, elbows, and tees assemble into crisp geometric stands with multiple rails for hanging earrings. | View Copper Pipe and Fittings on Amazon
🧰 Core Crafting Tools & Equipment
- Heavy-Duty Staple Gun and Staples — A staple gun secures taut brass mesh cleanly to the rear edge of a wood frame. | Check Latest Price on Amazon
- Flush-Cut Wire Cutters — Flush cutters trim brass screen and other light-gauge wire ends with fewer sharp protrusions. | View on Amazon
- Mini Hand Drill with Micro Drill Bits — Small bits make controlled holes for stud grids, leather lacing, acrylic screens, and pegboard modifications. | Check Price on Amazon
- Leather Hole Punch — A rotary punch makes tidy, evenly sized holes along leather strips without tearing the material. | See Price on Amazon
- Fine-Tooth Craft Saw — A fine-tooth saw cuts narrow, controlled slots in hardwood blocks for a secure dangle-earring stand. | Check Fine-Tooth Craft Saw on Amazon
- Acrylic Scoring Knife — A scoring knife helps size thin cast-acrylic panels cleanly before drilling or mounting them. | See Acrylic Scoring Knife on Amazon
- Mini Copper Pipe Cutter — A compact tubing cutter produces square, smooth copper cuts for stable stand assemblies. | View Mini Copper Pipe Cutter on Amazon
💎 Hardware, Fasteners & Finishing
- Clear-Drying Wood Glue — Wood glue makes durable joints for dowels, block stands, driftwood assemblies, and pegboard frames. | Find Clear-Drying Wood Glue on Amazon
- Fine-Grit Sandpaper Assortment — Fine sanding rounds slot edges, smooths drilled holes, and gives wood display pieces a jewelry-safe finish. | Find Fine-Grit Sandpaper Assortment on Amazon
- Clear Water-Based Wood Sealer — A low-odor clear sealer protects unfinished wood from dust and handling while retaining its natural appearance. | Check Latest Price on Amazon
- Rubber Bumper Feet — Small adhesive feet keep ceramic, wood, acrylic, and copper stands from scratching a vanity surface. | View on Amazon
- Brass Screw Eyes — Brass screw eyes provide discreet hanging points for driftwood, leather, and framed display projects. | Check Price on Amazon
⚡ Studio Tools & Workshop Equipment
- Variable-Speed Rotary Tool Kit — A versatile rotary tool speeds up precision sanding, slot refinement, drilling, and edge polishing across wood, acrylic, and copper projects. | See Price on Amazon
- Benchtop Drill Press — A drill press creates consistently perpendicular, repeatable stud holes and clean acrylic perforations for professional-looking organizers. | Check Benchtop Drill Press on Amazon
- Daylight LED Magnifying Desk Lamp — Bright adjustable task lighting improves precision when trimming mesh, marking hole grids, embroidering linen, and finishing small display details. | See Daylight LED Magnifying Desk Lamp on Amazon
Framed Brass Mesh: DIY Earring Holder Masterclass
Do you want to try a signature diy earring holder project? Here, we explain a minimalist framed brass mesh organizer. the steps are detailed, you will succeed.
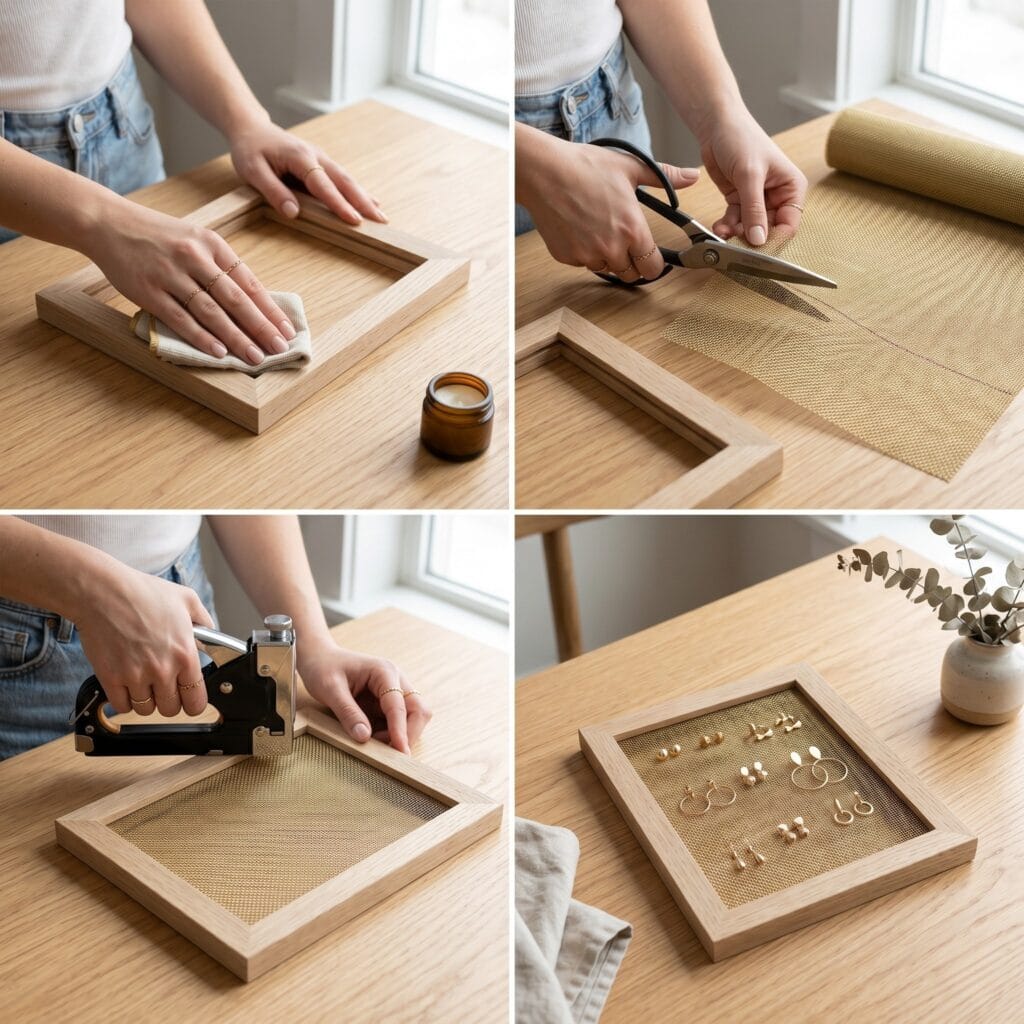
Step 1: clean your open wooden frame. Next, dry it completely. a clean surface helps.
Step 2: take your brass wire mesh screen. Next, cut it slightly smaller than the outer frame back. Then, press it flat.
Step 3: Additionally, smooth the mesh edges down. this stops accidental scratches, it is vital.
Step 4: Next, take a heavy-duty staple gun. Then, apply staples tightly around the wooden edges.
Step 5: Afterward, ensure the mesh is taut. Next, trim away any sharp protruding wires slowly. Consequently, the crisp borders appear.
Step 6: Finally, your elegant frame is ready. your artisan piece is complete. it makes a gorgeous addition for hanging studs and dangles!
9 More Clever Options for Jewelry Organization
Supplies Needed: Unfinished Pegboard Panels, Unfinished Wood Dowels, Clear-Drying Wood Glue, Brass Screw Eyes, Clear Water-Based Wood Sealer
Additionally, these projects focus on minimalist lines. Here are nine more unique variations for your diy earring holder layout using our quick mini-tutorial format. Similarly, if you enjoy shaping sleek metal details for your dresser, check out our 10 Epic DIY Copper Jewelry Ideas for a Beautiful Style.
2. Slotted Wood Block Stand
Supplies Needed: Unfinished Hardwood Craft Blocks, Fine-Tooth Craft Saw, Fine-Grit Sandpaper Assortment, Clear Water-Based Wood Sealer, Rubber Bumper Feet
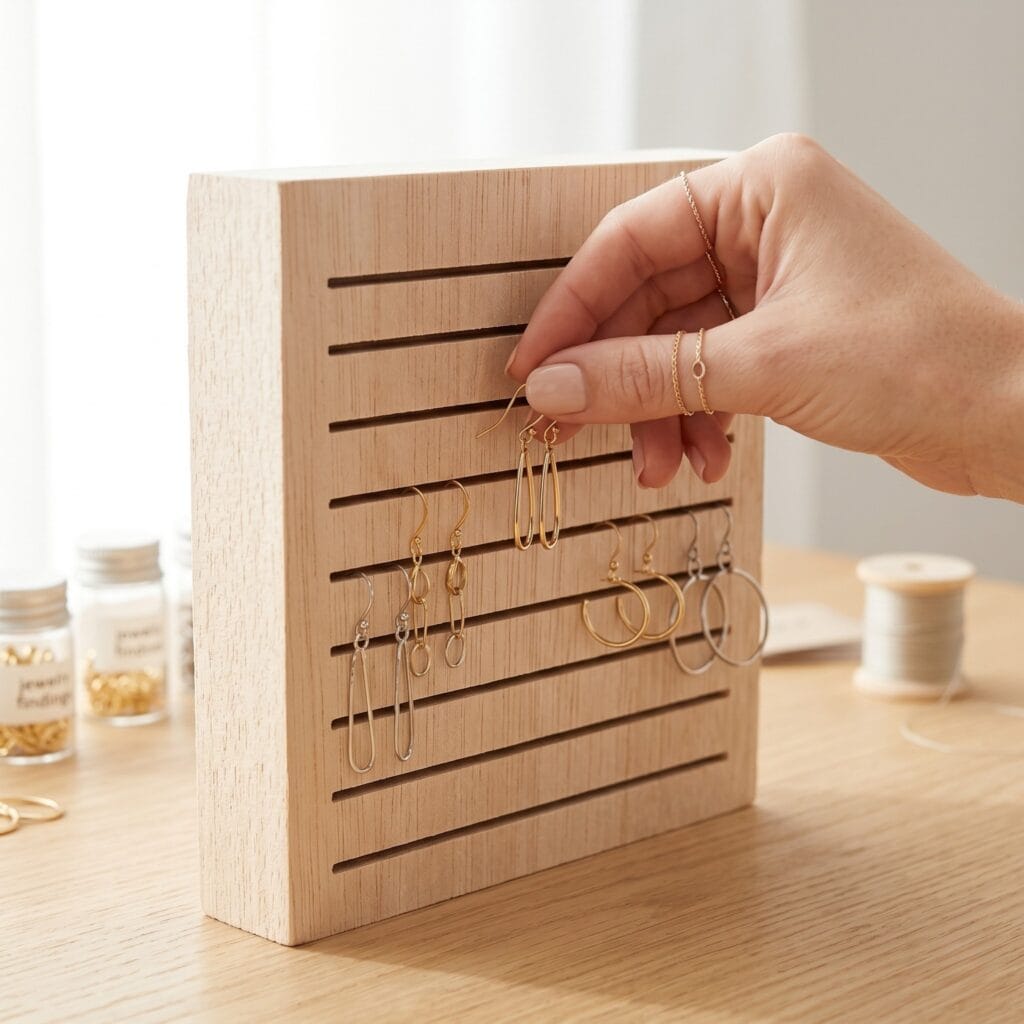
The Concept: Basically, keep your dangle earrings completely secure. the deep slots prevent slipping, this diy earring holder is highly practical and elegant. Quick Steps:
- smooth down a rectangular raw balsa wood block.
- Next, use a thin craft saw to cut parallel horizontal slots across the top surface.
- Then, sand the inner edges gently to protect your jewelry. Styling Tip: Specifically, pair this sleek wooden piece with our heavy 12 Epic DIY Cement Crafts on a modern shelf for a beautiful contrast.
3. Raw Wood Stud Block Layout
Supplies Needed: Unfinished Hardwood Craft Blocks, Mini Hand Drill with Micro Drill Bits, Fine-Grit Sandpaper Assortment, Clear Water-Based Wood Sealer, Rubber Bumper Feet
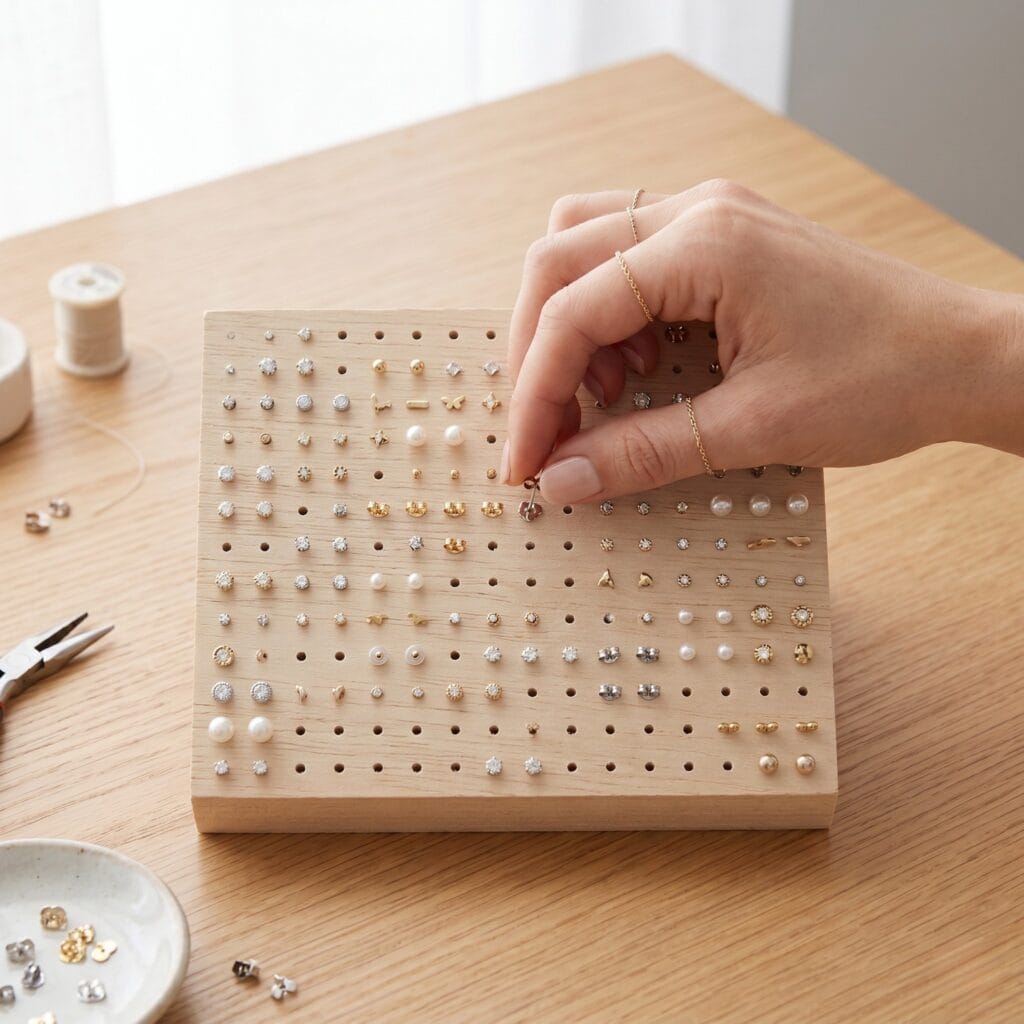
The Concept: Essentially, upgrade your bedside table easily. the clean drill alignment adds instant luxury. Quick Steps:
- smooth down a rectangular balsa wood block.
- Next, mark out grid dots using a fine pencil line.
- Then, drill tiny, neat holes straight through the block. Styling Tip: stand this block on a raw oak desk. Alternatively, place it next to your beautiful Stunning No-Sew Leather Valet Tray.
4. Leather Ribbon Ladder: DIY Earring Holder
Supplies Needed: Raw Vegetable-Tanned Leather Strips, Unfinished Wood Dowels, Leather Hole Punch, Clear-Drying Wood Glue, Brass Screw Eyes
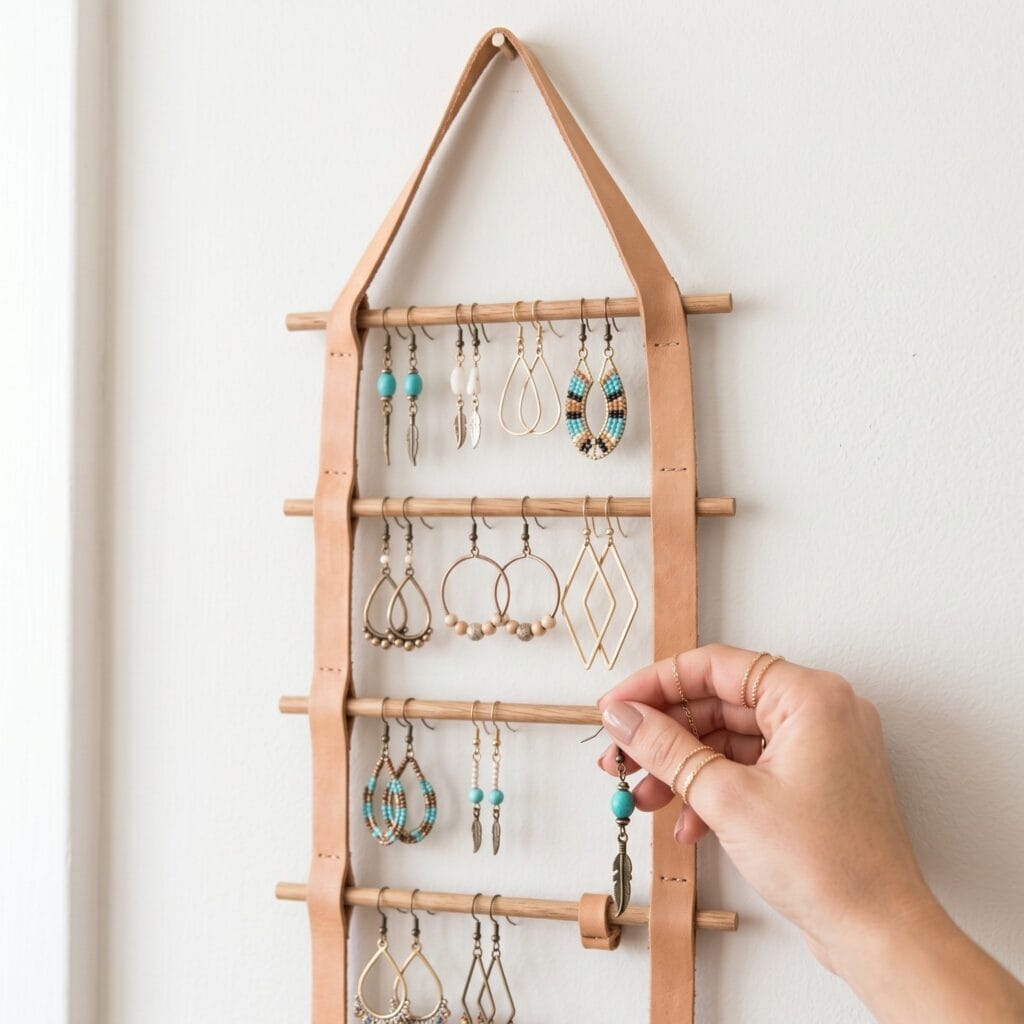
The Concept: Chiefly, modernize your closet wall setup. the raw leather creates a striking bohemian look. Quick Steps:
- cut three equal lengths of thick raw leather strips.
- Next, punch small holes along the leather center lines.
- Then, connect the rows vertically using thin wooden dowels. Styling Tip: Ultimately, hang it on an open closet door. Also, this works beautifully with other projects from our 10 Stunning and Easy Ways to Use Your Leather Scraps guide.
5. Ceramic Dish and Brass T-Bar
Supplies Needed: Small Ceramic Trinket Dishes, Solid Brass T-Bar Components, Clear-Drying Wood Glue, Rubber Bumper Feet
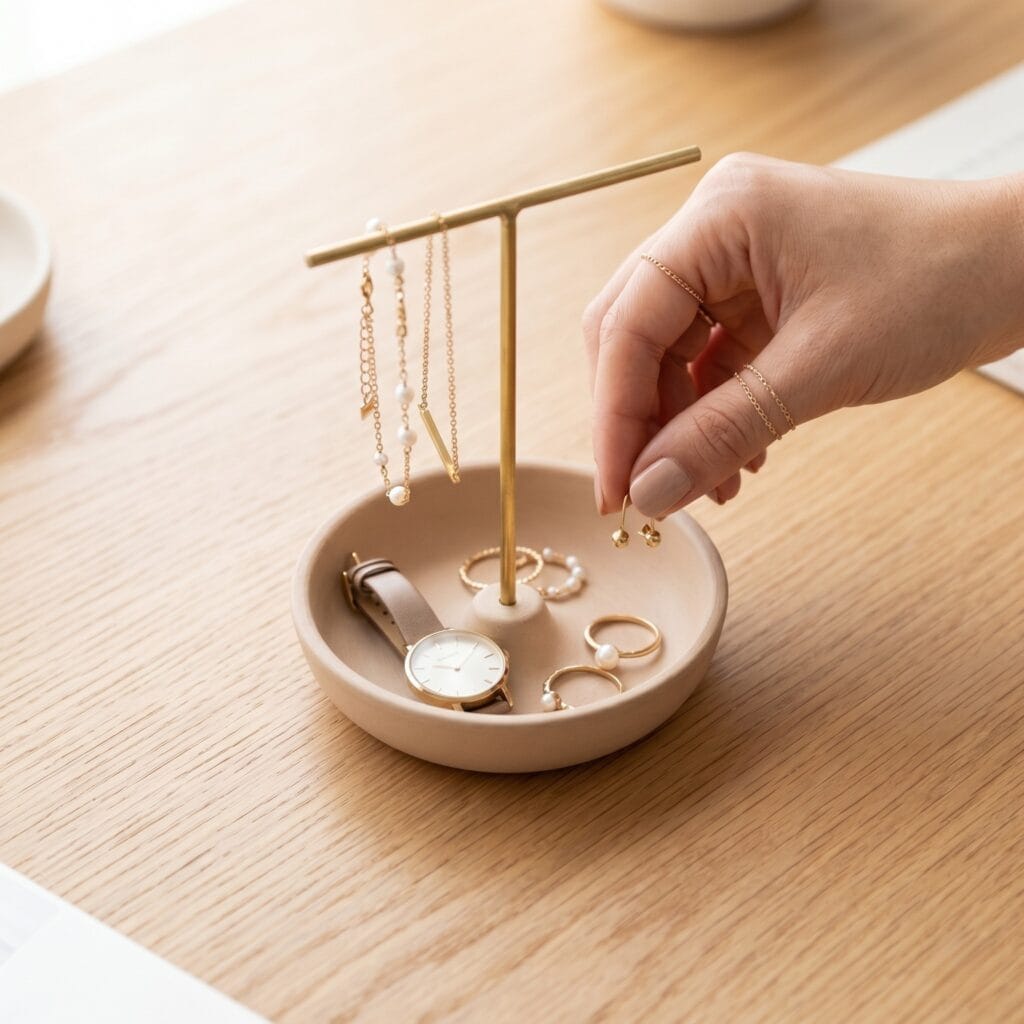
The Concept: Basically, catch your daily jewelry items beautifully. bring warmth indoors with this mixed-material diy earring holder technique. Quick Steps:
- build a small T-bar shape from thick brass wire.
- Next, secure the vertical base onto a small matte clay dish.
- Then, drill tiny hook holes along the top bar. Styling Tip: Consequently, place this tray on your primary entryway console table.
6. Minimalist Acrylic Screen: DIY Earring Holder
Supplies Needed: Clear Cast Acrylic Sheets, Acrylic Scoring Knife, Mini Hand Drill with Micro Drill Bits, Fine-Grit Sandpaper Assortment, Rubber Bumper Feet
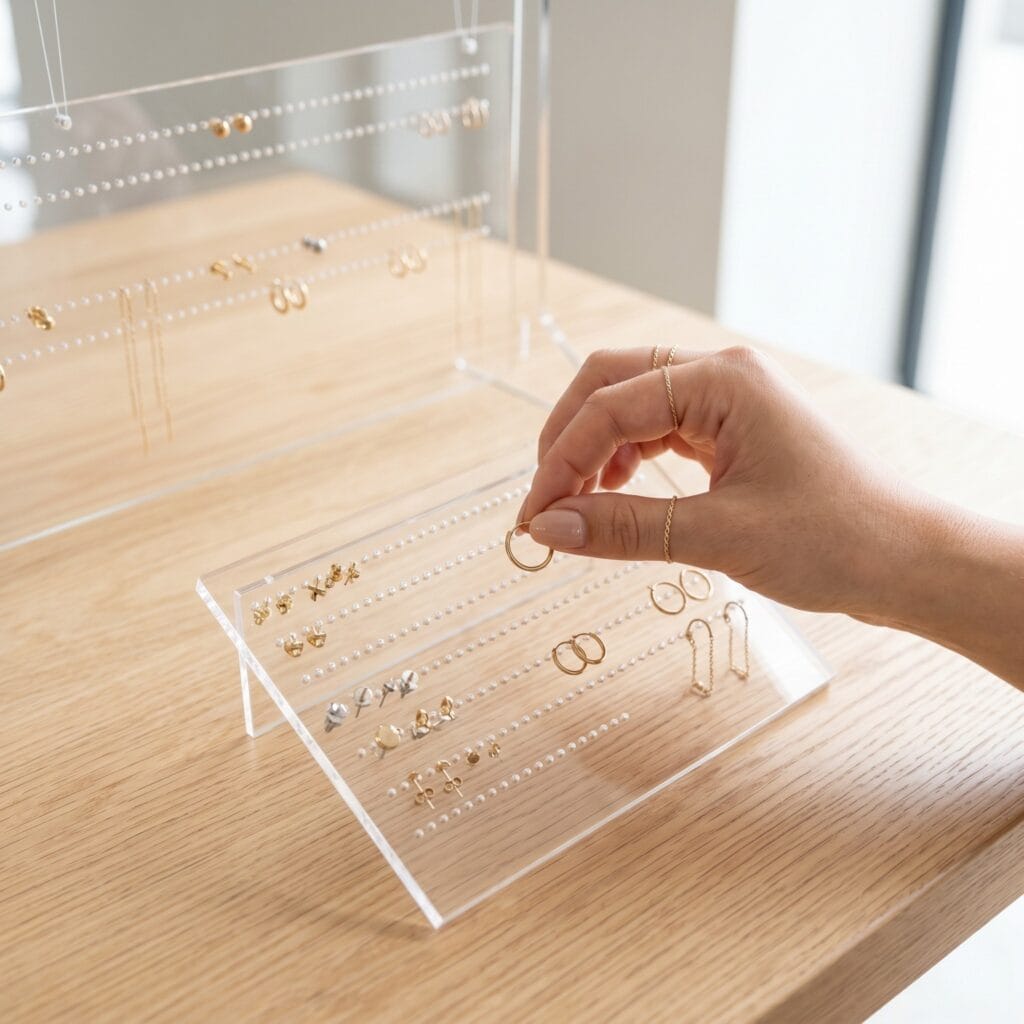
The Concept: In short, turn clear acrylic into a floating organizer. the invisible texture highlights your jewelry, it looks high-end. Quick Steps:
- peel the protective film off a small acrylic rectangle.
- Next, drill pairs of micro holes in neat parallel rows.
- Then, attach a thin jute twine to the top corners. Styling Tip: For example, hang it near a bright vanity mirror to reflect light.
7. Driftwood Branch Ladder: DIY Earring Holder
Supplies Needed: Natural Driftwood Branches, Raw Vegetable-Tanned Leather Strips, Unfinished Wood Dowels, Clear-Drying Wood Glue, Brass Screw Eyes
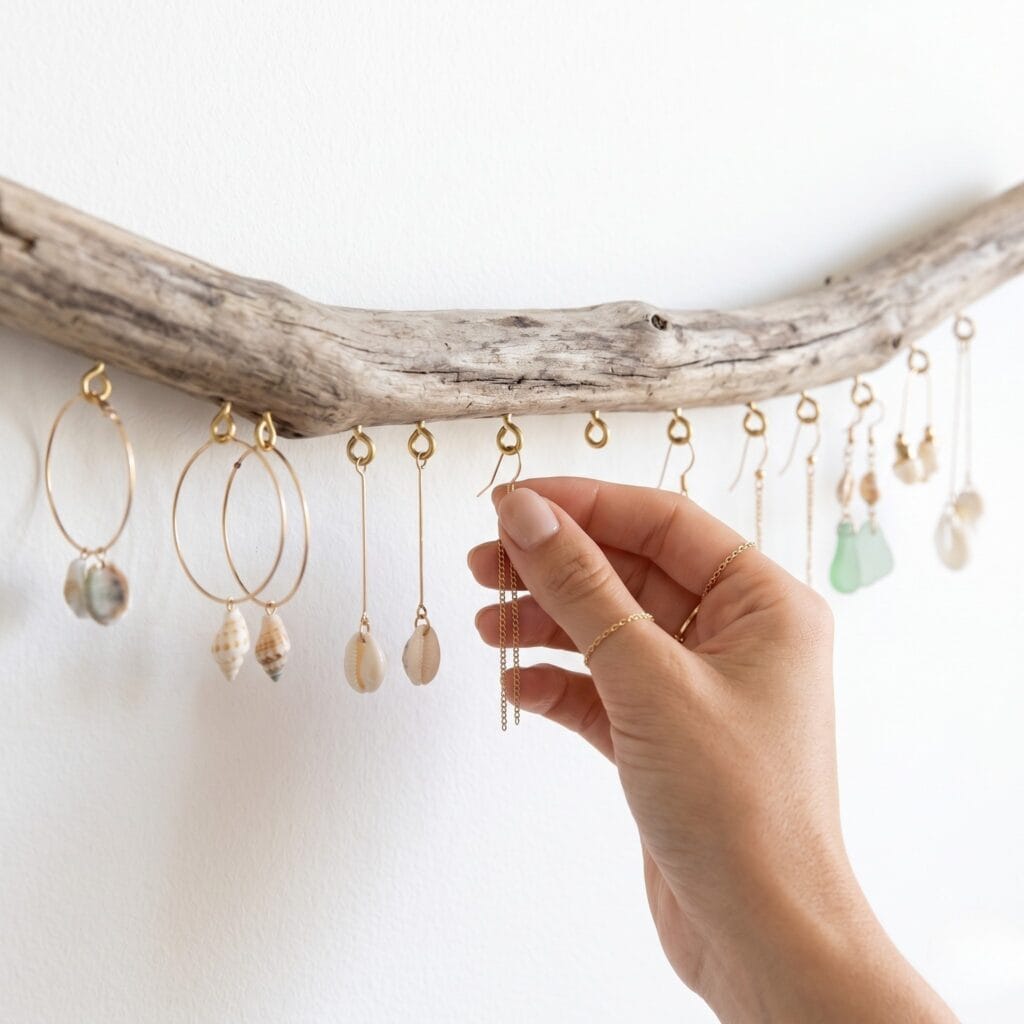
The Concept: Undoubtedly, bring a soft coastal vibe inside. the organic wood shapes look very calming. Quick Steps:
- clean a lightweight piece of ocean driftwood.
- Next, screw tiny brass eye hooks along the bottom curve.
- Then, tie a natural cotton rope for quick wall mounting. Styling Tip: Specifically, use this piece to display heavy statement earrings. Similarly, you can match this coastal vibe with our 12 Stunning Seashell Crafts and Decorations.
8. Embroidered Linen Hoop: DIY Earring Holder
Supplies Needed: Embroidery Linen Fabric, Wood Embroidery Hoops, Mini Hand Drill with Micro Drill Bits, Fine-Grit Sandpaper Assortment
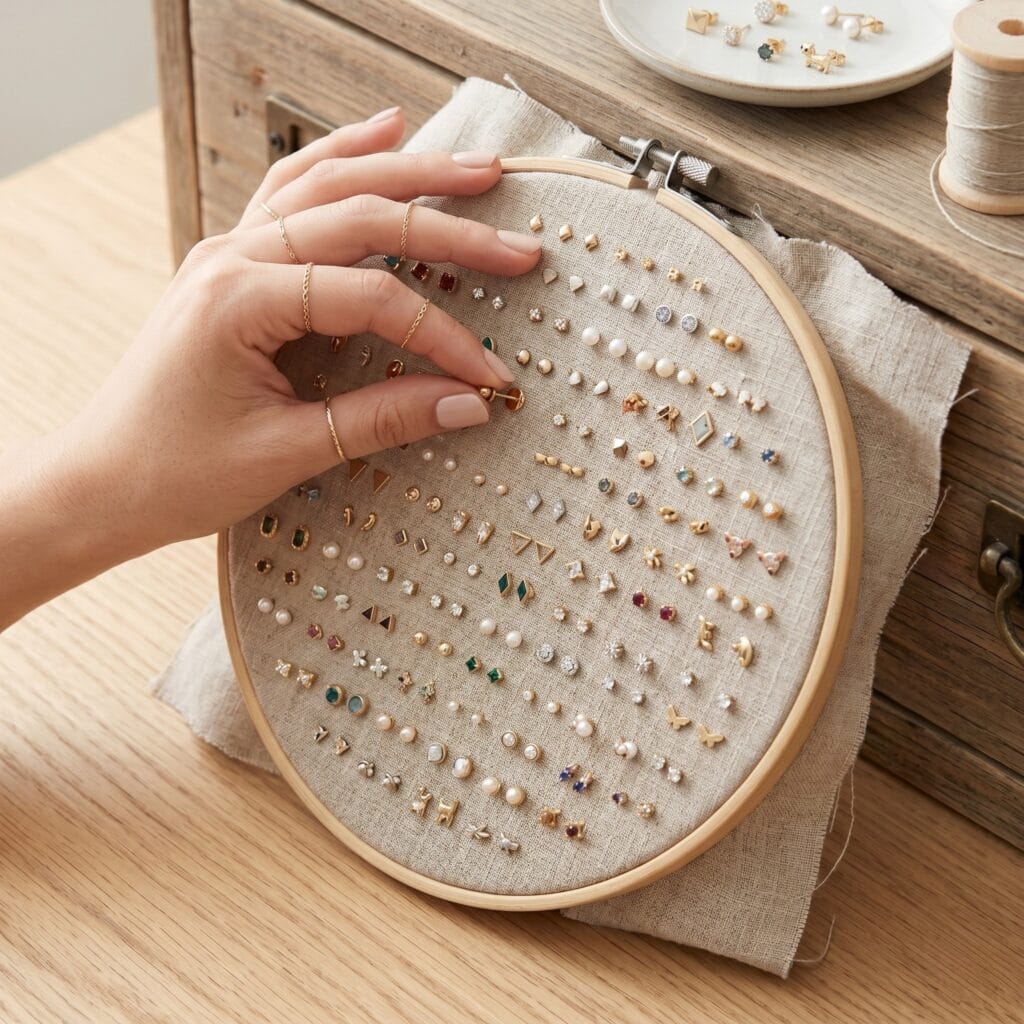
The Concept: Overall, create a soft, tactile display. the open-weave fabric creates an ideal grid for earring posts. Quick Steps:
- stretch raw, unbleached linen fabric inside a wooden hoop.
- Next, tighten the top metal screw securely.
- Then, trim away the messy excess fabric from the back edge. Styling Tip: Ultimately, lean this frame against a neutral-toned watercolor art print on your dresser.
9. Pegboard Slat Board: DIY Earring Holder
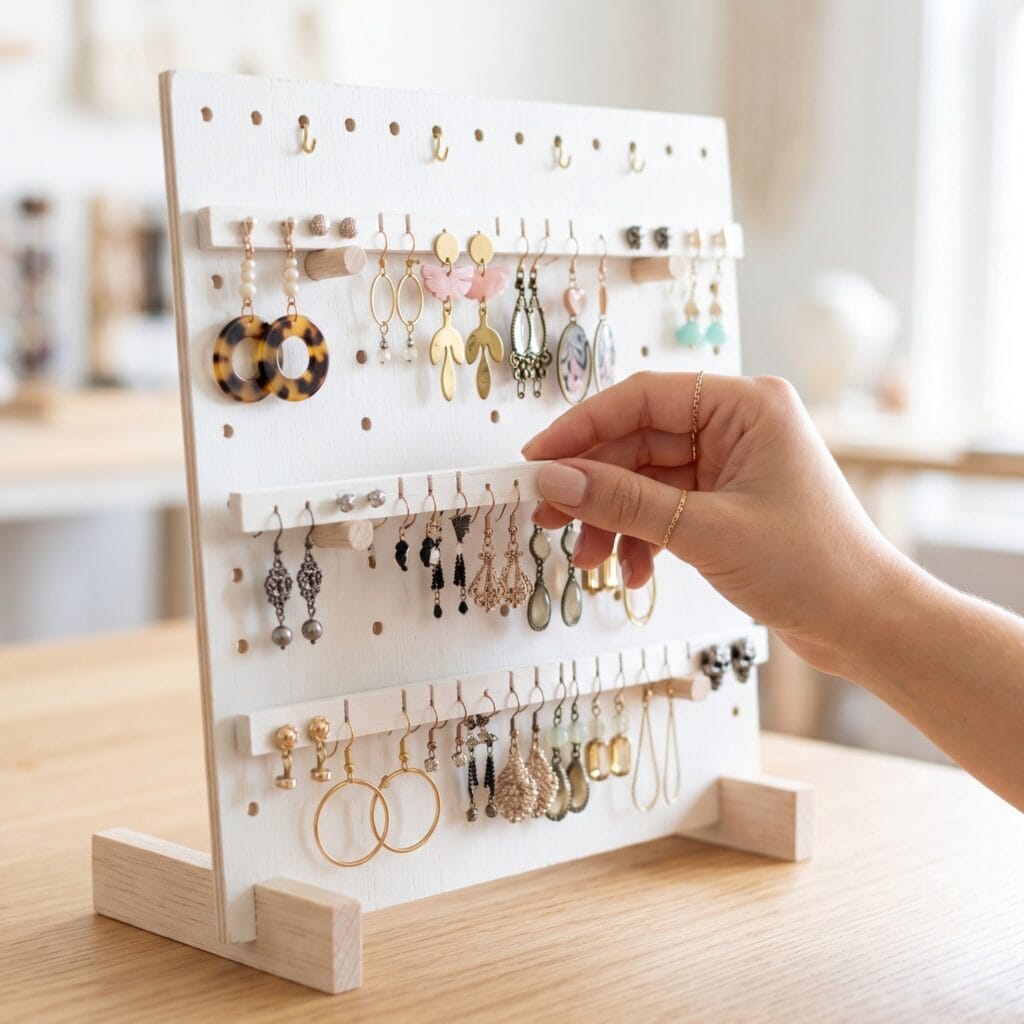
The Concept: Basically, design a trendy customizable grid board. the adjustable pegs are fun, it feels very modern. Quick Steps:
- cut a mini piece of white painted pegboard.
- Next, slide small balsa wood slats into the holes.
- Then, use the open holes directly for backing hooks. Styling Tip: place this modern board on an open clothing rack shelf.
10. Copper Pipe Stand: DIY Earring Holder
Supplies Needed: Copper Pipe and Fittings, Mini Copper Pipe Cutter, Fine-Grit Sandpaper Assortment, Rubber Bumper Feet
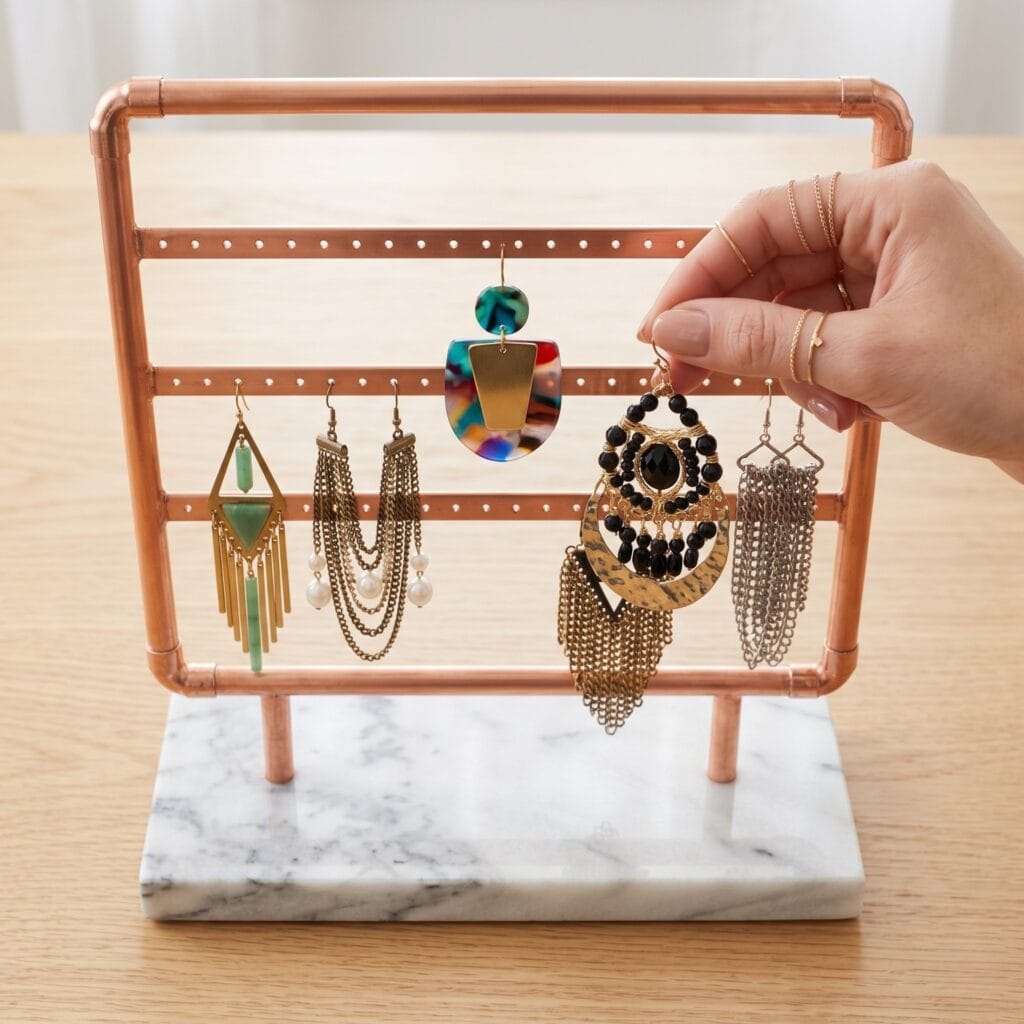
The Concept: Chiefly, build a bold, industrial metallic organizer. the glowing copper tubes look very chic. Quick Steps:
- assemble clean copper pipes using 90-degree elbow joints.
- Next, drill parallel hole pairs along the horizontal bars.
- Then, mount the industrial frame onto a heavy marble base. Styling Tip: Consequently, place this structural stand in a minimalist walk-in closet space.
Elevate Your Vanity with a DIY Earring Holder
Designing your own organizational pieces is deeply satisfying. Ultimately, this diy earring holder will instantly upgrade your interior. dedicate a few hours this weekend. Consequently, your home will look highly stylish. So, which modern project are you planning to make first? Please, share your upcoming plans in the comments below!
Quick Reference: All Supplies at a Glance
For your convenience, here is a quick summary of all materials and tools used in this tutorial:
✨ Consumable Raw Materials
- Unfinished Wood Picture Frames | Check Price on Amazon
- Brass Wire Mesh Screen | See Price on Amazon
- Unfinished Hardwood Craft Blocks | Check Unfinished Hardwood Craft Blocks on Amazon
- Raw Vegetable-Tanned Leather Strips | See Raw Vegetable-Tanned Leather Strips on Amazon
- Unfinished Wood Dowels | View Unfinished Wood Dowels on Amazon
- Small Ceramic Trinket Dishes | Find Small Ceramic Trinket Dishes on Amazon
- Solid Brass T-Bar Components | Check Latest Price on Amazon
- Clear Cast Acrylic Sheets | View on Amazon
- Natural Driftwood Branches | Check Price on Amazon
- Embroidery Linen Fabric | See Price on Amazon
- Wood Embroidery Hoops | Check Wood Embroidery Hoops on Amazon
- Unfinished Pegboard Panels | See Unfinished Pegboard Panels on Amazon
- Copper Pipe and Fittings | View Copper Pipe and Fittings on Amazon
🧰 Core Crafting Tools & Equipment
- Heavy-Duty Staple Gun and Staples | Check Latest Price on Amazon
- Flush-Cut Wire Cutters | View on Amazon
- Mini Hand Drill with Micro Drill Bits | Check Price on Amazon
- Leather Hole Punch | See Price on Amazon
- Fine-Tooth Craft Saw | Check Fine-Tooth Craft Saw on Amazon
- Acrylic Scoring Knife | See Acrylic Scoring Knife on Amazon
- Mini Copper Pipe Cutter | View Mini Copper Pipe Cutter on Amazon
💎 Hardware, Fasteners & Finishing
- Clear-Drying Wood Glue | Find Clear-Drying Wood Glue on Amazon
- Fine-Grit Sandpaper Assortment | Find Fine-Grit Sandpaper Assortment on Amazon
- Clear Water-Based Wood Sealer | Check Latest Price on Amazon
- Rubber Bumper Feet | View on Amazon
- Brass Screw Eyes | Check Price on Amazon
⚡ Studio Tools & Workshop Equipment
- Variable-Speed Rotary Tool Kit | See Price on Amazon
- Benchtop Drill Press | Check Benchtop Drill Press on Amazon
- Daylight LED Magnifying Desk Lamp | See Daylight LED Magnifying Desk Lamp on Amazon
Important Crafting Safety Notes
Crafting is a rewarding creative activity, but maintaining a safe workshop environment is essential for yourself, your family, and your pets. Please review these vital safety precautions before starting:
• Personal Protective Equipment (PPE) & Safe Handling: Always wear safety glasses or protective eyewear when cutting metal wire, clipping jump rings, trimming hard findings, or using power tools to prevent flying shards. Use heat-resistant work mats and exercise caution around high-temperature glue guns, irons, or heating tools to avoid burns. Wear disposable nitrile gloves and a particle dust mask when sanding wood or working with clays, resins, and solvent-based sealants to protect your skin and lungs.
• Room Ventilation & Fume Safety: Always craft in a well-ventilated space with open windows, cross-ventilation, or active exhaust whenever using solvent-based adhesives, instant bonders, aerosol sprays, epoxy resins, or heat-curing materials. Never inhale chemical fumes directly, and allow finished pieces to off-gas and cure completely in an airy area away from everyday living spaces.
• Child & Pet Safety (Choking & Swallowing Prevention): Small craft components—including safety eyes, split rings, clasps, jump rings, beads, bells, small magnets, unbaked clay scraps, and loose polyester fiberfill—present severe choking, intestinal obstruction, and ingestion hazards for babies, toddlers, and pets. Keep all unattached hardware, yarn cutoffs, and stuffing strictly out of reach. For handmade gifts intended for infants or young children, omit plastic washer eyes and detachable findings entirely in favor of securely stitched, double-knotted embroidered details.
• Sharp Tool Storage & Clean Work Area: Store sharp tools—such as rotary cutters, craft knives, bent-tip yarn needles, snips, scissors, and jewelry pliers—in secure, latching cases or high cabinets immediately after use. Thoroughly inspect, sweep, or vacuum your craft area and floor after finishing to ensure no dropped needles, pins, wire clippings, or small findings remain where curious pets or bare feet could step on or swallow them.
• Certified, Quality & Non-Toxic Supplies: Always choose verified non-toxic craft supplies (such as ACMI AP-certified paints and adhesives, lead-free and nickel-free jewelry findings, and skin-safe materials). Follow manufacturer label guidelines for curing durations, safe operating temperatures, and proper product disposal. Never use food preparation utensils or kitchen cookware for craft chemicals.
For more detailed guidance on safe crafting practices, liability disclosures, and website usage, please review our Terms and Conditions.
“Which of these How to Make a Beautiful DIY Earring Holder: 10 Epic Ideas are you excited to try first, or do you have a creative tip of your own to share? Drop a comment below—I’d love to hear your thoughts and see what you create!”


