

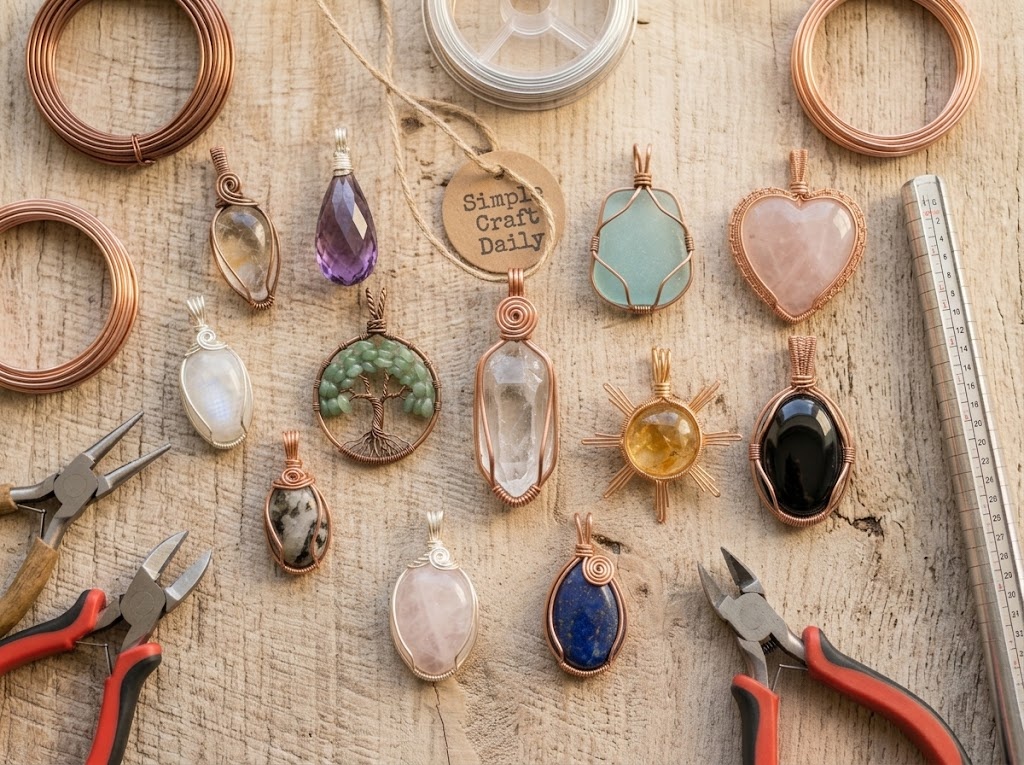
Loose wire ruins a pendant. DIY Wire Wrap Pendants stay secure when each wire is measured, tensioned, and tucked with intention instead of forced around a stone. These 12 no-solder designs show how to capture tumbled crystals, cabochons, and drilled focal beads with clean frames, firm coils, and comfortable bails.
Start with a few controlled bends, loops, and spirals, then build from there. If you have enjoyed our DIY copper jewelry guide or practiced with these DIY wire flower crafts, these pendant frames will make your wire control feel far more natural.
Affiliate Disclosure: This post contains affiliate links. As an Amazon Associate, I earn from qualifying purchases. If you buy through these links, I may earn a commission at no additional cost to you.
Essential Materials & Tools
wp:paragraphWire gauge controls the whole structure. Use dead-soft 20-gauge wire for frames, prongs, and bails, then use 26-gauge wire for binding, weaving, and neat coil work. Each DIY Wire Wrap Pendants project below includes a dedicated supplies blockquote, so you can set out the exact wire lengths and tools before cutting.
/wp:paragraph✨ Consumable Raw Materials
- Bare Copper Jewelry Wire Assortment, 20-Gauge and 26-Gauge — Dead-soft copper bends cleanly for structural frames and fine binding wraps | Check Bare Copper Jewelry Wire Assortment, 20-Gauge and 26-Gauge on Amazon
- Non-Tarnish Silver-Plated Copper Wire, 20-Gauge and 26-Gauge — A cool-toned option for moonstone, labradorite, clear quartz, and blue stones | Check Price on Amazon
- Tumbled Natural Crystal and Stone Assortment, 20 to 35 mm — Smooth, rounded stones give beginner wire wraps reliable contact points | View Tumbled Natural Crystal and Stone Assortment, 20 to 35 mm on Amazon
- Flat-Back Gemstone Cabochon Assortment, 18 to 30 mm — Calibrated cabochons sit predictably in prong frames and woven rails | Find Flat-Back Gemstone Cabochon Assortment, 18 to 30 mm on Amazon
- Top-Drilled Gemstone Briolette Beads, 18-25 mm — Project 11’s focal drop — assorted top-drilled gemstone briolettes, 18 to 25 mm, for the wrapped loop and fringe. | See Price on Amazon
- Seed Beads, Size 11/0, Glass — Uniform glass beads slide through 26-gauge wire for controlled fringe and decorative stops | See Seed Beads, Size 11/0, Glass on Amazon
- Oval Moonstone Cabochons, 18-25 mm — Project 3’s oval moonstone cabochon, 18 by 25 mm — the prong frame wraps its edges. | Find on Amazon
- Green Aventurine Cabochons, 25-30 mm — Project 4’s focal cabochon, 25 to 30 mm — flat back so the wire frame can grip it. Focal stone for 4. Tree-of-Life Aventurine Wire Pendant. | Check Green Aventurine Cabochons, 25-30 mm on Amazon
- Frosted Sea Glass Pieces — Naturally softened sea glass edges are well suited to an open wire cage. Focal stone for 5. DIY Wire Wrap Pendant with a Sea Glass Cage. | Check Price on Amazon
- Labradorite Cabochons — Flat-back labradorite provides a stable focal for the woven bezel-style pendant. Focal stone for 6. Labradorite Bezel-Style Woven Pendant. | View Labradorite Cabochons on Amazon
- Raw Quartz Points — Natural pointed quartz crystals create the vertical focal required for a wire point wrap. Focal stone for 7. DIY Wire Wrap Pendant with a Raw Quartz Point. | Find Raw Quartz Points on Amazon
- Rose Quartz Heart Cabochons, 20-25 mm — Project 8’s heart cabochon, 20 to 25 mm — flat back for the wrapped frame. Focal stone for 8. Rose Quartz Heart Frame Pendant. | Check Rose Quartz Heart Cabochons, 20-25 mm on Amazon
- Round Citrine Cabochons, 18-22 mm — Project 9’s round citrine cabochon, 18 to 22 mm — the sunburst wrap expects a calibrated disc. Focal stone for 9. DIY Wire Wrap Pendant with a Citrine Sunburst. | Check Round Citrine Cabochons, 18-22 mm on Amazon
- Lapis Lazuli Teardrop Cabochons — Teardrop lapis cabochons support the curved silhouette and swirl details of the pendant. Focal stone for 10. Lapis Lazuli Teardrop Swirl Pendant. | Explore Lapis Lazuli Teardrop Cabochons on Amazon
- Black Onyx Cabochons — Smooth black onyx cabochons sit securely between the retaining rails of a double-wire frame. Focal stone for 12. Black Onyx Double-Wire Frame Pendant. | View on Amazon
- 18-Gauge Dead-Soft Copper Wire — Project 4’s circular tree frame calls for 6 in of 18-gauge copper — stiffer than the 20/26 set. | Check 18-Gauge Dead-Soft Copper Wire on Amazon
- 22-Gauge Copper Jewelry Wire — Project 11 uses 22-gauge copper wire for its wrapped-loop gemstone fringe. | Check 22-Gauge Copper Jewelry Wire on Amazon
- Rose-Gold Copper Jewelry Wire, 20 and 26 Gauge — Project 8’s frame wrap uses rose-gold wire in 20 and 26 gauge. | Check Rose-Gold Copper Jewelry Wire, 20 and 26 Gauge on Amazon
- Gold-Colored Copper Jewelry Wire, 20 and 26 Gauge — Project 9’s warm-tone frame uses gold-colored wire in 20 and 26 gauge. | Check Gold-Colored Copper Jewelry Wire, 20 and 26 Gauge on Amazon
- 22-Gauge Non-Tarnish Silver-Plated Wire — Project 2’s wrapped loop uses 3 in of 22-gauge non-tarnish silver-plated wire — a different finish from the copper set. | Check 22-Gauge Non-Tarnish Silver-Plated Wire on Amazon
- Top-Drilled Amethyst Briolette, 15-22 mm — Project 2’s focal stone — a top-drilled amethyst drop, 15 to 22 mm, held by the wrapped loop. | Check Top-Drilled Amethyst Briolette, 15-22 mm on Amazon
🧰 Core Crafting Tools & Equipment
- Nylon-Jaw Pliers for Jewelry Wire — Straighten soft wire without scratching plated finishes or flattening the round profile | Explore Nylon-Jaw Pliers for Jewelry Wire on Amazon
- Smooth-Jaw Chain-Nose and Round-Nose Jewelry Pliers Set — Round jaws form loops while chain-nose jaws compress wraps and press tails inward | View on Amazon
- Flush Cutters for Soft Jewelry Wire — A flush cut leaves a shorter, safer tail that can be pressed against the frame | Find on Amazon
- Stainless Steel Ruler with Millimeter Markings — Millimeter markings for measuring wire wraps and loop spacing accurately. | Check Stainless Steel Ruler with Millimeter Markings on Amazon
- Stainless Steel Ring Mandrel and Bail-Making Pliers — Consistent diameters make round frames, spirals, and chain-friendly bails easier to repeat | Check Price on Amazon
- Removable Masking Tape for Wire Marking — Project 8 marks the wire midpoint with a small removable piece of tape. | Check Removable Masking Tape for Wire Marking on Amazon
- Clear Safety Glasses for Wire Cutting — Eye protection for snipping wire — the safety notes call for it. | Check Clear Safety Glasses for Wire Cutting on Amazon
💎 Hardware, Fasteners & Finishing
- Jewelry Polishing Cloth — Project 12 finishing — lifts tarnish from copper wraps with a quick rub. | Check Jewelry Polishing Cloth on Amazon
- Microcrystalline Wax for Jewelry — Project 12 finishing — seals the polished surface against faster re-tarnish. | Check Microcrystalline Wax for Jewelry on Amazon
Tumbled stones suit open cages because their rounded edges accept crossing wires. Cabochons need a fitted frame and opposing retaining points, while drilled briolettes need a wrapped loop through the hole. For crystal wire wrapping for beginners, choose stones with smooth edges and a size between 20 mm and 30 mm.
/wp:paragraph wp:paragraphUse only smooth-jaw jewelry pliers on soft wire. Serrated household pliers bite into copper, leave grooves, and create weak spots that catch the light. Next, keep the cutter jaws pointed away from the stone when trimming each tail.
/wp:paragraph wp:paragraphAfter polishing a finished copper pendant, apply a pinhead-sized amount of microcrystalline wax with a clean cloth, avoiding stones and woven gaps. Buff the metal lightly after 10 minutes, then leave the pendant undisturbed for 24 hours before wearing it so the protective film can set fully.
/wp:paragraphOptional Studio Upgrades
Never required to finish the projects above — convenience upgrades for makers who want them.
📦 Beginner Project Kits & Coordinated Bundles
For beginners or makers starting from scratch, these coordinated bundles and all-in-one project packs bring together the core supplies in one convenient order.
- Beginner Wire Wrapping Jewelry Kit with Stones and Tools — A practical starting set for makers who need wire, simple tools, and pendant-scale stones together | See Price on Amazon
⚡ Studio Tools & Workshop Equipment
Optional studio upgrades — every project above can be completed without these.
- Bead Mat or Project Work Tray — Keeps round beads and stones from rolling while you work — the setup suggests a tray or bead mat. | Check Bead Mat or Project Work Tray on Amazon
- Daylight LED Magnifying Craft Lamp with Desk Clamp — Clear light and magnification help you inspect coil spacing and sharp wire ends before polishing | View on Amazon
- Silver-Plated Jump Rings and Pendant Chains — Assembly findings for displaying finished pendants — silver-plated base metal, not sterling. | View Sterling Silver-Plated Jump Rings and Pendant Chains on Amazon
- Rotary Tumbler Jewelry Polishing Machine with Steel Shot — A workshop machine for brightening batches of all-metal wirework with no stones or plated finishes attached | See Rotary Tumbler Jewelry Polishing Machine with Steel Shot on Amazon
- Cordless Precision Rotary Hobby Tool Kit with Flexible Shaft — Helps experienced makers deburr accessible metal areas with controlled polishing attachments | Explore Cordless Precision Rotary Hobby Tool Kit with Flexible Shaft on Amazon
DIY Wire Wrap Pendants: 12 Secure Crystal Designs
Work over a tray or bead mat so a clipped tail cannot disappear across the bench. First, straighten each length with nylon-jaw pliers, measure it with a ruler, and make all structural bends gradually. Wire becomes work-hardened after repeated bending, so make deliberate adjustments rather than opening and closing the same bend many times.
1. DIY Wire Wrap Pendant with a Copper Spiral Bail
Supplies Needed: 20-gauge bare copper wire, 2 lengths of 18 in; tumbled quartz stone, 25 to 30 mm; round-nose pliers; chain-nose pliers; flush cutters.
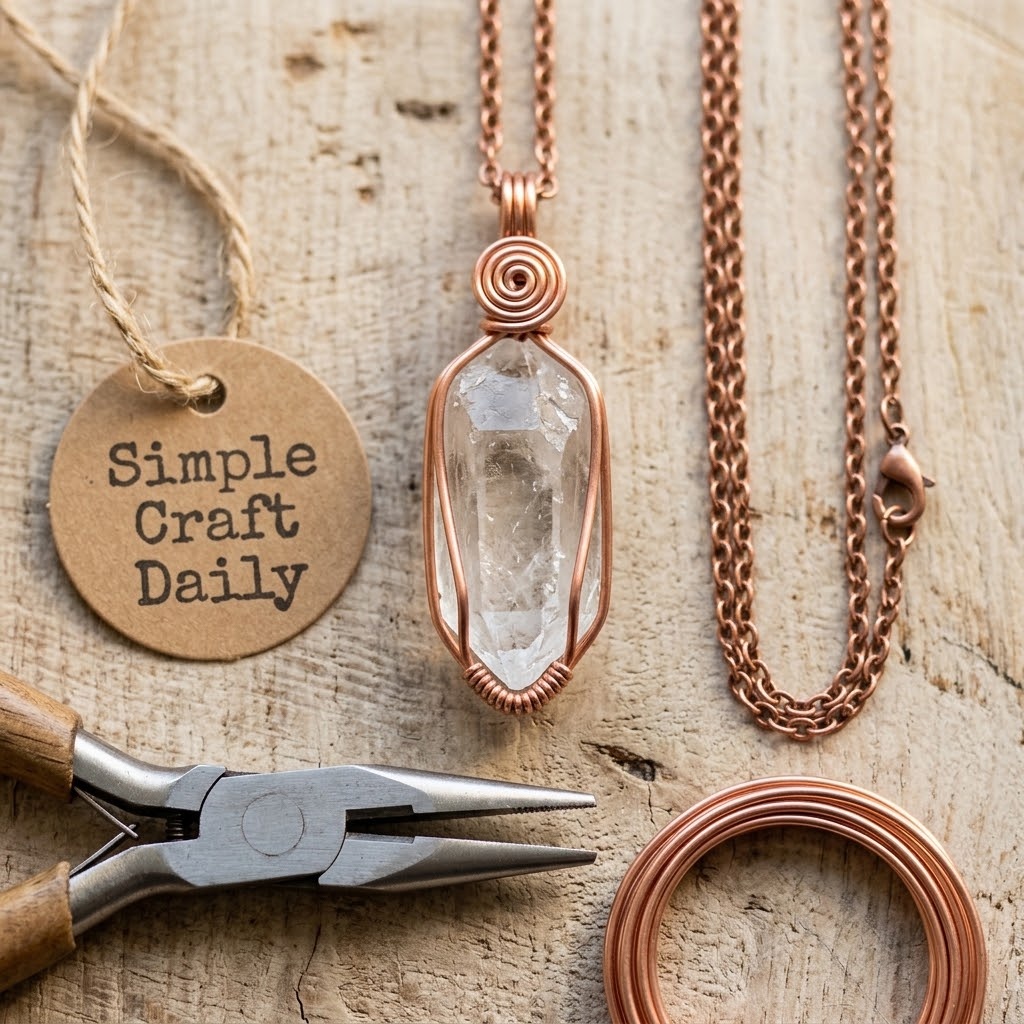
This open wrap holds a smooth tumbled quartz stone with two structural wires and a centered front cross. Cut two 18-inch lengths of 20-gauge bare copper wire. Use chain-nose pliers to straighten both lengths, then place them side by side with their midpoints aligned behind the stone.
- Cross the paired wires at the stone’s front center, then bring all four ends around the sides toward the back. Keep the front cross low enough to secure the stone without covering its center.
- At the back, cross the upper pair once and pull them snug. Bring the lower pair upward so the stone sits in a shallow wire basket.
- Use round-nose pliers to form a 6 mm loop with one upper wire. Wrap the remaining upper wire twice around the bail neck, then cut the tail with flush cutters.
- Form a small spiral with one lower front wire, press it flat against the frame, and trim the final tail. Use chain-nose pliers to tuck every cut end inward.
Finally, shake the finished DIY Wire Wrap Pendant gently. The quartz should not shift inside the frame. If it moves, tighten the opposite side wires in small increments rather than pulling one wire tightly across the front.
2. Amethyst Briolette Wrapped-Loop Pendant
Supplies Needed: Top-drilled amethyst briolette, 15 to 22 mm; 22-gauge non-tarnish silver-plated wire, 3 in; round-nose pliers; chain-nose pliers; flush cutters.
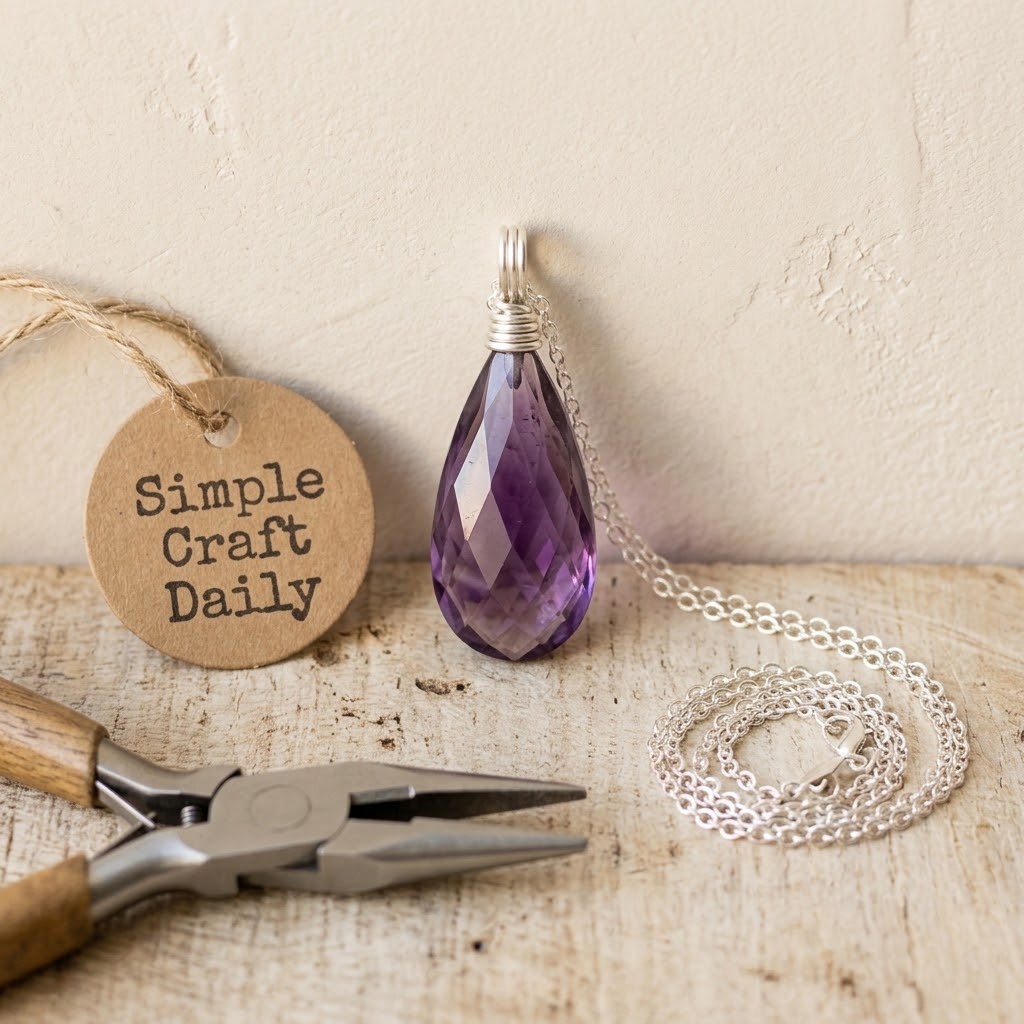
A top-drilled briolette needs a compact wrapped loop that cannot pull open while worn. Cut one 3-inch length of 22-gauge non-tarnish silver-plated wire and thread it through the amethyst briolette’s hole. Center the bead so the two wire ends meet above it.
- Grip both wire ends 1/4 inch above the bead and bend them upward at 90 degrees with chain-nose pliers.
- Use round-nose pliers to form a 5 mm loop with both wires. Keep the loop centered over the drilled hole.
- Hold the loop with chain-nose pliers. Wrap each wire end around the neck directly beneath the loop for three close turns.
- Cut both tails flush, then press them into the wrapped neck with the chain-nose pliers.
Check that the wrapped neck sits firmly above the briolette and does not pinch its top edge. This pendant works well on a fine chain because the 5 mm loop has enough clearance for most small jump rings.
3. DIY Wire Wrap Pendant with a Moonstone Prong Frame
Supplies Needed: Oval moonstone cabochon, 18 by 25 mm; 20-gauge silver-plated wire, 2 lengths of 10 in; 26-gauge silver-plated wire, 18 in; nylon-jaw pliers; round-nose pliers; chain-nose pliers; flush cutters.
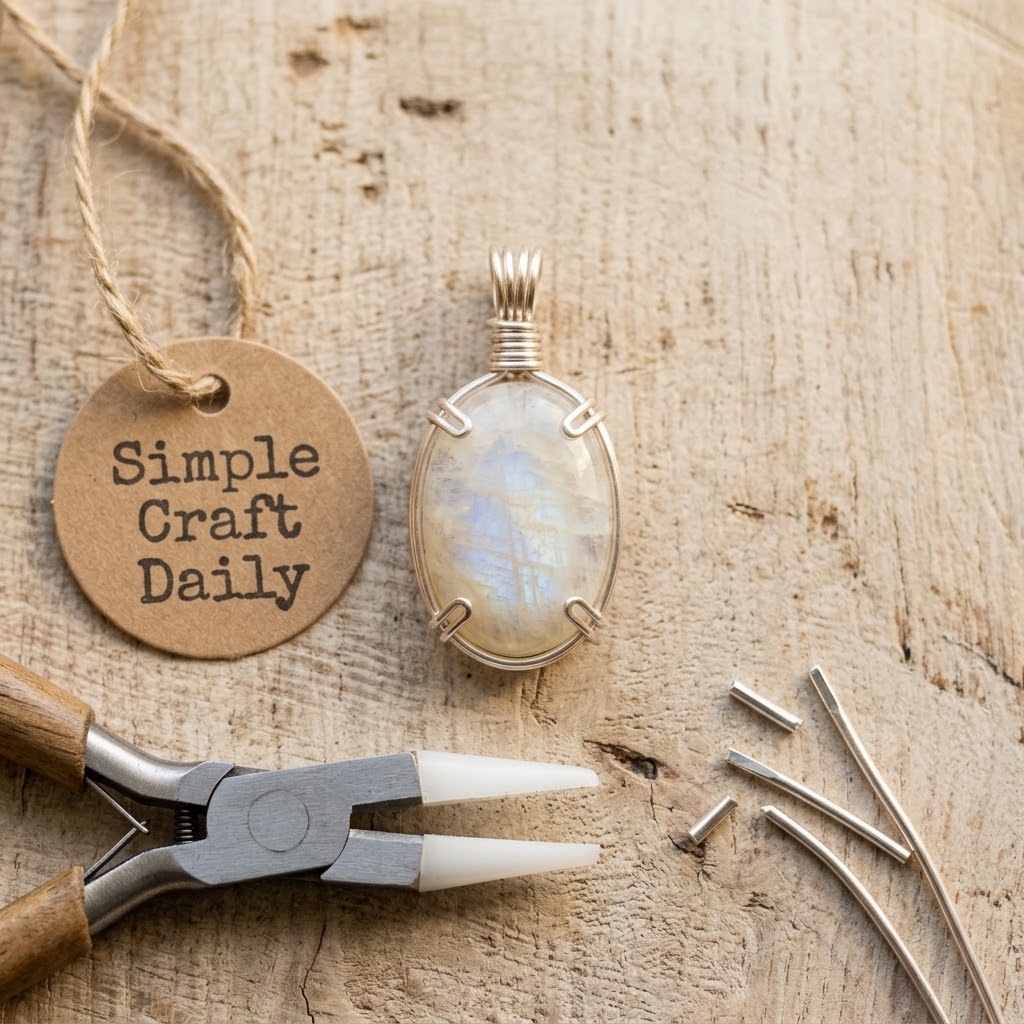
This moonstone frame uses four front prongs and a woven lower base. First, straighten two 10-inch lengths of 20-gauge silver-plated wire with nylon-jaw pliers. Lay the wires together and bend them around the cabochon’s lower curve, leaving equal tails at both sides.
- Remove the cabochon and bind the paired rails at the bottom center with 6 inches of 26-gauge wire. Make six close wraps, cut the binding wire, and press its tail between the rails.
- Set the moonstone into the lower curve. Bend one 20-gauge tail over the front at the lower left and bend its opposite tail over the front at the upper right.
- Repeat with the second wire so the four prongs land at roughly the 2, 4, 8, and 10 o’clock positions. Tighten opposite prongs evenly to keep the stone centered.
- Bring the two upper structural tails together. Form a 6 mm bail with round-nose pliers, wrap the remaining tail twice beneath it, then trim and tuck the tail with chain-nose pliers.
For DIY Wire Wrap Pendants with cabochons, test the frame before you finish the bail. Hold the pendant face-down over a soft cloth. The moonstone should remain seated without rattling, while the front prongs should touch only the stone’s edge.
4. Tree-of-Life Aventurine Wire Pendant
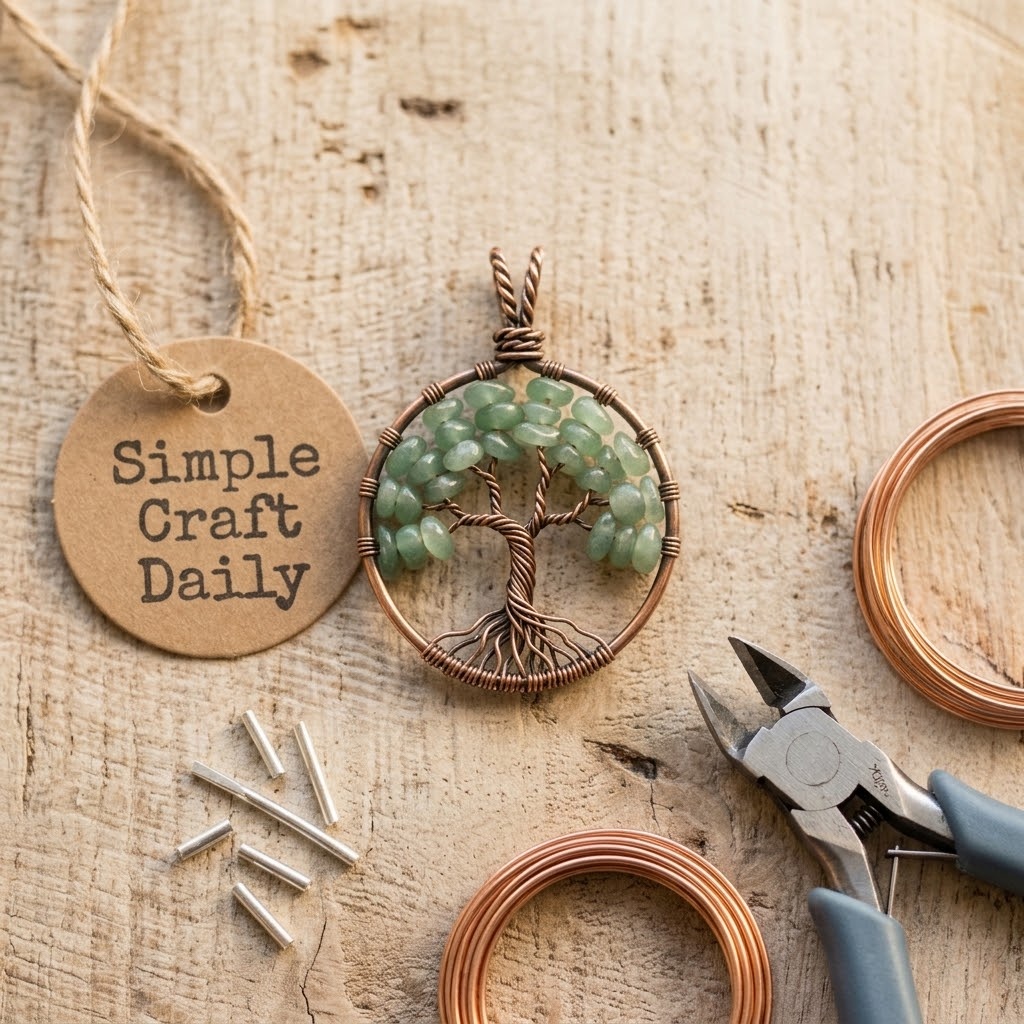
Supplies Needed: Green aventurine cabochon, 25 to 30 mm; 18-gauge copper wire, 6 in; 26-gauge copper wire, 12 lengths of 8 in; ring mandrel; chain-nose pliers; flush cutters.
Build the circular frame before shaping the tree canopy. Cut one 6-inch length of 18-gauge copper wire and wrap it around the 1.25-inch section of a ring mandrel. Cross the ends by 1/2 inch, then use chain-nose pliers to press the circle closed.
- Cut twelve 8-inch lengths of 26-gauge copper wire. Stack them evenly, fold the bundle at its midpoint, and twist the center section together for 3/4 inch to create the trunk.
- Separate the upper wire ends into six pairs. Twist each pair for 1/2 inch, then split the pairs again to create smaller branches.
- Fan the branches across the top half of the circular frame. Wrap each branch end once around the 18-gauge circle, cut the excess, and press every tail toward the back.
- Split the lower ends into root groups. Twist and curve them across the lower half of the aventurine cabochon, then bind the roots to the frame behind the stone.
Finish by forming a small loop at the top of the 18-gauge frame with chain-nose pliers. The cabochon should sit behind the roots and trunk without adhesive: the wrapped roots press the stone against the circular frame while the trunk locks the top edge, so wire tension alone keeps it from shifting. Consequently, the pendant remains easier to repair if you later adjust the wire placement.
5. DIY Wire Wrap Pendant with a Sea Glass Cage
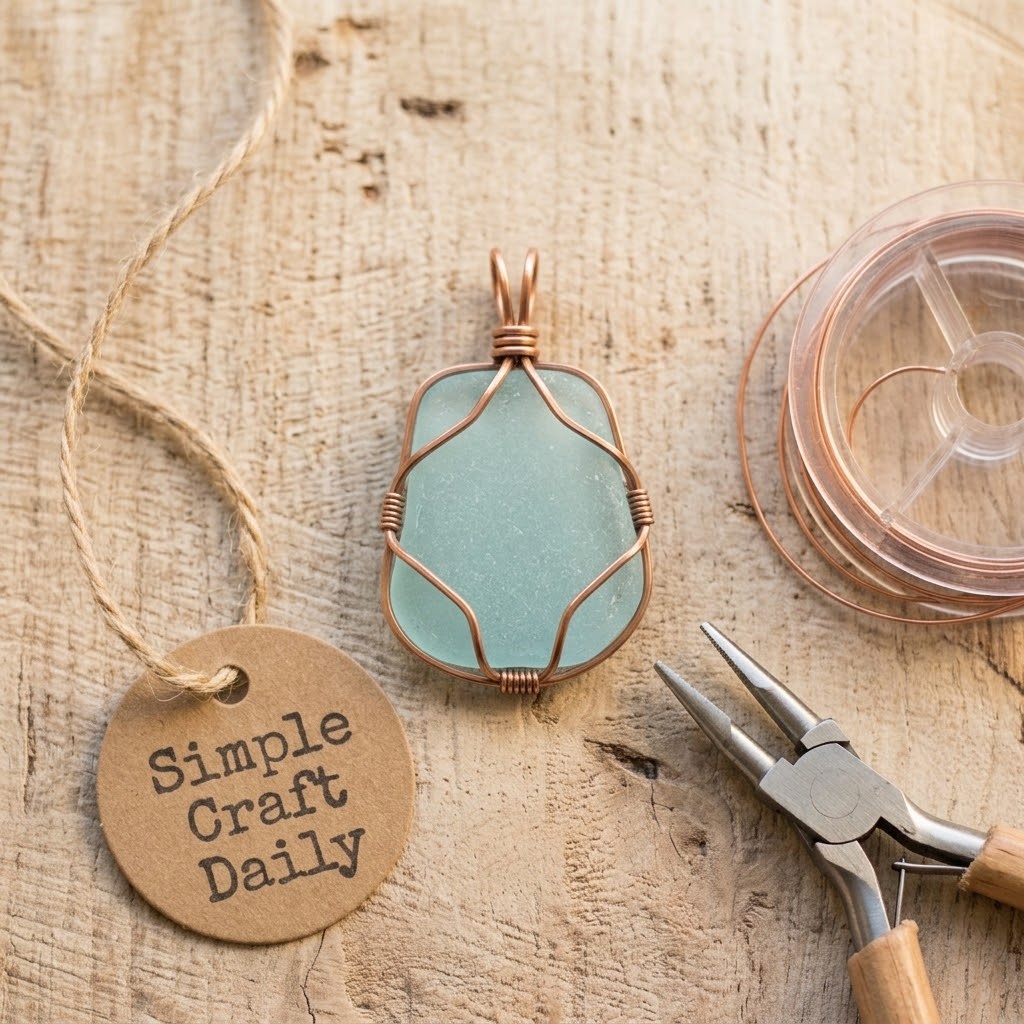
Supplies Needed: Sea glass piece, 25 to 35 mm; 20-gauge copper wire, 3 lengths of 14 in; 26-gauge copper wire, 24 in; round-nose pliers; chain-nose pliers; flush cutters.
Irregular sea glass needs a flexible cage rather than rigid, evenly spaced prongs. Cut three 14-inch lengths of 20-gauge copper wire. Align their midpoints and bind the center with 4 inches of 26-gauge wire, making five close wraps to create the lower basket point.
- Spread the six structural wire ends like spokes. Place the sea glass over the binding wraps, then curve three wires upward around the front and three around the back.
- Cross one front wire and one back wire near the stone’s upper third. Repeat on the opposite side so the cage grips several edges.
- Bring two upper wires together above the glass and form a 6 mm bail with round-nose pliers. Use one remaining wire to make two neck wraps beneath the bail.
- Use the 26-gauge wire to bind any loose side intersection with four close wraps. Trim every tail with flush cutters and press each cut end into the back of the cage.
This DIY Wire Wrap Pendant leaves the frosted sea glass visible from both sides. Nature-inspired materials also pair beautifully with the found details used in our DIY miniature worlds and fairy garden terrarium ideas.
6. Labradorite Bezel-Style Woven Pendant
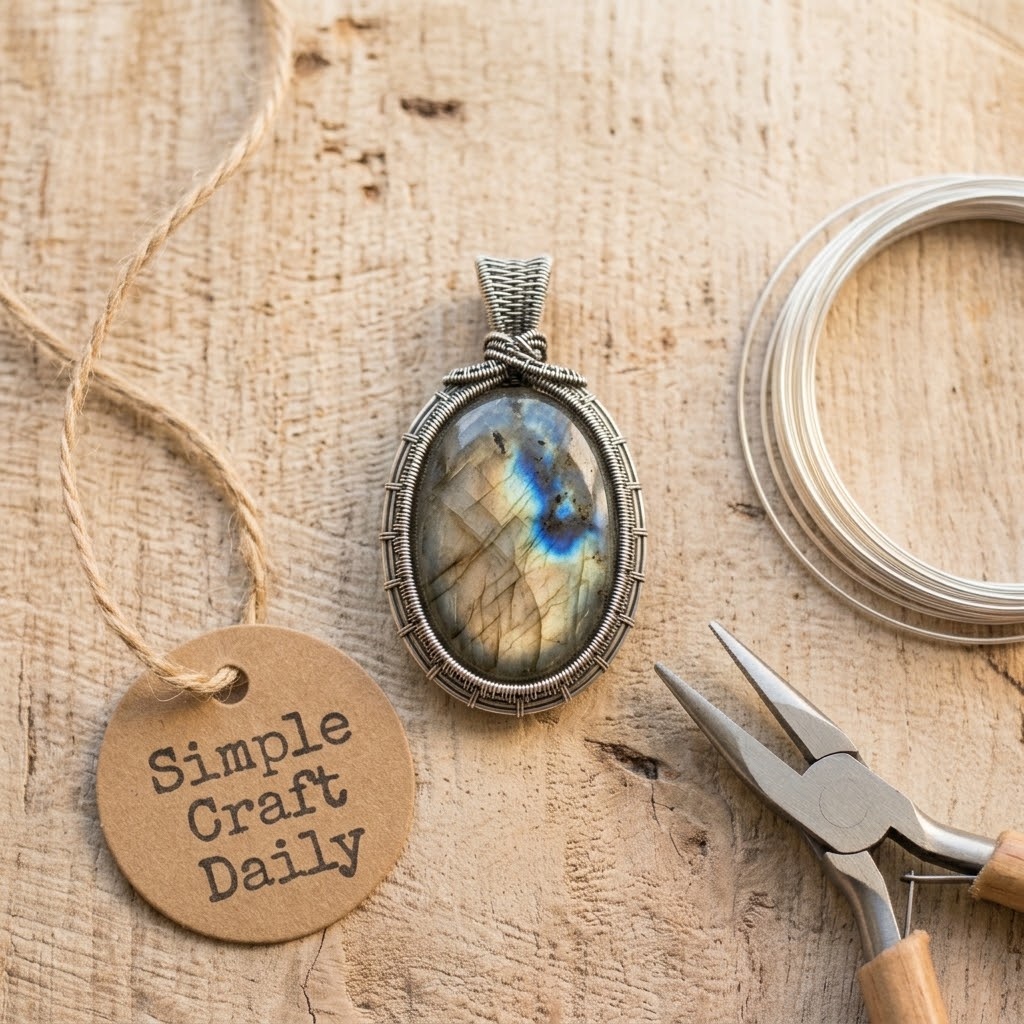
Supplies Needed: Labradorite cabochon, 20 by 30 mm; 20-gauge silver-plated wire, 2 lengths of 16 in; 26-gauge silver-plated wire, 72 in; nylon-jaw pliers; chain-nose pliers; flush cutters.
This bezel-style frame uses paired rails and fine figure-eight weaving to hold a flat-back labradorite cabochon. Straighten two 16-inch lengths of 20-gauge silver-plated wire with nylon-jaw pliers. Lay them parallel with a 3 mm gap, then cut one 72-inch length of 26-gauge silver-plated wire for weaving.
- Starting 2 inches from one end, weave the 26-gauge wire in a figure-eight pattern around the two rails for 2 inches. Make each pass snug against the previous pass, but do not crush the 3 mm gap.
- Curve the woven section around the cabochon’s lower edge. Continue weaving each side rail for 1 1/2 inches so the frame follows the stone’s outline.
- Set the labradorite inside the frame and check the fit before bending retaining prongs. The stone should sit flush against the back rail without rocking.
- Bend four short 20-gauge rail ends across the cabochon’s edge at balanced points. Press the prongs down with chain-nose pliers, then trim any long tails with flush cutters.
- Bring the two longest upper rails together, weave them for 1 inch with the remaining 26-gauge wire, and curve the woven section into a wide bail.
Keep the front prongs narrow so the labradorite flash stays visible. After this step, inspect each figure-eight weave from the side. Even spacing gives the frame a calm, professional finish and prevents the rails from spreading under wear.
Stainless Steel Ring Mandrel and Bail-Making Pliers
Forms consistent loops, bails and wrapped rings: the shaping tools all 12 pendants need.
I earn a commission if you make a purchase, at no additional cost to you.
7. DIY Wire Wrap Pendant with a Raw Quartz Point
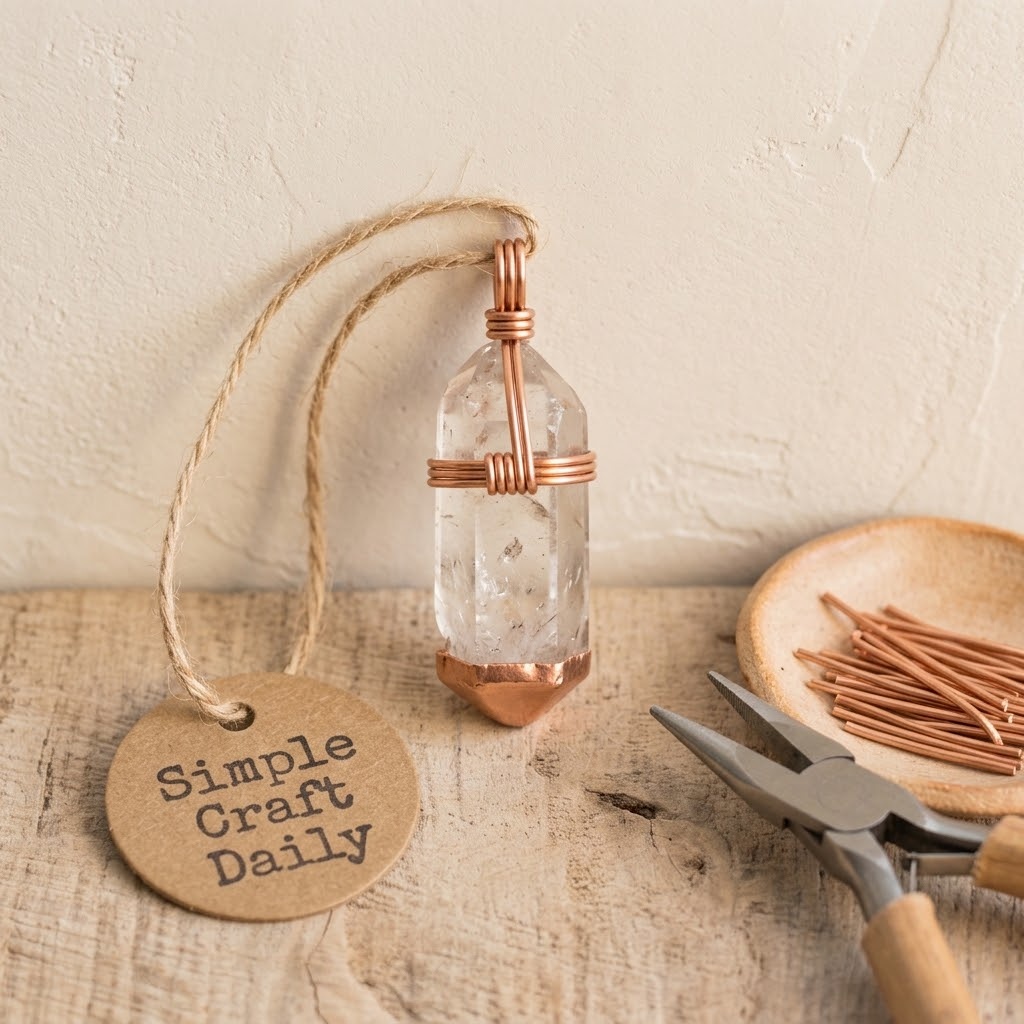
Supplies Needed: Raw clear quartz point, 30 to 45 mm; 20-gauge copper wire, 16 in; 26-gauge copper wire, 30 in; round-nose pliers; chain-nose pliers; flush cutters.
A raw quartz point needs a cap that grips its upper shoulder while leaving the pointed end exposed. Cut one 16-inch length of 20-gauge copper wire and one 30-inch length of 26-gauge copper wire. Position the quartz with its widest shoulder near the top.
- Wrap the 20-gauge wire once around the upper third of the quartz point, leaving equal tails. Cross the tails at the back and pull the band snug enough that it cannot slide downward.
- Bring both 20-gauge tails to the front. Curve them upward along opposite sides of the crystal and cross them 1/4 inch above the upper shoulder.
- Form a 6 mm bail with one tail using round-nose pliers. Wrap the second tail twice around the bail neck, then trim and tuck the tail with chain-nose pliers.
- Use the 26-gauge wire for two binding wraps around the side rails, one at the upper shoulder and one just above the midpoint. Keep the lowest binding above the crystal point.
The cap should hold the quartz without covering its natural point. For this DIY Wire Wrap Pendant, avoid pressing wire hard against a sharp crystal edge because repeated impact can chip a fragile raw point.
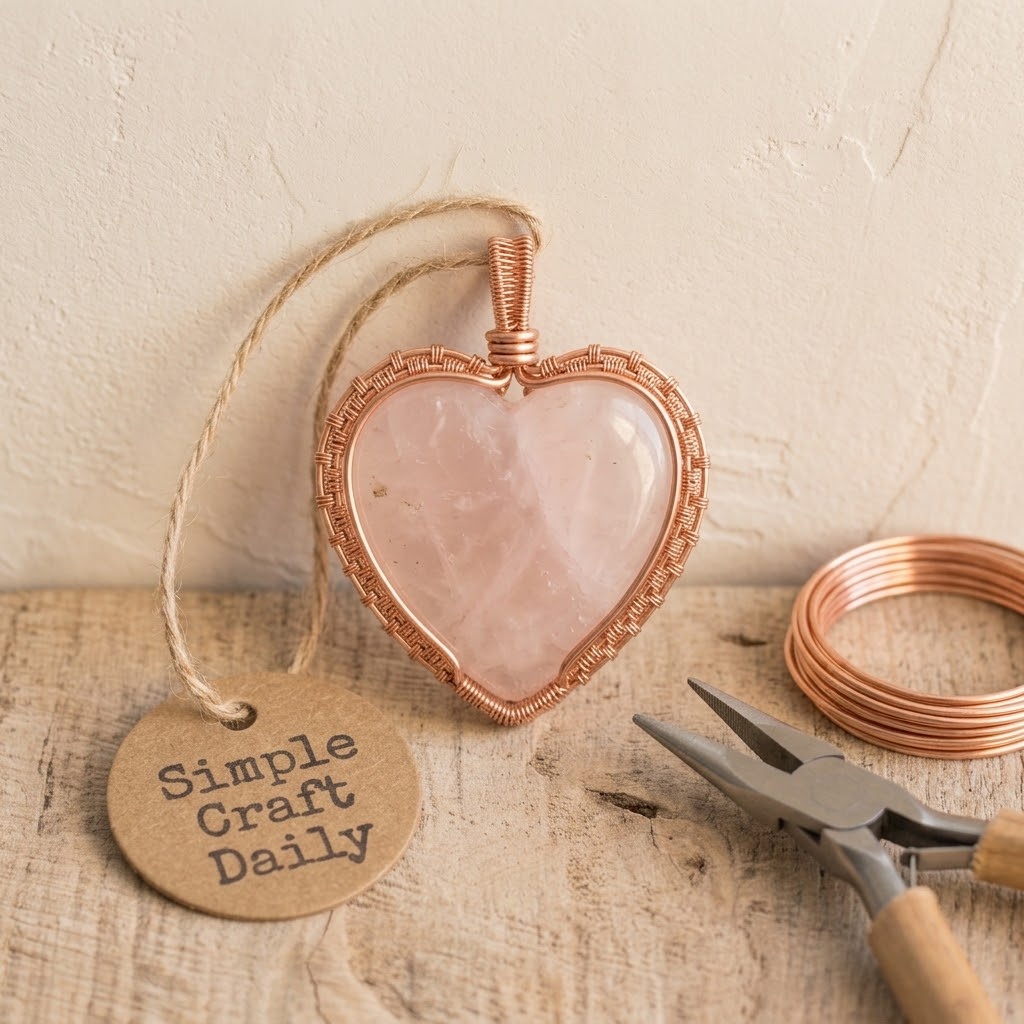
8. Rose Quartz Heart Frame Pendant
Supplies Needed: Rose quartz heart cabochon, 20 to 25 mm; 20-gauge rose gold copper wire, 18 in; 26-gauge rose gold copper wire, 30 in; bail-making pliers; chain-nose pliers; flush cutters.
Mark the midpoint of one 18-inch length of 20-gauge rose gold copper wire with a small removable piece of tape. Place the midpoint at the heart’s lower point, then bend each side upward around the cabochon so the wire follows the heart outline.
- Shape the left lobe first by curving the wire around the cabochon’s upper left side. Repeat the same curve on the right side, checking both lobes from directly above for symmetry.
- Meet the two wire ends at the heart’s center notch. Set the cabochon into the frame and confirm it sits flush before adding the binding wire.
- Use the 26-gauge rose gold copper wire to bind the lower point with five close wraps. Next, add four wraps at each upper side where the cabochon needs support.
- Use bail-making pliers to form a centered 6 mm bail from the two upper wire ends. Wrap one tail twice around the bail neck, cut both excess tails flush, and press the ends toward the back.
Keep the heart frame slightly wider than the cabochon during shaping. Once the binding wraps are in place, the wire closes inward by a small amount, and the lower and upper wraps clamp the cabochon’s rim so the stone stays seated without glue. Therefore, an initially tight frame can squeeze the stone or distort the heart lobes.
9. DIY Wire Wrap Pendant with a Citrine Sunburst
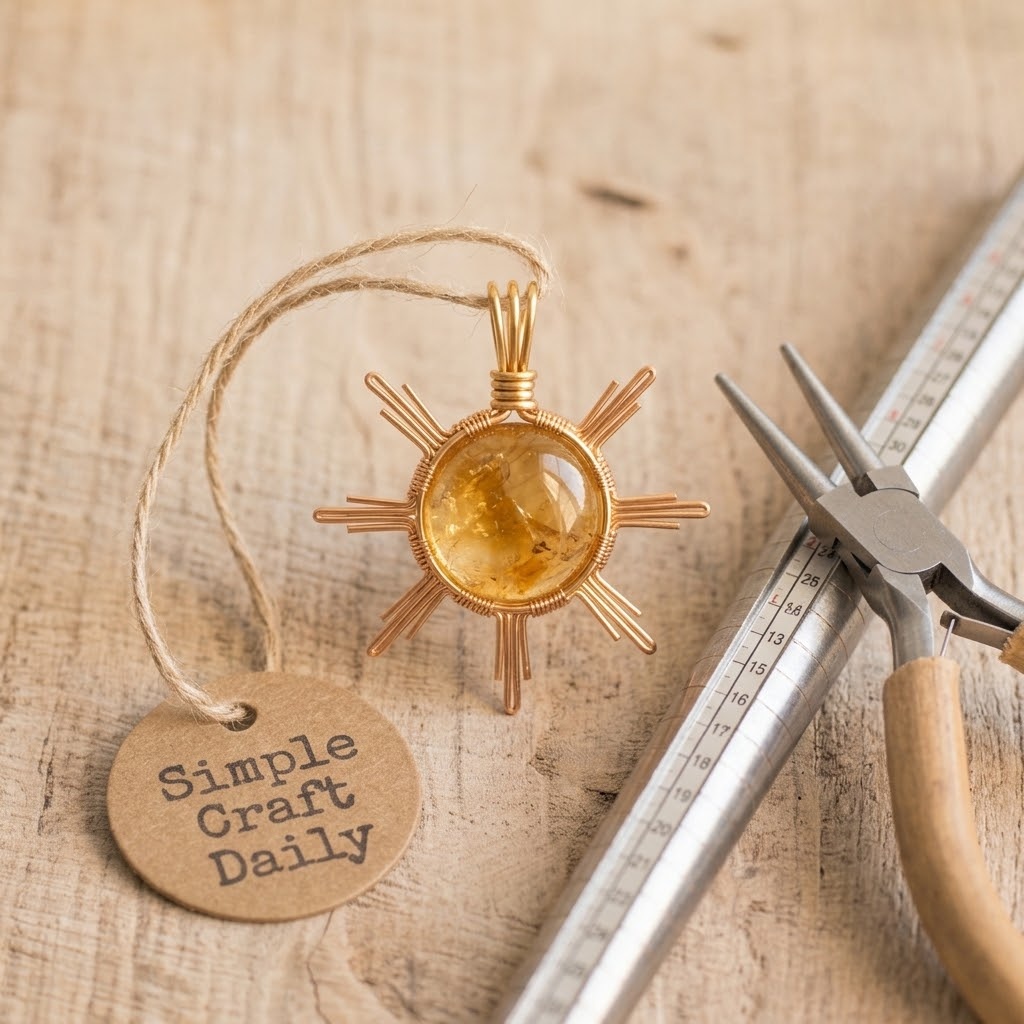
Supplies Needed: Round citrine cabochon, 18 to 22 mm; 20-gauge gold-colored copper wire, 20 in; 26-gauge gold-colored copper wire, 36 in; ring mandrel; round-nose pliers; flush cutters.
The sunburst frame combines a circular base with eight restrained rays. Wrap the 20-inch length of 20-gauge gold-colored copper wire around the 1-inch section of a ring mandrel. Leave two 3-inch tails at the top, then remove the circle and overlap the ends by 1/2 inch.
- Cut the 26-gauge wire into eight 4-inch lengths. Fold each length around the 20-gauge circle at evenly spaced points, leaving two short tails facing the front.
- Set the round citrine cabochon inside the circle. Bend each pair of 26-gauge tails gently over the stone’s outer edge, creating eight small rays around the perimeter.
- At the back, twist each ray pair together twice, trim the tails with flush cutters, and press the ends flat against the frame.
- Bring the two 20-gauge top tails together. Use round-nose pliers to form a 6 mm wrapped loop, then wrap one tail twice beneath the loop and trim it flush.
Space the eight rays before securing their ends. If you tighten one ray early, the citrine can drift off-center and leave uneven gaps. This DIY Wire Wrap Pendant looks best when every ray lands at the cabochon edge rather than crossing its face.
10. Lapis Lazuli Teardrop Swirl Pendant
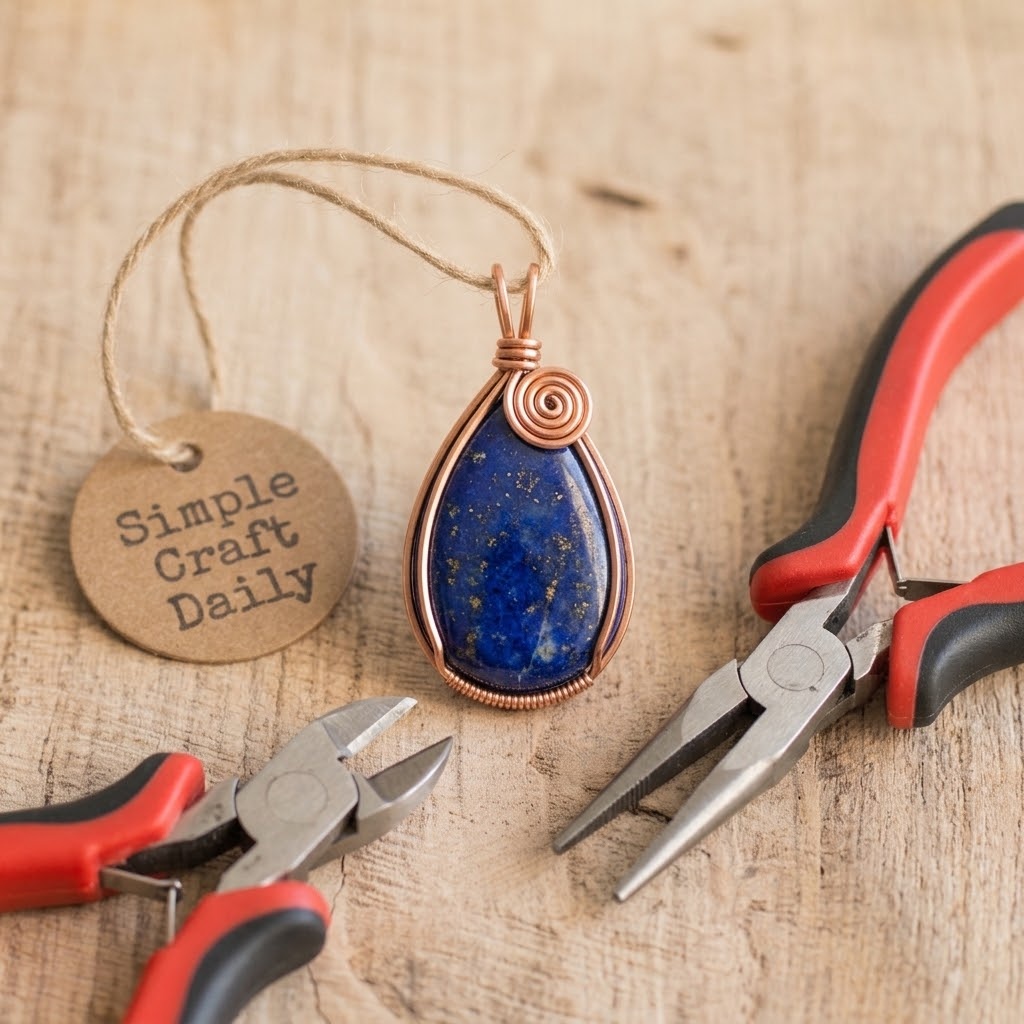
Supplies Needed: Lapis lazuli teardrop cabochon, 20 by 30 mm; 20-gauge copper wire, 24 in; 26-gauge copper wire, 24 in; round-nose pliers; chain-nose pliers; flush cutters.
Plan the front spiral before you shape the lower frame. Cut one 24-inch length of 20-gauge copper wire and make a flat spiral at one end with round-nose pliers. Coil the wire inward for two full turns, keeping the spiral flat against the bench.
- Place the spiral at the lower left of the lapis lazuli cabochon. Curve the remaining 20-gauge wire around the lower point, up the right side, and around the teardrop’s upper shoulder.
- Bend the wire back toward the front at the top. Form a 6 mm bail with round-nose pliers, leaving enough tail to create two wraps beneath the bail.
- Cut one 24-inch length of 26-gauge copper wire. Bind the spiral to the lower frame with six close wraps at the back, then add five wraps at the upper right side.
- Check that the cabochon sits flat: the frame curve should hug the teardrop’s rim while the spiral lies across its lower-left face, and the back bindings lock that setting so the stone stays seated without adhesive. Trim the binding-wire tails with flush cutters and use chain-nose pliers to press the ends into the back frame.
Keep the spiral broad and flat so the lapis face remains visible. The 26-gauge binding wire holds the frame together, while the 20-gauge wire provides the pendant’s shape and bail strength.
11. DIY Wire Wrap Pendant with Beaded Fringe
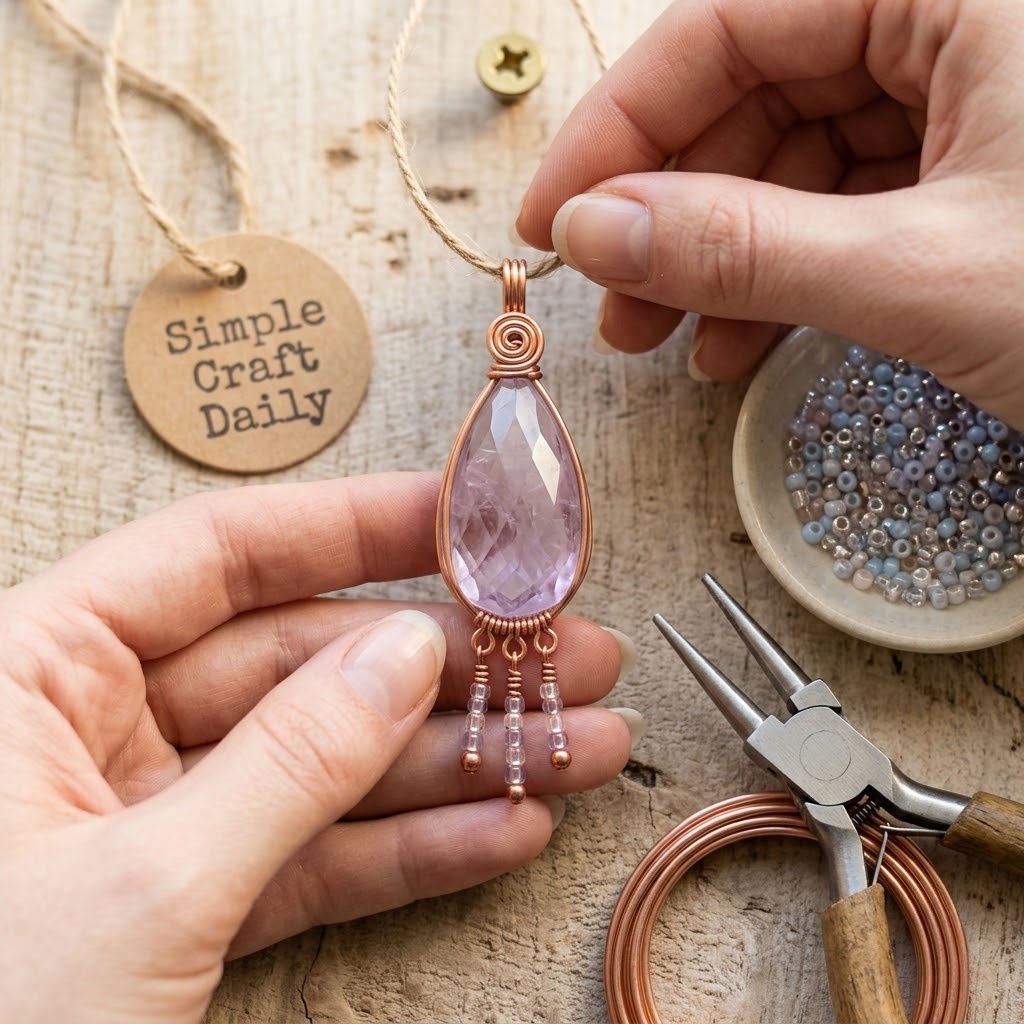
Supplies Needed: Top-drilled gemstone briolette, 18 to 25 mm; size 11/0 glass seed beads; 22-gauge copper wire, 3 in; 26-gauge copper wire, 3 lengths of 2.5 in; round-nose pliers; chain-nose pliers; flush cutters.
This light pendant uses a wrapped-loop briolette with three small bead-fringe drops. Thread the 3-inch length of 22-gauge copper wire through the top-drilled gemstone briolette. Bend both ends upward 1/4 inch above the bead and form a centered 5 mm loop with round-nose pliers.
- Wrap both 22-gauge wire ends three times around the loop neck. Trim the tails flush and press them inward with chain-nose pliers.
- Cut three 2.5-inch lengths of 26-gauge copper wire. Thread five size 11/0 glass seed beads onto each length, leaving 3/4 inch of bare wire above the bead row.
- Form a tiny closed wrapped loop at the top of every fringe wire. Wrap each neck twice, trim the tail with flush cutters, and press it flat with chain-nose pliers.
- Attach the three fringe loops around the lower wrapped neck of the briolette before closing the final loop completely. Space one drop at center and one on each side.
Closed wrapped loops keep fringe secure during wear. For DIY Wire Wrap Pendants, short fringe stays comfortable and avoids snagging on sweaters, scarves, or long hair.
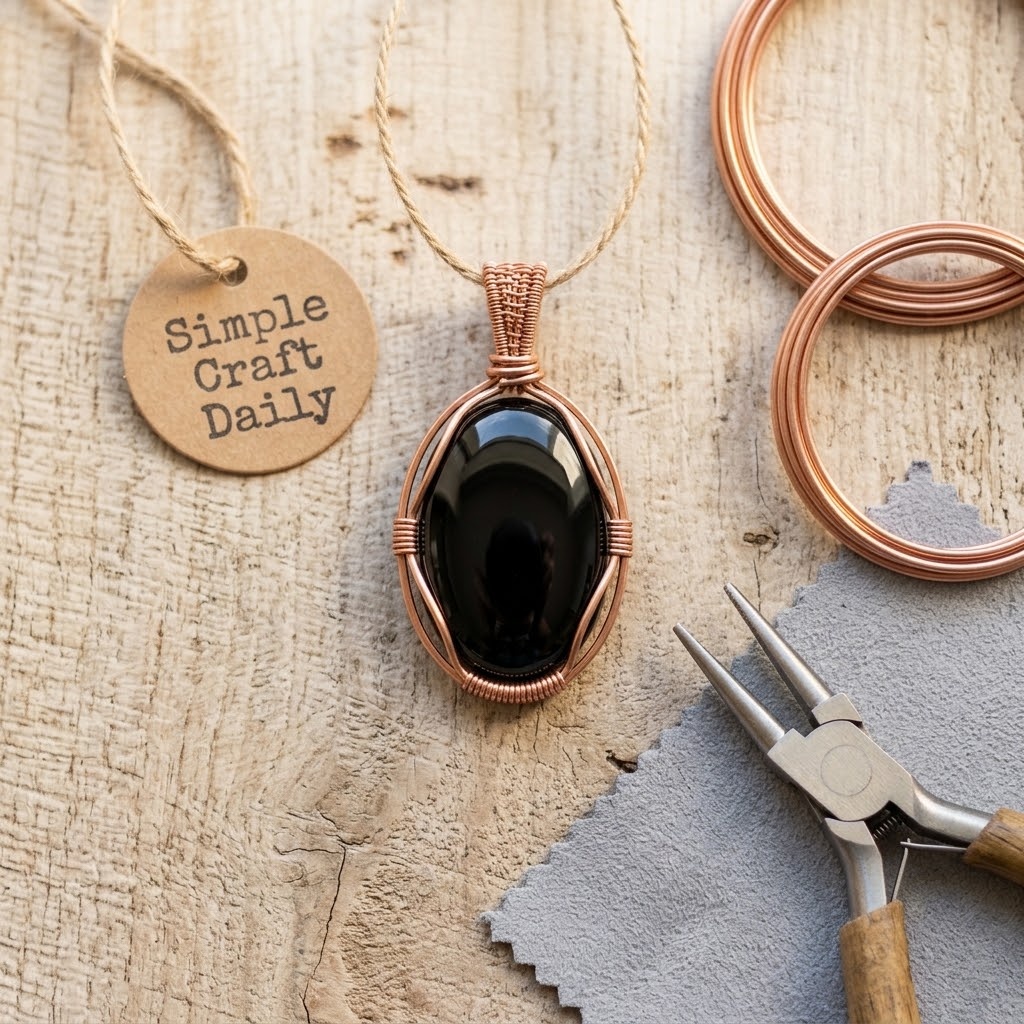
12. Black Onyx Double-Wire Frame Pendant
Supplies Needed: Black onyx oval cabochon, 18 by 25 mm; 20-gauge copper wire, 2 lengths of 15 in; 26-gauge copper wire, 60 in; nylon-jaw pliers; chain-nose pliers; flush cutters; jewelry polishing cloth; microcrystalline wax.
Finish the collection with a crisp double-rail frame that gives polished black onyx strong contrast. Straighten two 15-inch lengths of 20-gauge copper wire with nylon-jaw pliers. Hold the wires parallel with a 3 mm gap, then curve the pair around the lower half of the oval cabochon.
- Cut one 60-inch length of 26-gauge copper wire. Bind the two rails at the bottom center with eight close wraps, then continue with 3 mm-spaced binding sections up both lower sides.
- Set the onyx into the frame. Bend the lower rail ends across the front edge first, then bend the upper rail ends across the upper edge. Alternate sides so the stone remains centered.
- Bring the two longest upper rails together. Wrap them with the 26-gauge wire for 1 inch, then curve the woven section into a centered bail using chain-nose pliers.
- Trim all remaining tails with flush cutters. Under magnification, press each cut end flat against the back rail so no sharp edge can scratch the wearer.
- Use a jewelry polishing cloth to brighten only the accessible copper wire. Apply a pinhead-sized amount of microcrystalline wax to the copper with the cloth, avoid the onyx, buff after 10 minutes, and leave the pendant for 24 hours before wearing.
This DIY Wire Wrap Pendant depends on repeated, evenly spaced binding wraps. Consequently, measure the 3 mm spacing by eye against the wire diameter and adjust each wrap before moving to the next section.
DIY Wire Wrap Pendants FAQ
Secure wraps come from measured wire, balanced pressure points, and careful tail finishing. These answers cover the issues that show up most often at a beginner jewelry bench.
What wire gauge should beginners use for DIY Wire Wrap Pendants?
Begin with dead-soft 20-gauge copper wire for frames, bails, and prongs. It is thick enough to hold a pendant shape, yet it can still be bent with hand pliers. Use 26-gauge copper wire for binding rails, weaving, and small securing wraps.
Avoid half-hard or heavily work-hardened wire for your first pieces because repeated corrections can create sharp kinks. Practice with inexpensive bare copper first, then move to silver-plated or colored wire once your loops, coils, and tail tucks feel consistent.
How do I stop a wire-wrapped stone from slipping?
Build the frame around the stone, then test its fit before forming the final bail. A secure pendant uses opposing pressure points: for example, one lower front prong and one upper back rail on each side. This balanced contact keeps the stone from rotating.
If a stone shifts, tighten the matching opposite wire in a small adjustment. Pulling one front wire tightly across the stone can make the pendant look crooked and may push the stone out at the back. For irregular sea glass, add a small 26-gauge binding wrap at a loose intersection.
Can I polish DIY Wire Wrap Pendants after finishing?
Yes, use a soft jewelry polishing cloth after you inspect and tuck every wire tail. Rub accessible copper or silver-plated wire lightly, especially around the bail and front frame. Keep the cloth away from delicate coatings, soft stones, porous stones, and tightly woven areas where fibers can snag.
If you use microcrystalline wax on bare copper, apply only a thin film, buff it after 10 minutes, and allow 24 hours for the coating to set before wearing. Do not tumble stone-set pendants, plated wire, glued components, porous stones, or fragile raw points.
Which crystals work best for DIY Wire Wrap Pendants beginners?
Smooth tumbled quartz, aventurine, amethyst, and evenly shaped cabochons are good choices for crystal wire wrapping for beginners. Their rounded or calibrated edges give wire a clear place to sit, which makes it easier to test tension before you close the bail.
Raw points, irregular sea glass, and sharply faceted stones need more practice because the wire has fewer predictable contact points. Start with a 20 mm to 30 mm stone that fits comfortably between your thumb and forefinger, then work toward larger or more irregular focal pieces.
Quick Reference: All Supplies at a Glance
For your convenience, here is a quick summary of all materials and tools used in this tutorial:
✨ Consumable Raw Materials
- Bare Copper Jewelry Wire Assortment, 20-Gauge and 26-Gauge | Check Bare Copper Jewelry Wire Assortment, 20-Gauge and 26-Gauge on Amazon
- Non-Tarnish Silver-Plated Copper Wire, 20-Gauge and 26-Gauge | Check Price on Amazon
- Tumbled Natural Crystal and Stone Assortment, 20 to 35 mm | View Tumbled Natural Crystal and Stone Assortment, 20 to 35 mm on Amazon
- Flat-Back Gemstone Cabochon Assortment, 18 to 30 mm | Find Flat-Back Gemstone Cabochon Assortment, 18 to 30 mm on Amazon
- Top-Drilled Gemstone Briolette Beads, 18-25 mm | See Price on Amazon
- Seed Beads, Size 11/0, Glass | See Seed Beads, Size 11/0, Glass on Amazon
- Oval Moonstone Cabochons, 18-25 mm | Find on Amazon
- Green Aventurine Cabochons, 25-30 mm | Check Green Aventurine Cabochons, 25-30 mm on Amazon
- Frosted Sea Glass Pieces | Check Price on Amazon
- Labradorite Cabochons | View Labradorite Cabochons on Amazon
- Raw Quartz Points | Find Raw Quartz Points on Amazon
- Rose Quartz Heart Cabochons, 20-25 mm | Check Rose Quartz Heart Cabochons, 20-25 mm on Amazon
- Round Citrine Cabochons, 18-22 mm | Check Round Citrine Cabochons, 18-22 mm on Amazon
- Lapis Lazuli Teardrop Cabochons | Explore Lapis Lazuli Teardrop Cabochons on Amazon
- Black Onyx Cabochons | View on Amazon
- 18-Gauge Dead-Soft Copper Wire | Check 18-Gauge Dead-Soft Copper Wire on Amazon
- 22-Gauge Copper Jewelry Wire | Check 22-Gauge Copper Jewelry Wire on Amazon
- Rose-Gold Copper Jewelry Wire, 20 and 26 Gauge | Check Rose-Gold Copper Jewelry Wire, 20 and 26 Gauge on Amazon
- Gold-Colored Copper Jewelry Wire, 20 and 26 Gauge | Check Gold-Colored Copper Jewelry Wire, 20 and 26 Gauge on Amazon
- 22-Gauge Non-Tarnish Silver-Plated Wire | Check 22-Gauge Non-Tarnish Silver-Plated Wire on Amazon
- Top-Drilled Amethyst Briolette, 15-22 mm | Check Top-Drilled Amethyst Briolette, 15-22 mm on Amazon
🧰 Core Crafting Tools & Equipment
- Nylon-Jaw Pliers for Jewelry Wire | Explore Nylon-Jaw Pliers for Jewelry Wire on Amazon
- Smooth-Jaw Chain-Nose and Round-Nose Jewelry Pliers Set | View on Amazon
- Flush Cutters for Soft Jewelry Wire | Find on Amazon
- Stainless Steel Ruler with Millimeter Markings | Check Stainless Steel Ruler with Millimeter Markings on Amazon
- Stainless Steel Ring Mandrel and Bail-Making Pliers | Check Price on Amazon
- Removable Masking Tape for Wire Marking | Check Removable Masking Tape for Wire Marking on Amazon
- Clear Safety Glasses for Wire Cutting | Check Clear Safety Glasses for Wire Cutting on Amazon
💎 Hardware, Fasteners & Finishing
- Jewelry Polishing Cloth | Check Jewelry Polishing Cloth on Amazon
- Microcrystalline Wax for Jewelry | Check Microcrystalline Wax for Jewelry on Amazon
Important Crafting Safety Notes
Crafting is a rewarding creative activity, but maintaining a safe workshop environment is essential for yourself, your family, and your pets. Please review these vital safety precautions before starting:
• Personal Protective Equipment (PPE) & Safe Handling: Always wear safety glasses or protective eyewear when cutting metal wire, clipping jump rings, trimming hard findings, or using power tools to prevent flying shards. Use heat-resistant work mats and exercise caution around high-temperature glue guns, irons, or heating tools to avoid burns. Wear disposable nitrile gloves and a particle dust mask when sanding wood or working with clays, resins, and solvent-based sealants to protect your skin and lungs.
• Room Ventilation & Fume Safety: Always craft in a well-ventilated space with open windows, cross-ventilation, or active exhaust whenever using solvent-based adhesives, instant bonders, aerosol sprays, epoxy resins, or heat-curing materials. Never inhale chemical fumes directly, and allow finished pieces to off-gas and cure completely in an airy area away from everyday living spaces.
• Child & Pet Safety (Choking & Swallowing Prevention): Small craft components—including safety eyes, split rings, clasps, jump rings, beads, bells, small magnets, unbaked clay scraps, and loose polyester fiberfill—present severe choking, intestinal obstruction, and ingestion hazards for babies, toddlers, and pets. Keep all unattached hardware, yarn cutoffs, and stuffing strictly out of reach. For handmade gifts intended for infants or young children, omit plastic washer eyes and detachable findings entirely in favor of securely stitched, double-knotted embroidered details.
• Sharp Tool Storage & Clean Work Area: Store sharp tools—such as rotary cutters, craft knives, bent-tip yarn needles, snips, scissors, and jewelry pliers—in secure, latching cases or high cabinets immediately after use. Thoroughly inspect, sweep, or vacuum your craft area and floor after finishing to ensure no dropped needles, pins, wire clippings, or small findings remain where curious pets or bare feet could step on or swallow them.
• Certified, Quality & Non-Toxic Supplies: Always choose verified non-toxic craft supplies (such as ACMI AP-certified paints and adhesives, lead-free and nickel-free jewelry findings, and skin-safe materials). Follow manufacturer label guidelines for curing durations, safe operating temperatures, and proper product disposal. Never use food preparation utensils or kitchen cookware for craft chemicals.
For more detailed guidance on safe crafting practices, liability disclosures, and website usage, please review our Terms and Conditions.
“Which of these DIY Wire Wrap Pendants: 12 Easy Crystal Designs are you excited to try first, or do you have a creative tip of your own to share? Drop a comment below—I’d love to hear your thoughts and see what you create!”


