

Creating a handmade ceramic centerpiece without a spinning pottery wheel is a beautiful ritual. Specifically, starting with air dry clay pottery offers a deeply grounding, tactile experience. Consequently, it easily elevates your home gallery without high gallery prices or expensive kiln equipment.
Indeed, you can craft high-end, abstract storage pieces for your living room this weekend. Here, we review the best raw studio supplies. Then, we will explore 10 gorgeous ideas to build easily at home.
This blog post contains affiliate links. As an Amazon Associate, I earn from qualifying purchases. The content on some of these projects may be enhanced with structural craft inspirations.
Key Facts:
- Technique: Air Dry Clay Pottery
- Total time: 48 hours
- Difficulty: Easy
- Makes: 10 project ideas

The Artisan’s Essential Pottery Supplies
| Supply | Spec / Size | Used For |
|---|---|---|
| Premium Air-Dry Clay | Assorted colors | Base medium for every pottery idea |
| Wooden Modeling Knife | Shaping and trimming wet clay | |
| Steel Clay-Cutting Blade | Cutting clean clay slabs | |
| Wooden Rolling Pin | Rolling even clay slabs | |
| Liquid Clay Slip | Joining scored clay pieces | |
| Damp Studio Sponge | Smoothing surfaces and seams |
A few foundational tools are used throughout nearly every project in this guide, marked with a (used throughout) tag below.
🏺 Clay & Base Materials
Premium air-dry clay in assorted tones covers every project below — no kiln required, and it dries rigid enough for real display pieces.
- Premium Air-Dry Clay (Assorted Colors) (used throughout) | Check Price on Amazon
🔪 Cutting & Shaping Tools
A wooden modeling knife handles carving, edge work, and smoothing, while a separate steel blade delivers the clean, straight cuts that slab-built pieces need. A rolling pin and sandpaper round out the basic toolkit.
- Wooden Modeling Knife (used throughout) | View Price on Amazon
- Steel Clay-Cutting Blade (used throughout) | See Price on Amazon
- Wooden Rolling Pin (used throughout) | Check Price on Amazon
- Fine Sandpaper Blocks (used throughout) | View Price on Amazon
- Wooden Skewer or Pencil (for piercing holes) | Check Price on Amazon
- Mini Cookie Cutter (For Idea #9) | See Price on Amazon
🧴 Joining & Finishing
Liquid clay slip and a damp sponge are what actually hold pieces together and give every surface its final smooth finish.
- Liquid Clay Slip (used throughout) | Check Price on Amazon
- Damp Studio Sponge (used throughout) | View Price on Amazon
🕯️ Specialty & Project Extras
A handful of specialty items support the more architectural designs in this guide.
- Raw Woven Linen Fabric Scrap (For Idea #10) | Check Price on Amazon
- Cardboard Cone Form (For Idea #9) | Check Price on Amazon
- Heat-Safe Glass Dish (For Idea #9) | See Price on Amazon
- LED Tealight, Recommended (For Idea #9) | View Price on Amazon
Core Techniques for Air Dry Clay Pottery
Every design below builds on the same handful of hand-building skills. Master these once, and each idea becomes a simple variation.
1. Scoring & Slip Joining
This is how two separate clay pieces are permanently fused together.
Quick Steps: First, use the tip of your wooden knife to scratch a rough cross-hatch pattern onto both surfaces you’re about to join. Next, brush a thin layer of liquid clay slip over both scored areas. Then, press the two pieces firmly together and smooth the seam with a damp sponge until it disappears.
Used in: Floating Pebble Cone Ring Stack, Ribbon-Style Scalloped Jewelry Dish, Pressed Linen Cylinder Vase.
2. Rolling & Cutting a Slab
This is the foundation for nearly every flat or wrapped design in this guide.
Quick Steps: First, place your clay between two even guide sticks or thickness guides and roll it out with your rolling pin until it’s uniformly flat. Next, use your steel blade to cut clean, straight lines — dragging the blade in one smooth motion rather than sawing back and forth. Then, gently lift the cut slab with both hands to avoid stretching or distorting the edges.
Used in: Ribbon-Style Scalloped Jewelry Dish, Flat-Fold Ceramic Envelope Pocket, Monolithic Twin-Slot Photo Block, Abstract Bookmark Rest Cushion, Folded Ribbon Sage Bundle Tray, Tapered Geometric Oil Burner Shell, Pressed Linen Cylinder Vase.
3. Coiling
This builds tall, hollow forms by stacking rolled ropes of clay rather than a single solid mass.
Quick Steps: First, roll a length of clay between your palms and the table until it forms a long, even rope of consistent thickness. Next, coil the rope around itself in a tight upward spiral, scoring and slipping each new layer against the one beneath it as you go. Then, smooth the inner and outer walls with a damp sponge to blend the coils into a single continuous surface.
Used in: Sculptural Coil-Wrapped Taper Candle Holder.
4. Draping Over a Mold
This technique shapes a flat slab into a dome or shell by molding it over a temporary form.
Quick Steps: First, wrap your cardboard cone (or other form) in plastic wrap so the clay won’t stick to it. Next, drape your rolled slab evenly over the form, smoothing it downward with your hands to eliminate air pockets. Then, let the clay firm up slightly while still on the form before gently lifting it free, so it holds its shape.
Used in: Tapered Geometric Oil Burner Shell.
5. Fabric Texture Pressing
This transfers a real fabric’s weave directly onto a clay surface.
Quick Steps: First, lay your fabric scrap flat over a freshly rolled slab, while the clay is still soft and workable. Next, roll firmly over the fabric with your rolling pin so the weave presses into the surface. Then, peel the fabric back slowly and evenly to reveal the imprinted texture underneath.
Used in: Pressed Linen Cylinder Vase.
6. Piercing Clean Holes
This adds functional openings without cracking the surrounding clay.
Quick Steps: First, choose a spot with enough surrounding clay thickness to stay strong once pierced. Next, push a wooden skewer or pencil straight through in one smooth, steady motion rather than wiggling it side to side. Then, gently rotate the skewer once to smooth the inside edge of the hole before sliding it out.
Used in: Fluted Ikebana Flower Frog Vessel, Flat-Fold Ceramic Envelope Pocket.
7. Drying Thick or Hollow Forms Without Cracking
Thicker or hollow pieces dry unevenly if rushed, which is the most common cause of cracking in air-dry clay.
Quick Steps: First, let any hollow or thick piece dry slowly, out of direct sun or drafts, rather than somewhere warm and fast-drying. Next, if the piece has a hollow cavity, leave it open to the air on at least one side so trapped moisture can escape evenly. Then, expect longer dry times for thicker or joined pieces — 48 hours or more is normal — and resist the urge to move or handle the piece until it’s fully rigid.
Used in: Floating Pebble Cone Ring Stack, Flat-Fold Ceramic Envelope Pocket, Tapered Geometric Oil Burner Shell, Pressed Linen Cylinder Vase.
10 Sculptural Pottery Ideas to Master at Home
Additionally, these fresh gallery designs rely on clean contours. Here are ten inspiring formulations for your mood board.
Similarly, if you enjoy mixing raw earthen textures with modern vanity storage, check out our popular How to Make a Beautiful DIY Earring Holder: 10 Epic Ideas.
1. The Fluted Ikebana Flower Frog Vessel
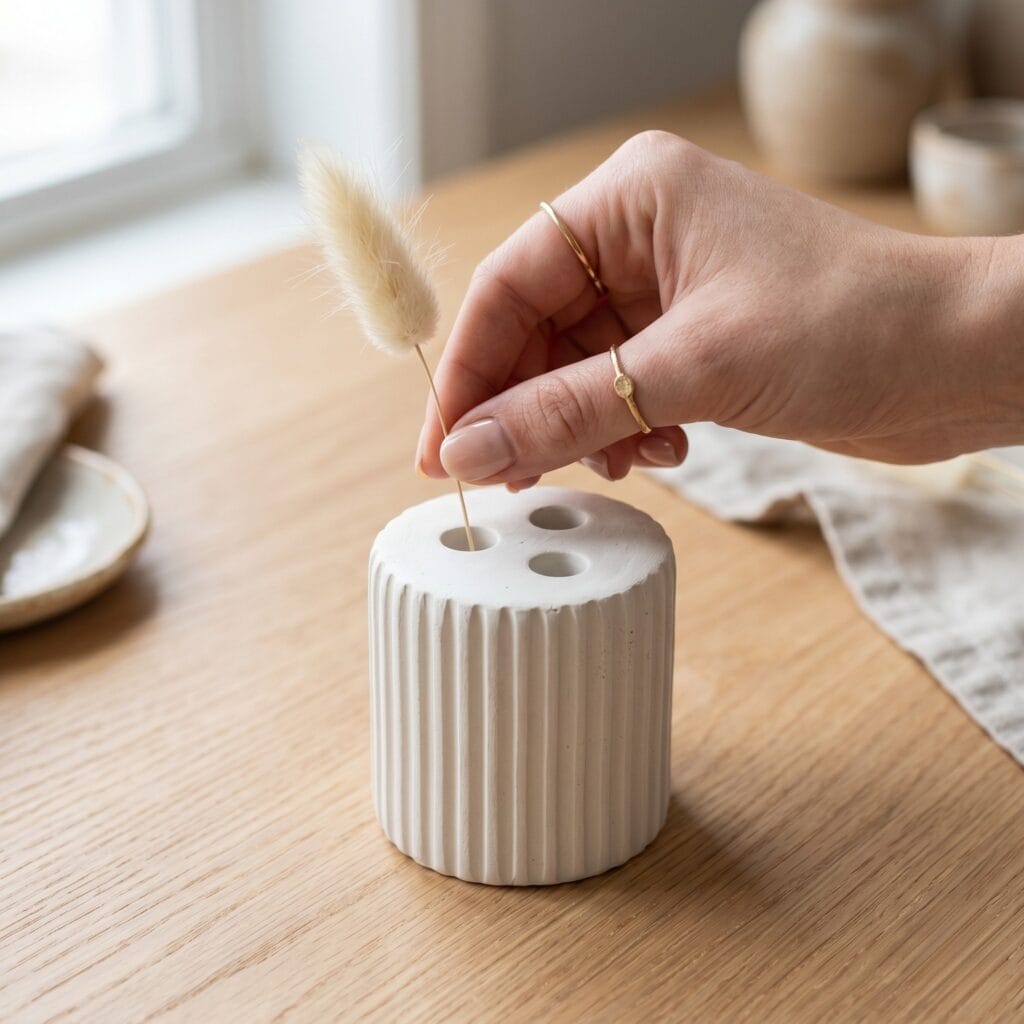
Supplies Needed: Air-dry clay (white), wooden modeling knife, wooden skewer or pencil.
The Concept: First, mix a powerful geometric vessel for single stems. This design acts like a modern flower frog. It draws bold shadows out of vertical ribbed clay channels. Quick Steps:
- First, form a solid 3-inch cylinder of white air-dry clay.
- Next, use a wooden knife to carve uniform, vertical fluted ridges down the side walls.
- Then, poke three clean, deep vertical holes into the top surface using a wooden pencil (see Technique 6: Piercing Clean Holes above).
Styling Tip: Next, let it dry flat. Place a single dried bunny tail stem inside. Display a single dried stem inside — air-dry clay isn’t waterproof, so skip fresh-cut flowers and standing water.
2. The Floating Pebble Cone Ring Stack: Air Dry Clay Pottery Project
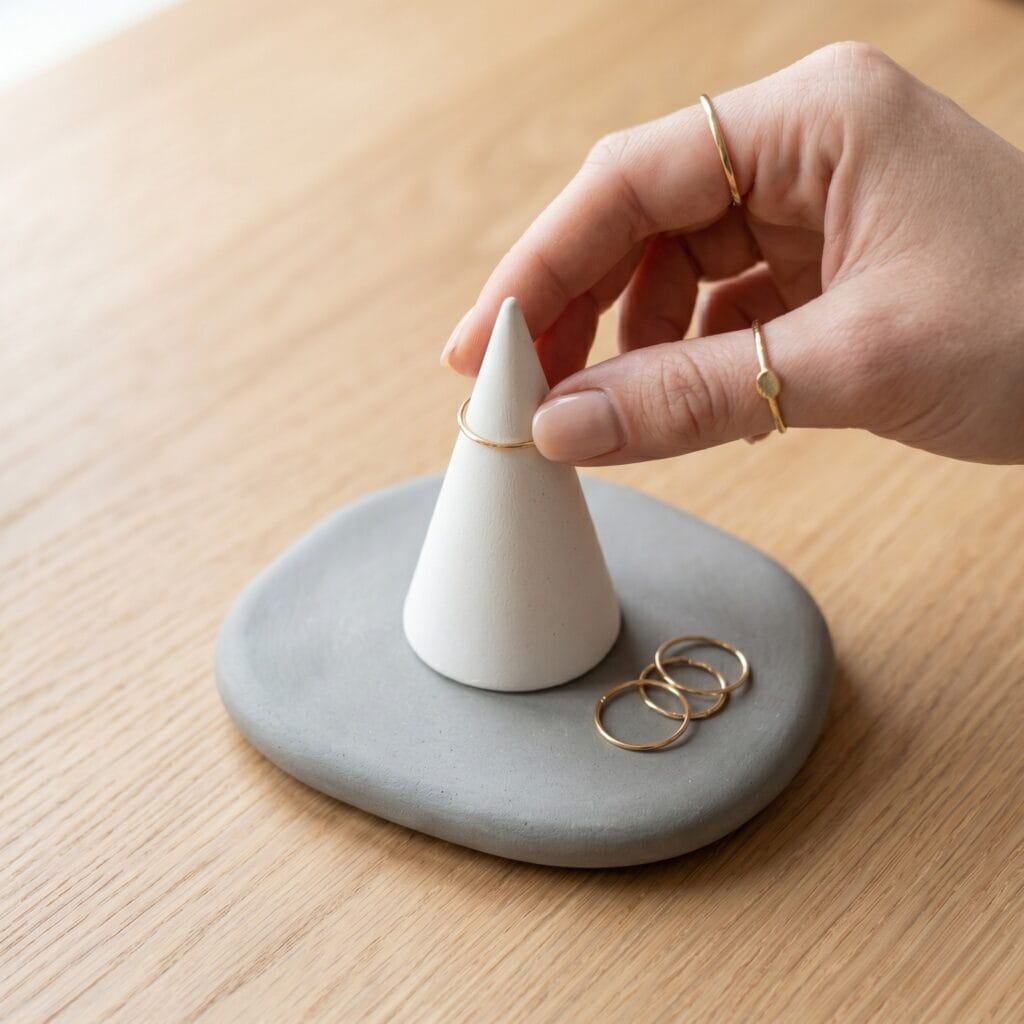
Supplies Needed: Air-dry clay (gray and white), liquid clay slip, damp studio sponge.
The Concept: Essentially, this organic, minimalist structure combines two shapes into a unique jewelry pyramid. Plus, it highlights smooth river stone contours. Quick Steps:
- First, roll a flat, smooth oval stone shape from gray clay to act as a base.
- Next, sculpt a separate thin 3-inch cone using white clay.
- Then, attach the cone slightly off-center onto the pebble base using a drop of wet slip (see Technique 1: Scoring & Slip Joining above).
Styling Tip: Therefore, let the heavy clay shape dry slowly for forty-eight hours to keep the joins strong (see Technique 7: Drying Thick or Hollow Forms above).
3. Ribbon-Style Scalloped Jewelry Dish
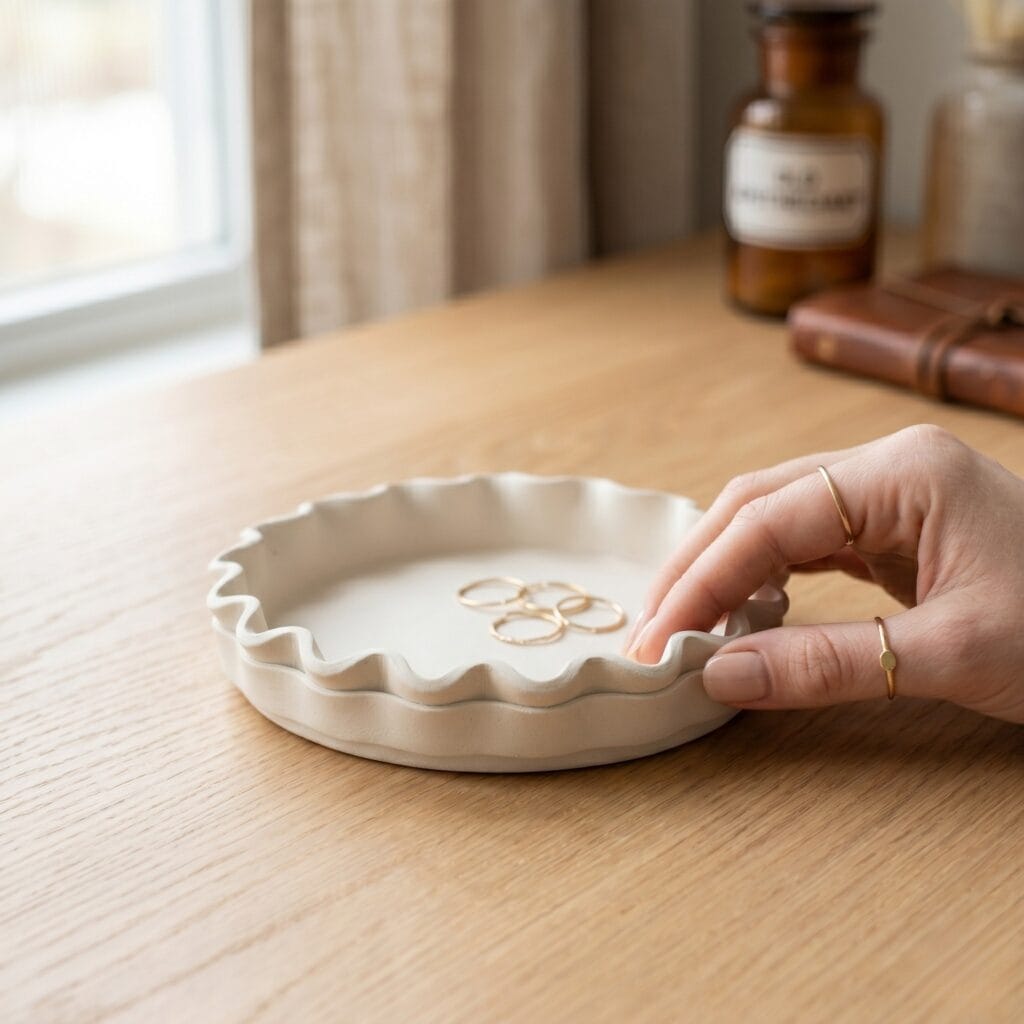
Supplies Needed: Air-dry clay, wooden rolling pin, steel clay-cutting blade, liquid clay slip.
The Concept: This neoclassical piece provides playful, wavy lines. So, it reduces visual clutter. It wakes up empty dresser vignettes instantly. Quick Steps:
- First, roll out a flat circular base disc using a rolling pin.
- Next, cut a long 1-inch wide ribbon strip from a flat clay slab.
- Then, press the strip around the disc edge, rippling it gently to create a scalloped border (see Techniques 1 and 2 above).
Styling Tip: Consequently, display this sleek monochrome dish on your nightstand. It pairs nicely with our textured 12 Epic DIY Cement Crafts to balance stone surfaces.
4. Flat-Fold Ceramic Envelope Pocket
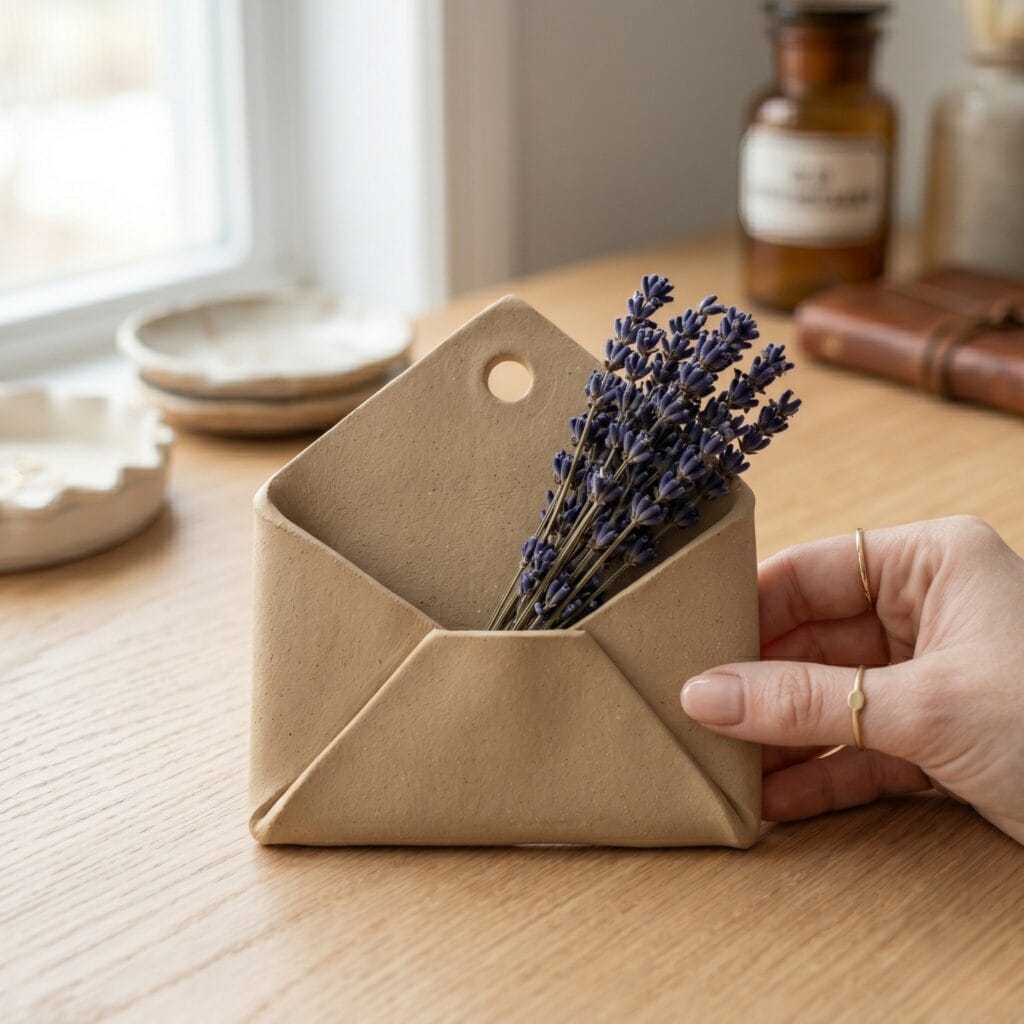
Supplies Needed: Air-dry clay (tan), wooden rolling pin, steel clay-cutting blade, wooden skewer or pencil.
Concept: Basically, craft a clever, envelope-inspired wall pocket or mail pocket. It focuses entirely on paper-like fold lines and sharp geometric contrast. Quick Steps:
- First, roll out a thin, flat rectangle of tan clay.
- Next, fold the bottom third upward, then fold the side flaps inward like a paper letter envelope.
- Then, poke a single clean hole through the flat top backing flap for hanging (see Technique 6: Piercing Clean Holes above).
Styling Tip: Ultimately, mount this hollow pocket onto a sunny wall and place a cluster of dried lavender stems inside (let it dry fully per Technique 7 above before hanging).
5. Monolithic Twin-Slot Photo Block: Air Dry Clay Pottery Layout
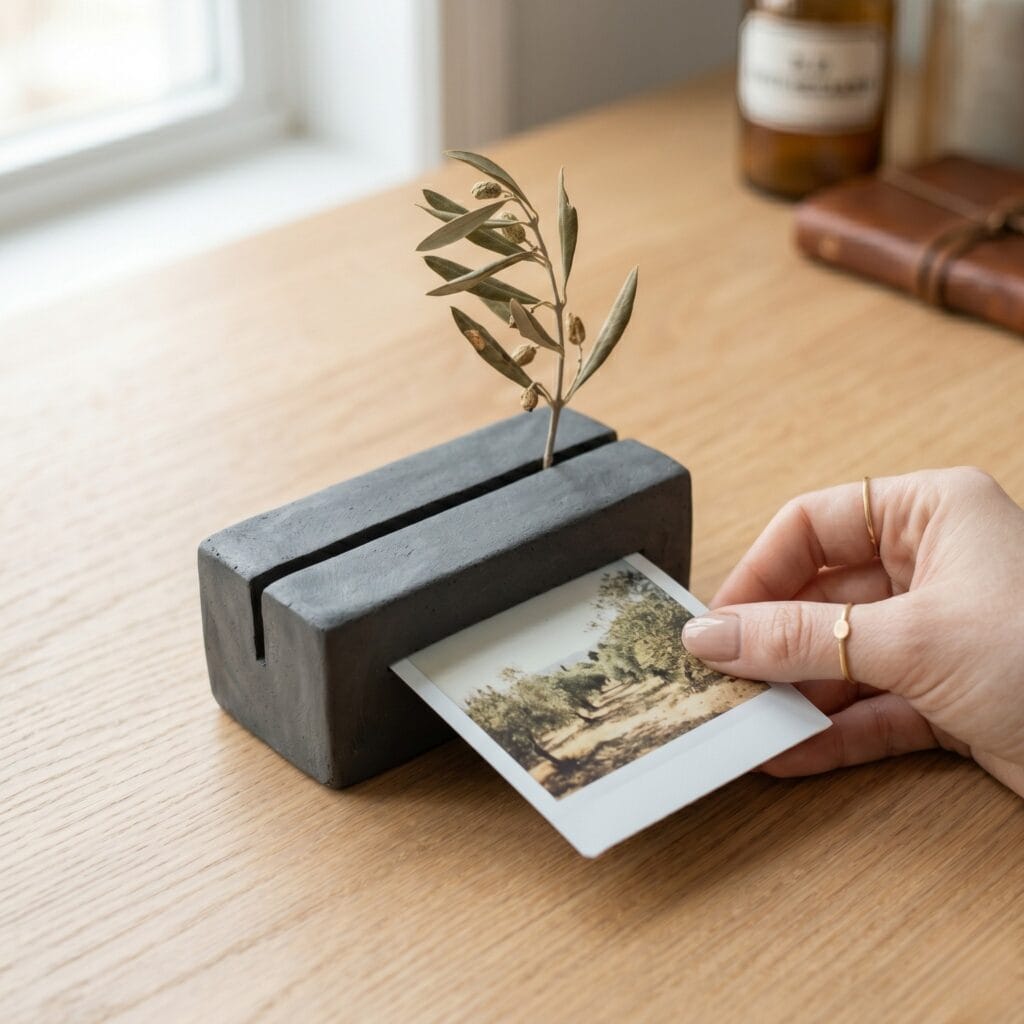
Supplies Needed: Air-dry clay (charcoal), steel clay-cutting blade, damp studio sponge.
The Concept: Chiefly, design a solid desk accessory that introduces a robust boost of blocky geometry. Thus, the twin vertical segments create striking shadow depth on your workspace. Quick Steps:
- First, shape a thick, heavy rectangular block of charcoal clay.
- Next, use a steel blade to slice two clean, deep parallel slots across the top surface (see Technique 2: Rolling & Cutting a Slab above).
- Then, smooth all the outer block edges with a damp studio sponge before drying.
Styling Tip: So, slide a polaroid into the front slot and a dried olive branch into the rear slot to maximize contrast.
6. The Abstract Bookmark Rest Cushion
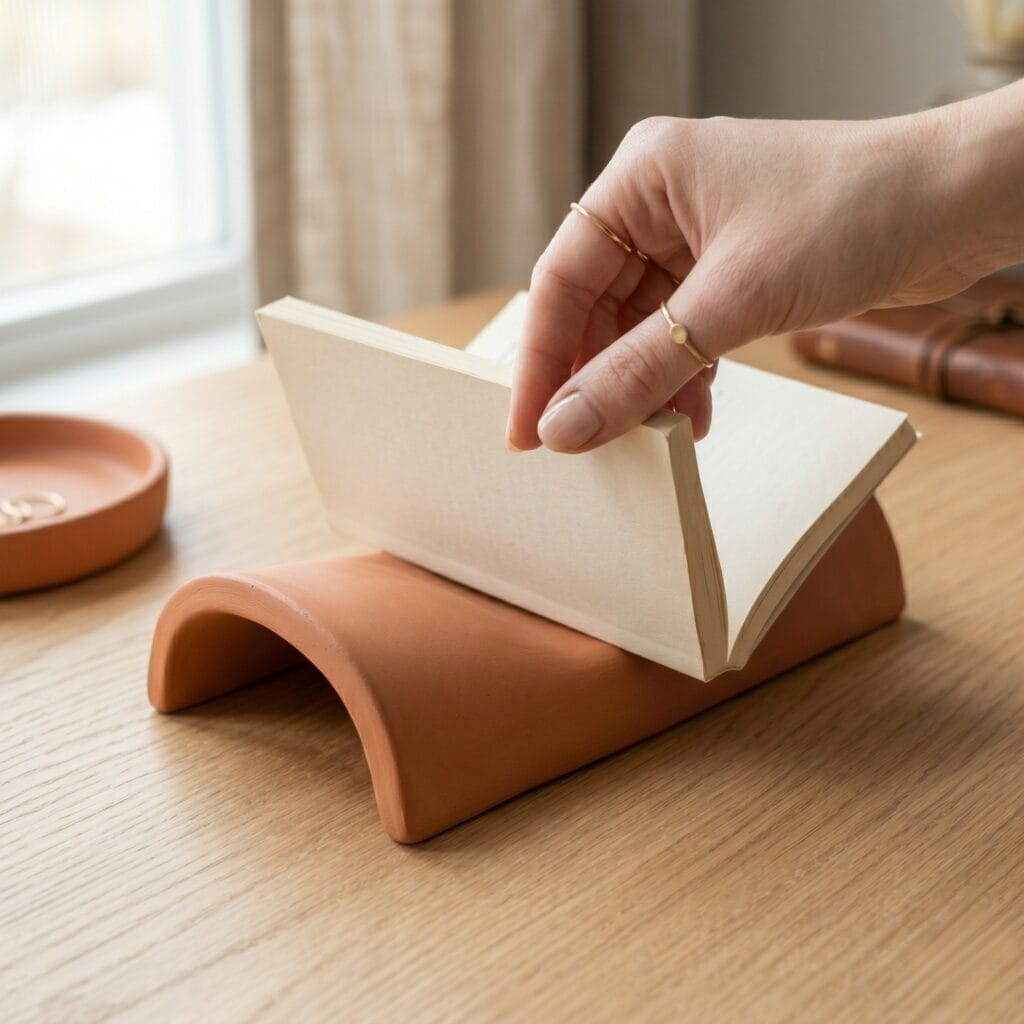
Supplies Needed: Air-dry clay (terracotta), wooden rolling pin, fine sandpaper blocks.
The Concept: The textured beauty of a miniature clay pillow translates brilliantly into a functional reading tool. True, this design is ideal for keeping your book pages safe in style. Quick Steps:
- First, roll a smooth rectangle slab using premium terracotta clay (see Technique 2 above).
- Next, curve the short ends upward while pressing the center downward to form a hollow saddle.
- Then, sand the dried cushion surface until it reaches a flawless porcelain finish.
Styling Tip: Therefore, rest your open book face-down over the saddle peak to protect your page placement perfectly.
7. Sculptural Coil-Wrapped Taper Candle Holder: Air Dry Clay Pottery Setup
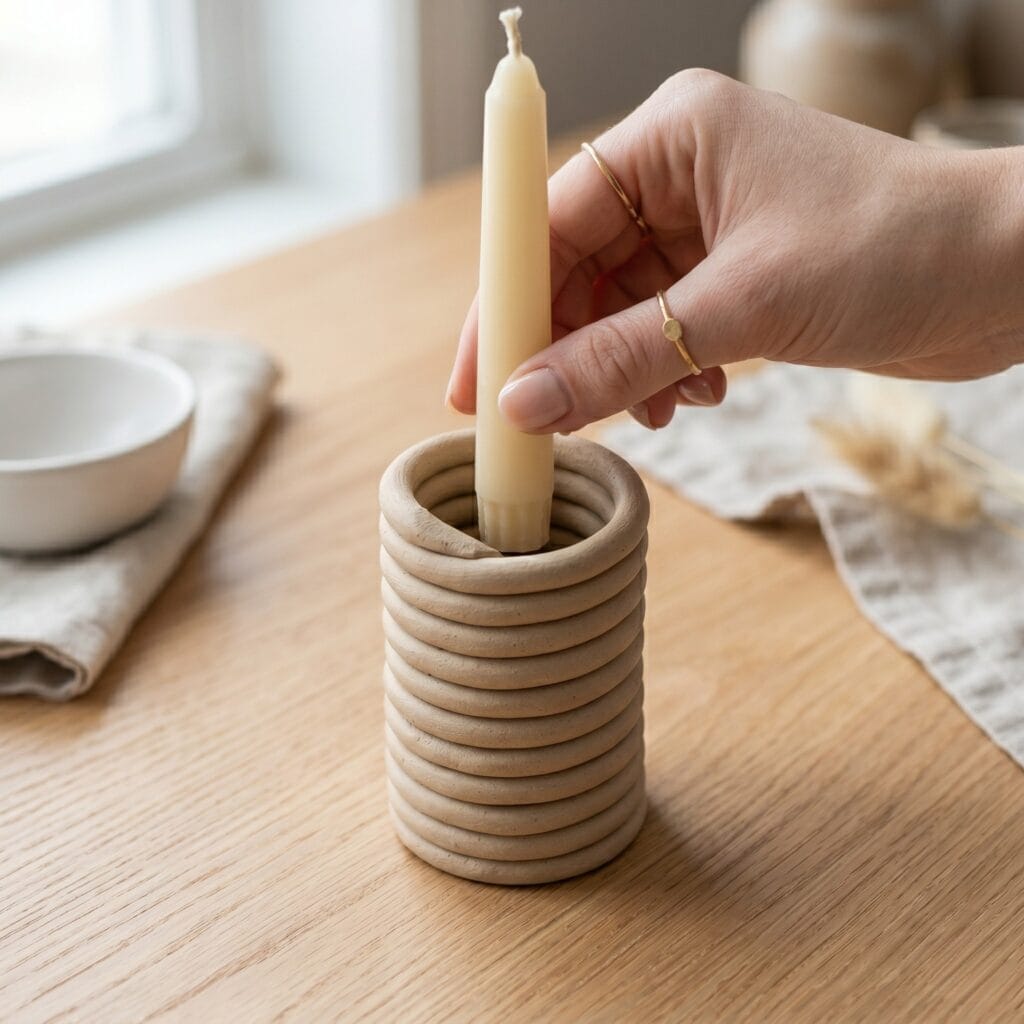
Supplies Needed: Air-dry clay, real taper candle (for sizing).
The Concept: In short, this texturized recipe pairs organic hand-rolled clay coils with linen dinner tables. Thus, it forms a luxurious spiral effect to hold modern candles. Quick Steps:
- First, roll out a long, thick clay rope of uniform thickness.
- Next, coil the rope upward into a tight, hollow vertical spiral cylinder stack (see Technique 3: Coiling above).
- Then, insert a real taper candle base into the top opening to size the socket perfectly.
Styling Tip: For example, display this heavy clay spiral object on a modern dining table centerpiece.
8. The Folded Ribbon Sage Bundle Tray
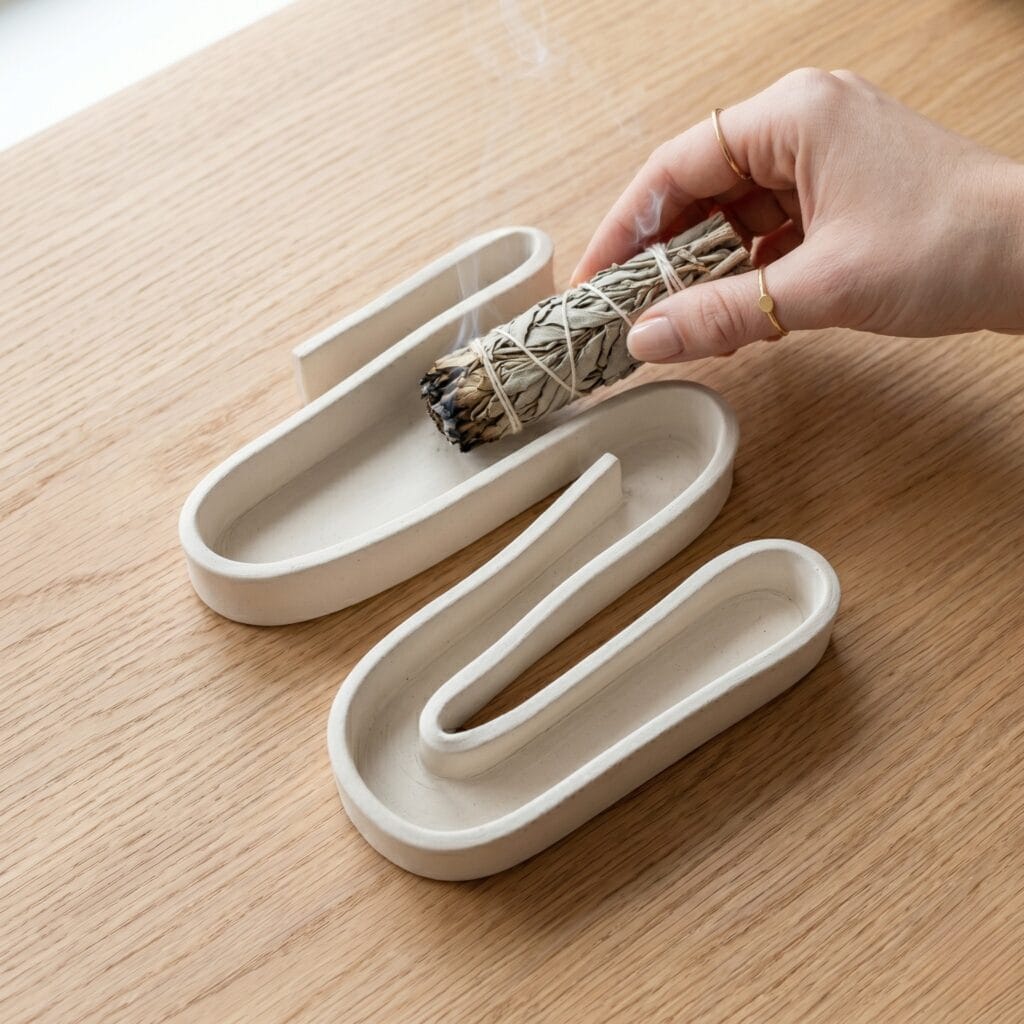
Supplies Needed: Air-dry clay (earthenware), steel clay-cutting blade.
The Concept: Undoubtedly, enjoy a modern approach where a long clay ribbon is folded into a zig-zag wave. So, it creates striking ash catching zones on your table. Quick Steps:
- First, slice a long 2-inch wide strip from a flat earthenware clay slab (see Technique 2 above).
- Next, lift and fold the ribbon over itself twice to form a continuous Z-shaped wave track.
- Then, compress the flat bottom points gently against the table to ensure it sits perfectly level.
Styling Tip: Next, rest a smoking sage smudge stick inside the upper curve to catch falling ash safely. Only rest a smoldering sage bundle here after the tray is fully dry and cured — unfired clay is porous, so let embers burn in a heat-safe dish rather than directly on the clay surface.
9. Tapered Geometric Oil Burner Shell
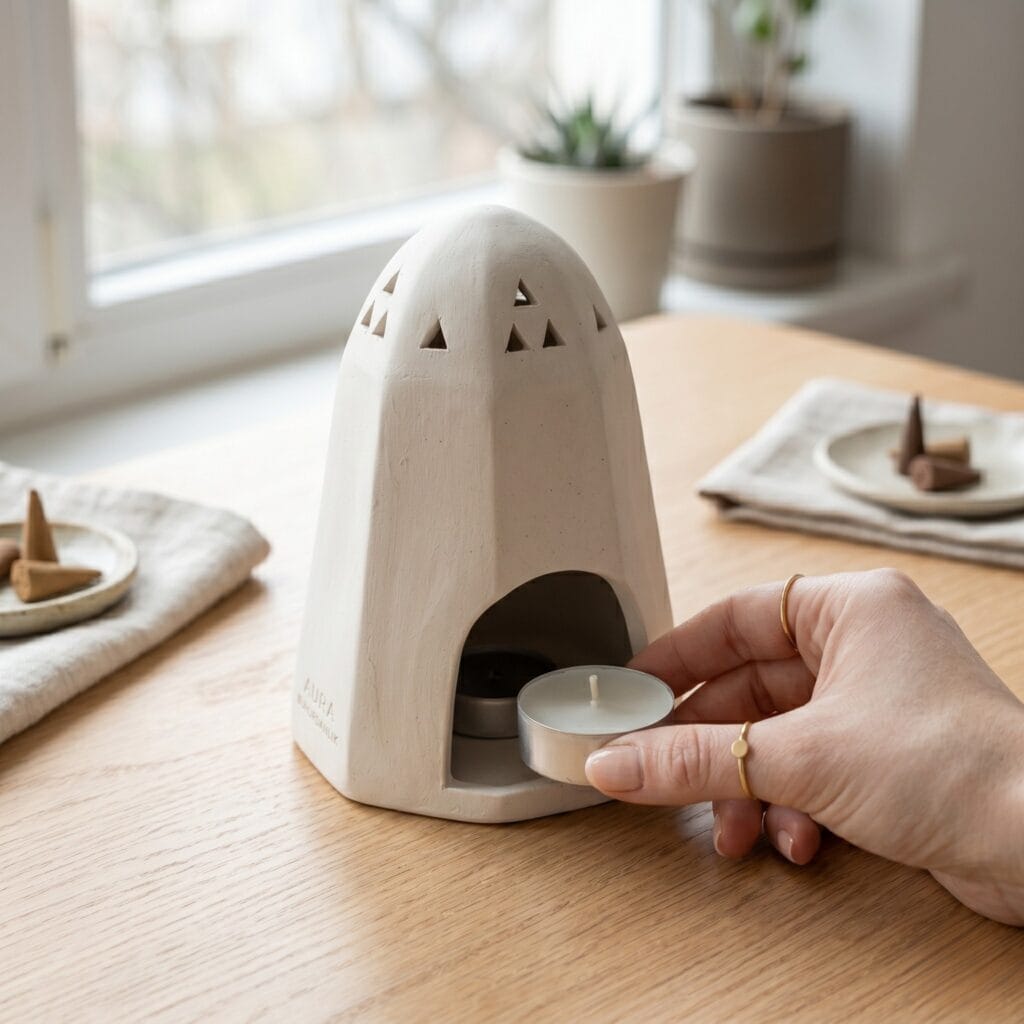
Supplies Needed: Air-dry clay (white), cardboard cone form, mini cookie cutter, heat-safe glass dish, LED tealight.
The Concept: Overall, style a bold, architectural centerpiece dome that showcases clean geometric windows to cast light. Quick Steps:
- First, mold a sheet of white clay over a cardboard cone to create a tapered shell (see Technique 4: Draping Over a Mold above).
- Next, slice a wide arched opening at the rear base for a tealight candle entry.
- Then, use a mini cookie cutter to punch out small geometric windows near the top dome.
Styling Tip: Ultimately, place a small heat-safe glass dish on top to diffuse your favorite essential oils. We recommend a flameless LED tealight rather than a real flame — unfired air-dry clay isn’t heat-rated and can scorch, discolor, or crack near an open flame.
10. The Pressed Linen Cylinder Vase
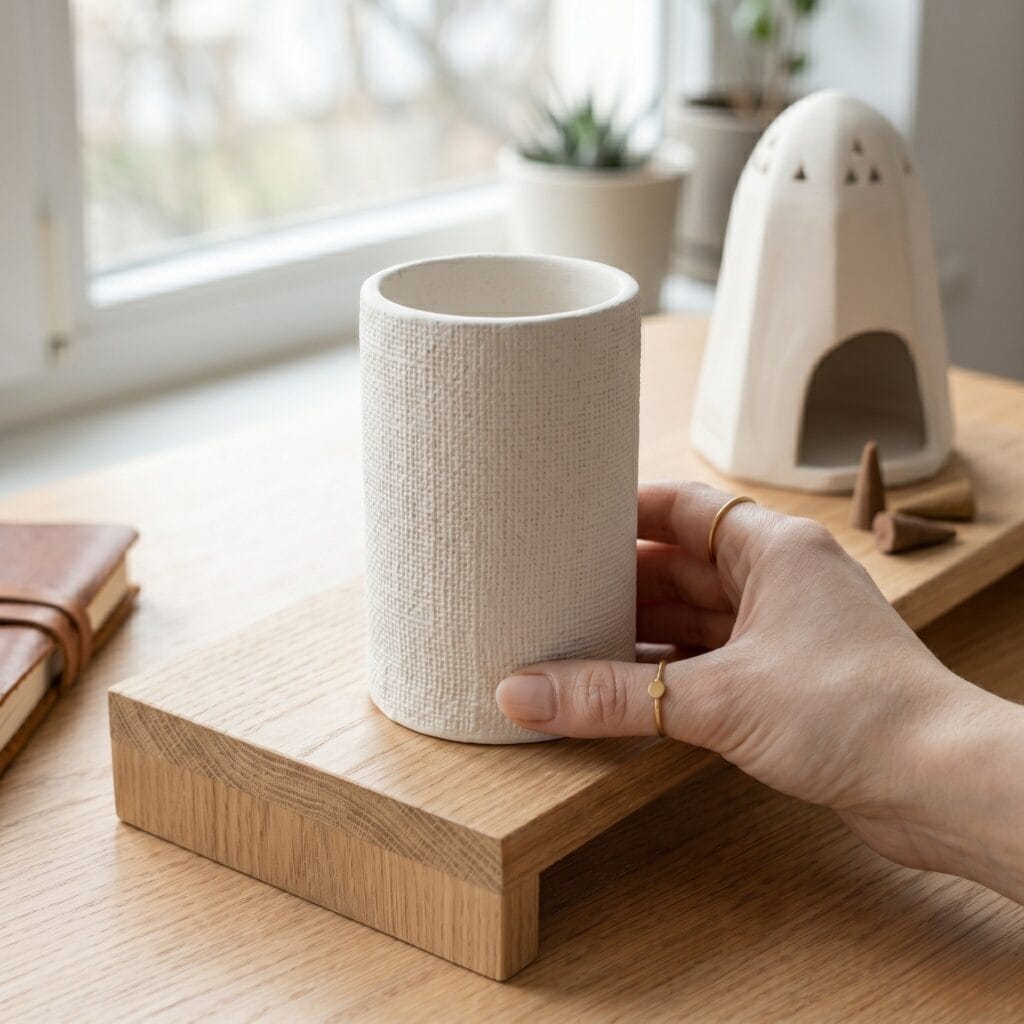
Supplies Needed: Air-dry clay, raw woven linen fabric scrap, wooden rolling pin, steel clay-cutting blade, liquid clay slip.
The Concept: Chiefly, design a highly tactile cylinder to elevate a sleek botanical vignette. Next, the organic fabric texture combined with a chalky white surface feels inviting. Quick Steps:
- First, roll a flat rectangular slab. Press a sheet of raw woven linen fabric firmly into the wet clay (see Technique 5: Fabric Texture Pressing above).
- Next, peel the fabric back, roll the textured slab into a tube, and blend the seam (see Technique 1 above).
- Then, cut a round clay disc base and attach it securely to the bottom of the tube.
Styling Tip: Consequently, display this linen-patterned masterpiece on an open shelf riser to catch the soft morning light. Display with dried or silk botanicals — like the other vessels in this guide, this piece isn’t sealed for water.
Enhance Your Vanity with Air Dry Clay Pottery Curation
Curating your own organic home accessories is a deeply satisfying project. Ultimately, incorporating these fresh air dry clay pottery ideas will instantly elevate your interior display.
First, spend an afternoon matching local clay tones to your existing gallery rooms. Your displays will look intentional and cohesive.
Quick Reference: All Supplies at a Glance
CLAY & BASE MATERIALS
- Premium Air-Dry Clay (Assorted Colors) | Check Price on Amazon
CUTTING & SHAPING TOOLS
- Wooden Modeling Knife | View Price on Amazon
- Steel Clay-Cutting Blade | See Price on Amazon
- Wooden Rolling Pin | Check Price on Amazon
- Fine Sandpaper Blocks | View Price on Amazon
- Wooden Skewer or Pencil | Check Price on Amazon
- Mini Cookie Cutter | See Price on Amazon
JOINING & FINISHING
- Liquid Clay Slip | Check Price on Amazon
- Damp Studio Sponge | View Price on Amazon
SPECIALTY & PROJECT EXTRAS
- Cardboard Cone Form | Check Price on Amazon
- Heat-Safe Glass Dish | See Price on Amazon
- LED Tealight | View Price on Amazon
- Raw Woven Linen Fabric Scrap | Check Price on Amazon
Important Crafting Safety Notes:
Working with raw craft clays is a great creative outlet, and a few precautions keep every studio session safe.
Workspace: Use a clean, dedicated surface away from food prep zones, and keep it clear of clutter while cutting or carving.
Personal Protection: Because sanding dry clay creates fine micro-dust, always wear a lightweight mask during cleanup, and consider safety glasses when using the steel blade for repeated cuts.
Children & Pets: Keep sharp blades, skewers, and wet slip out of reach of children and pets while you work, and store unfired clay pieces somewhere they can’t be chewed or knocked over while drying.
Material & Tool Integrity: Air-dry clay is not fired in a kiln, which means it stays porous and is not heat- or water-rated. Never place a real flame directly against unfired clay (see the Oil Burner Shell and Sage Bundle Tray notes above), and don’t use finished vessels to hold standing water — display dried or silk botanicals instead.
General Handling: Allow thick, hollow, or joined pieces the full recommended drying time before moving or displaying them, since handling a piece too early is the most common cause of cracks and broken joins.
So, which sculptural look are you inspired to style first? Please, share your design layout ideas in the comments section below!



[…] handmade dish is an ideal base for a small ring of sparkle. If you need a base first, these air-dry clay pottery ideas offer shapes that suit bedside rings, earrings, and small […]
[…] cool throughout. If you want more vessel-shaped projects after this collection, browse these air dry clay pottery ideas for more hand-built inspiration. Before starting the project list, you may also enjoy these easy […]