
Plain tote bags disappear into the pile. These diy tote bags last because every painted stroke, stitched initial, and pressed name is planned for real errands, library books, teacher gifts, and everyday carrying.
Choose one of four independent methods: fabric paint, reusable stencils, heat-transfer vinyl, or hand embroidery. If you enjoy making another handmade gift project from our craft archive, these durable canvas projects give you another useful surface to personalize.
Affiliate Disclosure: This post contains affiliate links. As an Amazon Associate, I earn from qualifying purchases. If you buy through these links, I may earn a commission at no additional cost to you.
Essential Materials for DIY Tote Bags
Each method begins with a heavyweight cotton canvas tote that has been washed and dried according to its care label. Prewashing removes finishing residue and lets the canvas shrink before you add paint, vinyl, or stitches.
Select color media made for cotton fabric, then follow the manufacturer’s cure and heat-setting directions exactly. A flat cardboard insert protects the back panel while you paint or press, and it should sit fully inside the bag without extending over the seams.
🎨 Canvas Bases and Color Media
- Heavyweight Natural Cotton Canvas Tote Bags — A firm cotton weave holds paint, stitches, and pressed vinyl without sagging under regular use | Check Price on Amazon
- Permanent Fabric Paint Set — Textile paint stays flexible on cotton canvas after the product’s stated cure and heat-setting process | See Price on Amazon
- Heat Transfer Vinyl Sheets — Fabric-compatible heat-transfer vinyl creates clean lettering that can flex with the tote panel | View Heat Transfer Vinyl Sheets on Amazon
- Six-Strand Cotton Embroidery Floss — Colorfast stranded floss separates cleanly into three working strands for readable canvas lettering | Find Embroidery Floss on Amazon
- Water-Soluble Embroidery Stabilizer Sheets — Wash-away transfer sheets hold a drawn or printed initial in place without permanent guide marks | Check Water-Soluble Stabilizer on Amazon
- Low-Tack Reusable Mylar Stencil Sheets — Flexible mylar lies flat against canvas for crisp painted leaves, flowers, and borders | View Mylar Stencil Sheets on Amazon
✂ Measuring, Painting, and Stitching Tools
- Fabric Paintbrush and Stencil Brush Set — Flat brushes cover a monogram evenly, while short stencil bristles keep paint from bleeding beneath mylar | Check Fabric Paintbrush Set on Amazon
- Self-Healing Cutting Mat, Rotary Cutter, and Acrylic Ruler Set — A measured cutting surface protects the table while trimming stabilizer or vinyl | See Cutting Mat Set on Amazon
- Large-Eye Embroidery Needles and 6-Inch Embroidery Hoop — The needle eye accommodates separated floss, and the hoop keeps one canvas layer taut while you stitch | View Embroidery Needles and Hoop on Amazon
- Heat-Resistant Pressing Pillow and Teflon Pressing Sheet — These accessories level the tote panel around seams and shield fabric during vinyl pressing | Find Pressing Accessories on Amazon
🧰 Heat-Setting and Studio Upgrades
- Beginner Tote Bag Decorating Kit — A coordinated starter set gives new makers compatible blanks and fabric-decoration supplies in one place | Check Beginner Tote Bag Decorating Kit on Amazon
- Electronic Cutting Machine Bundle — A fine-point cutting machine produces repeatable names, initials, and detailed vinyl motifs with accurate edges | See Electronic Cutting Machine Bundle on Amazon
- Digital Heat Press for Fabric Transfers — Controlled temperature and even pressure make repeated heat-transfer work more consistent across cotton canvas | View Digital Heat Press on Amazon
- Daylight LED Magnifying Craft Lamp with Desk Clamp — Daylight-balanced light helps you inspect painted edges, weed small lettering, and stitch cleanly through dense canvas | Find Magnifying Craft Lamp on Amazon
Paint and vinyl labels control the final cure temperature, pressing duration, and cooling or peel method. Therefore, keep those instructions beside your work surface rather than relying on a generic heat setting.
Prep DIY Tote Bags for Clean, Long-Lasting Designs
Supplies Needed: Heavyweight Natural Cotton Canvas Tote Bag, cardboard insert, ruler, iron, and ironing board.
First, wash and dry the cotton tote according to its care label if the label permits laundering. Press the front panel smooth on an ironing board, paying close attention to the folded side seams and the crease near the top hem.
- Cut a clean cardboard insert about 1 inch smaller than the tote’s front panel on every side. Slide it inside the bag so it prevents paint or adhesive from reaching the back layer.
- Use a ruler to find the panel center. Mark a light placement guide about 3 inches below the top edge, then adjust it slightly lower on a taller bag.
- Keep the handles folded away from the design zone. If needed, place the tote flat with the cardboard insert beneath the front panel before beginning your chosen design.
Four Personalized DIY Tote Bags to Make
1. Painted Monogram for DIY Tote Bags
Supplies Needed: Heavyweight Natural Cotton Canvas Tote Bag, Permanent Fabric Paint Set, Fabric Paintbrush and Stencil Brush Set, 4- to 5-inch paper letter template, painter’s tape, cardboard insert, iron, and pressing cloth.
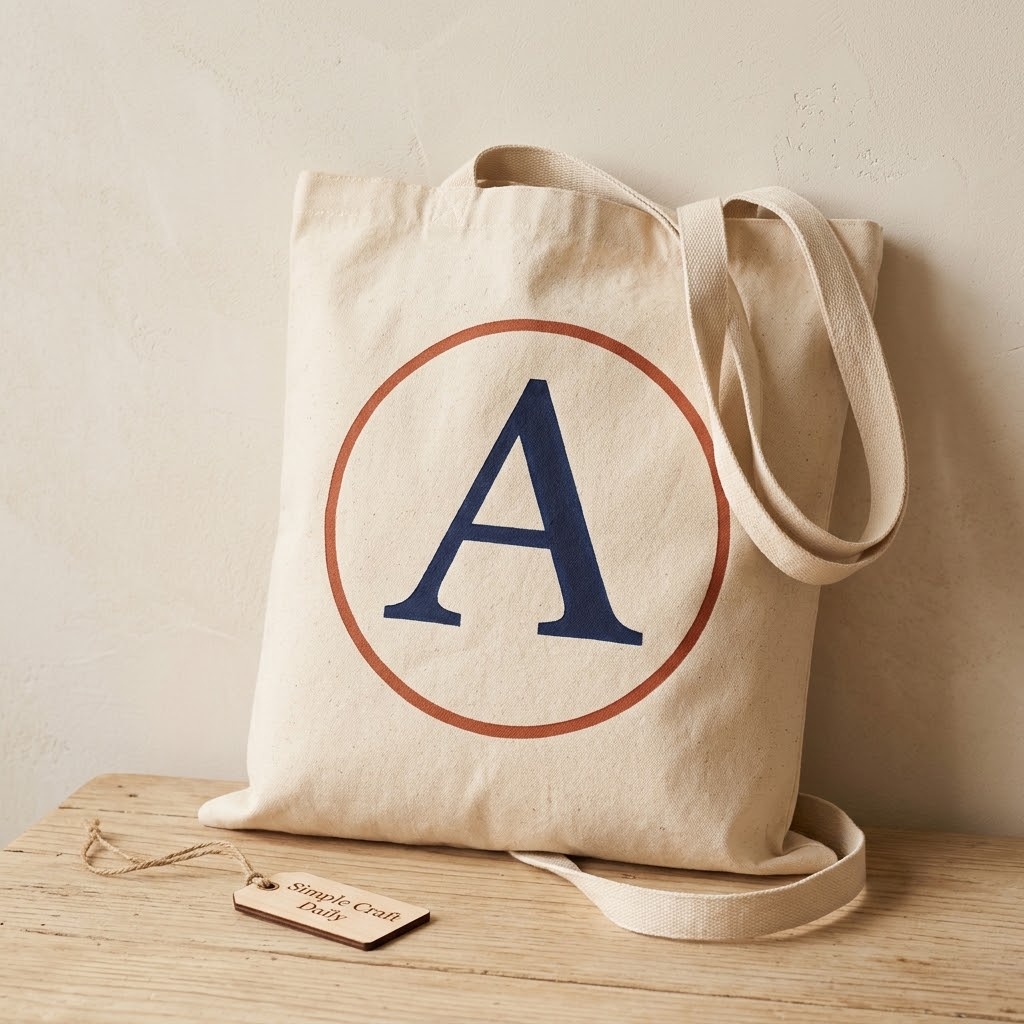
Choose a bold block or serif letter that measures 4 to 5 inches tall. Center the paper template within the marked design zone, then secure the corners with painter’s tape so the paper cannot shift while you trace its outline.
Place the cardboard insert inside the tote. Next, use the flat brush from the fabric paintbrush set to apply a thin, even coat of permanent fabric paint inside the letter shape. Pull the brush from the outline toward the center so paint does not build up against the paper edge.
Allow the first coat to dry for the exact period stated on the paint label, then apply a second thin coat for solid coverage. Remove the paper template only after the paint surface is dry enough that it will not drag. Makers who enjoy controlled painted surfaces may also like these DIY fall canvas painting ideas.
Finally, let the monogram dry fully. Place the pressing cloth over the painted area and heat-set according to the paint manufacturer’s stated temperature, duration, and fabric-side instructions. Let the tote bag cool flat before lifting the cardboard insert.
2. Layered Botanical Stencil DIY Tote Bags
Supplies Needed: Heavyweight Natural Cotton Canvas Tote Bag, Permanent Fabric Paint Set, Low-Tack Reusable Mylar Stencil Sheets, Fabric Paintbrush and Stencil Brush Set, painter’s tape, cardboard insert, iron, and pressing cloth.
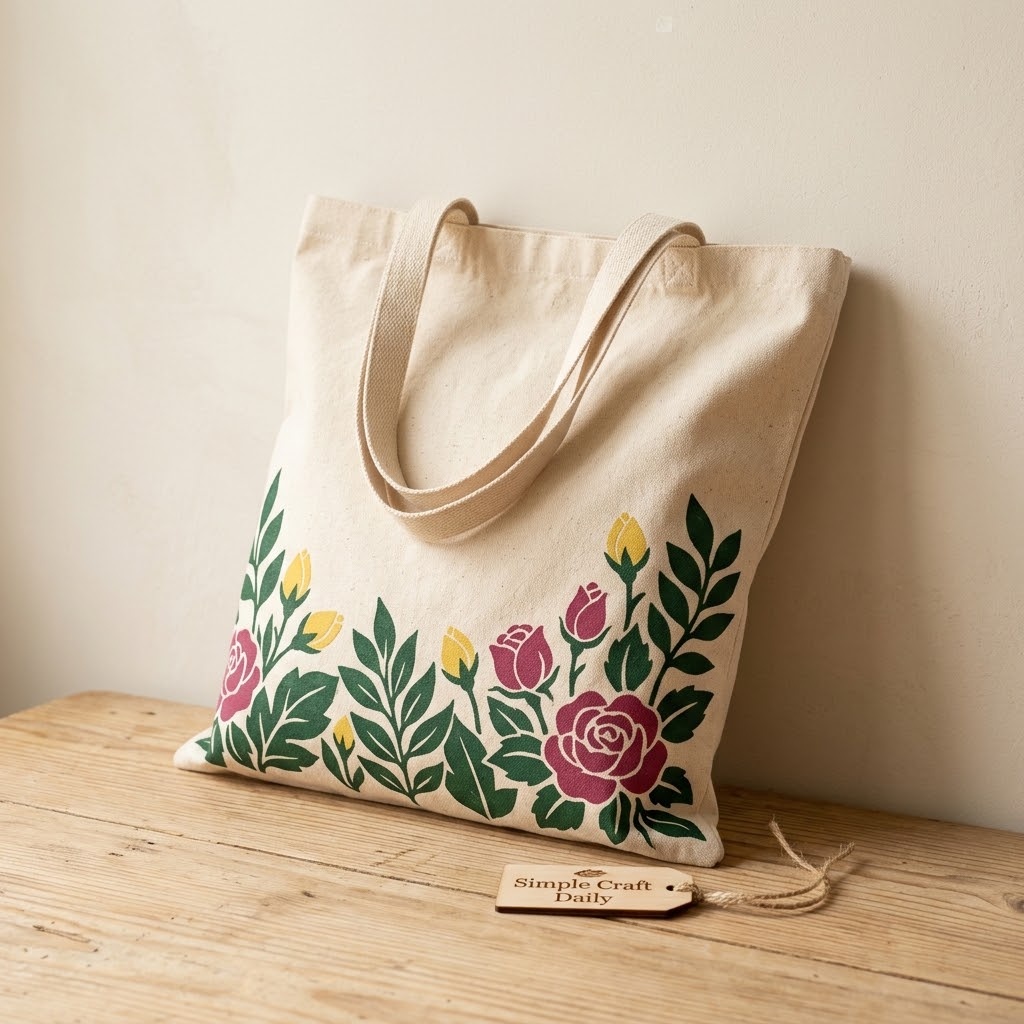
Slide the cardboard insert into the tote and smooth the front panel. Position a leaf or flower mylar stencil along the bottom edge or one side of the marked design zone, then tape every corner flat with painter’s tape.
Load a stencil brush with a small amount of permanent fabric paint, then blot most of it onto scrap paper until the bristles feel nearly dry. Pounce the brush straight down through the stencil openings with light, repeated taps. A wet brush pushes paint beneath the stencil and leaves soft, blurry edges.
Lift the stencil straight up after the first color layer. Allow that paint to dry for the label’s stated interval before shifting the stencil and adding a second color that overlaps only where the first layer is dry.
When the botanical pattern is fully dry, cover it with the pressing cloth and heat-set it exactly as directed by the fabric paint manufacturer. This stencil method works well with two colors because the layered leaves stay readable without crowding the canvas.
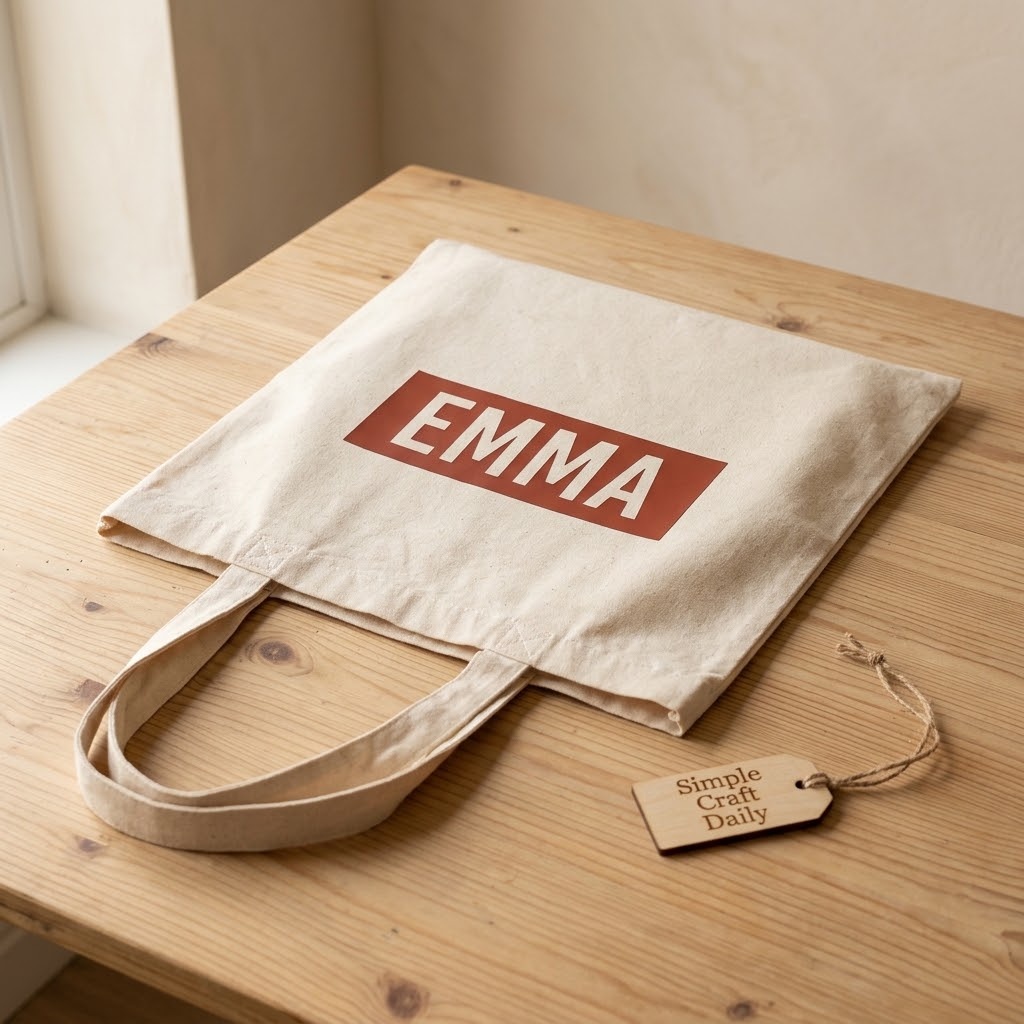
3. Name Label DIY Tote Bag With Heat-Transfer Vinyl
Supplies Needed: Heavyweight Natural Cotton Canvas Tote Bag, Heat Transfer Vinyl Sheets, Electronic Cutting Machine Bundle or craft knife, weeding tool, Heat-Resistant Pressing Pillow and Teflon Pressing Sheet, and Digital Heat Press for Fabric Transfers or a household iron approved by the vinyl manufacturer.
Create a name or short word that fits inside a design area about 6 inches wide. Mirror the lettering before cutting because heat-transfer vinyl is pressed carrier-sheet side up. Cut the design with an electronic cutting machine bundle or a craft knife, then use a weeding tool to remove the vinyl around and inside the letters while the design remains on its carrier sheet.
Place the heat-resistant pressing pillow inside the tote beneath the front panel so seams and hems sit outside the pressing area. Preheat the canvas only if the vinyl manufacturer permits it. Then center the carrier sheet in the marked zone and cover it with the Teflon pressing sheet.
Use a digital heat press or an approved household iron at the vinyl manufacturer’s stated temperature, pressure, and pressing time. Follow the label’s hot-peel, warm-peel, or cool-peel direction precisely. If the vinyl requires a second press after peeling, replace the Teflon sheet and repress for the stated time.
Let the tote cool flat before handling it. A crisp name label makes each tote especially useful for library visits, activity supplies, and handmade teacher gifts.
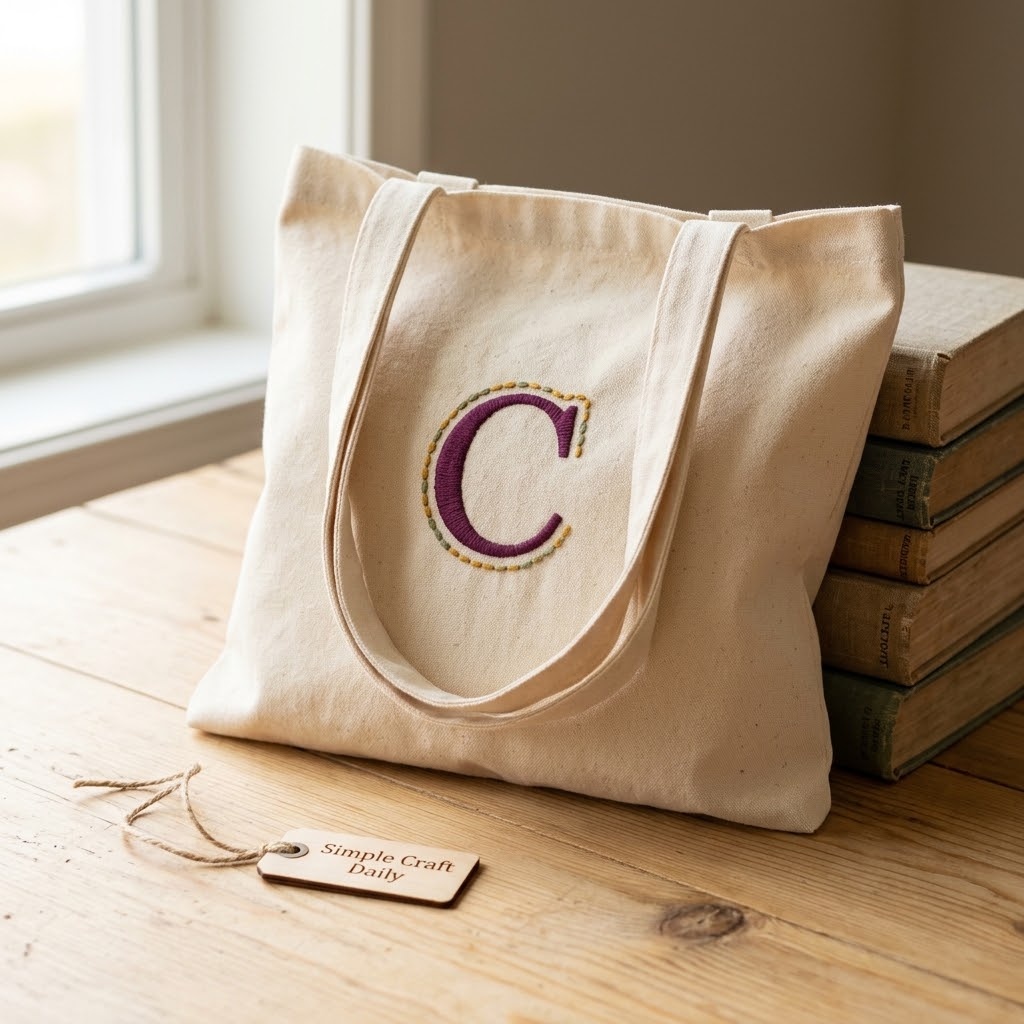
4. Embroidered Initial DIY Tote Bag
Supplies Needed: Heavyweight Natural Cotton Canvas Tote Bag, Six-Strand Cotton Embroidery Floss, Water-Soluble Embroidery Stabilizer Sheets, Large-Eye Embroidery Needles and 6-Inch Embroidery Hoop, embroidery scissors, and a bowl of clean water.
Draw or print an initial with a small border on a water-soluble embroidery stabilizer sheet, then attach the sheet to the tote’s front panel in the marked design zone. Place only the front canvas layer inside the 6-inch embroidery hoop. Keep the back panel entirely outside the hoop so you do not stitch the bag shut.
Separate three strands from the six-strand cotton embroidery floss and thread them through a large-eye embroidery needle. Cut a 20-inch length of floss to reduce tangling. Secure the first end with a small knot on the tote interior, then stitch the initial in backstitch using stitches about 1/8 inch long.
Check inside the bag before every few stitches to confirm the needle is passing through only the front layer. Add a small running-stitch border around the initial, then secure the final floss tail with a small knot on the inside and trim it with embroidery scissors.
Remove the tote from the hoop. Soak the stitched area in the bowl of clean water until the stabilizer dissolves, following the stabilizer label if it gives a specific soak time. Lay the tote flat to dry completely before use. These totes gain strength from stitched details that do not rely on an adhesive bond.
How to Care for Personalized DIY Tote Bags
Give paint its full manufacturer-stated cure time and allow vinyl to complete its recommended bonding period before washing. Washing too soon can soften fresh paint, disturb a vinyl edge, or leave moisture around embroidery knots.
When the chosen materials allow laundering, turn the tote inside out and wash gently in cool water. Use mild detergent, skip harsh bleach, and air-dry the bag flat or hanging by the handles.
Avoid direct high heat on heat-transfer vinyl. For embroidered totes, avoid extended soaking because prolonged immersion can stress the canvas and loosen dye from lower-quality floss. Press painted areas from the reverse side with a pressing cloth if the paint label permits ironing.
For another useful handmade seasonal project, browse these cozy DIY fall decorations for giftable ideas that pair well with a personalized tote.
DIY Tote Bags FAQ
These answers address the most common washability, paint, vinyl, and embroidery issues that come up while making totes for regular use.
Can DIY Tote Bags Be Washed?
Washability depends on the tote fabric, paint, vinyl, thread, and cure process. The manufacturer instructions for each product override general care advice, especially for heat-setting and waiting periods before the first wash.
Once every material has fully cured, turn the tote inside out and use a gentle cool-water wash if the supplies permit laundering. Then air-dry it. Do not launder a painted or vinyl tote before its required cure period has passed.
Which Paint Works Best on a Personalized Canvas Tote Bag?
Opaque permanent fabric paint made for cotton canvas gives the most reliable color and flexibility. Standard acrylic craft paint can dry stiffly and may crack on a tote that folds repeatedly unless its manufacturer specifically approves it for fabric or provides a compatible textile medium.
Use the product’s own instructions for paint additives, dry time, heat-setting temperature, and pressing method. For totes with bold lettering, apply two thin coats rather than one heavy coat so the paint stays smoother across the canvas weave.
Why Is My Heat-Transfer Vinyl Lifting?
Lifting edges usually point to uneven pressure, an incorrect temperature, too little pressing time, or a carrier sheet peeled at the wrong stage. Tote seams can also raise the design away from the heat source.
Place a pressing pillow inside the tote to level the front panel around the seams. Then use the vinyl manufacturer’s stated temperature, pressure, press time, peel method, and second-press direction. Do not guess at settings, since different vinyl types bond differently.
Can I Embroider a Tote Without Sewing It Shut?
Yes. Hoop only the front tote layer and keep the back panel loose and outside the hoop. Before each new section of stitching, reach inside the bag and check that the needle path passes through the front canvas only.
Use 20-inch floss lengths and three separated strands for tidy stitches with less tangling. Short lengths also make it easier to secure knots on the tote interior without creating bulky thread nests.
Quick Reference: DIY Tote Bags Supplies at a Glance
For your convenience, here is a quick summary of all materials and tools used in this tutorial:
🎨 Canvas Bases and Color Media
- Heavyweight Natural Cotton Canvas Tote Bags | Check Price on Amazon
- Permanent Fabric Paint Set | See Price on Amazon
- Heat Transfer Vinyl Sheets | View Heat Transfer Vinyl Sheets on Amazon
- Six-Strand Cotton Embroidery Floss | Find Embroidery Floss on Amazon
- Water-Soluble Embroidery Stabilizer Sheets | Check Water-Soluble Stabilizer on Amazon
- Low-Tack Reusable Mylar Stencil Sheets | View Mylar Stencil Sheets on Amazon
✂ Measuring, Painting, and Stitching Tools
- Fabric Paintbrush and Stencil Brush Set | Check Fabric Paintbrush Set on Amazon
- Self-Healing Cutting Mat, Rotary Cutter, and Acrylic Ruler Set | See Cutting Mat Set on Amazon
- Large-Eye Embroidery Needles and 6-Inch Embroidery Hoop | View Embroidery Needles and Hoop on Amazon
- Heat-Resistant Pressing Pillow and Teflon Pressing Sheet | Find Pressing Accessories on Amazon
🧰 Heat-Setting and Studio Upgrades
- Beginner Tote Bag Decorating Kit | Check Beginner Tote Bag Decorating Kit on Amazon
- Electronic Cutting Machine Bundle | See Electronic Cutting Machine Bundle on Amazon
- Digital Heat Press for Fabric Transfers | View Digital Heat Press on Amazon
- Daylight LED Magnifying Craft Lamp with Desk Clamp | Find Magnifying Craft Lamp on Amazon
Important Crafting Safety Notes
Crafting is a rewarding creative activity, but maintaining a safe workshop environment is essential for yourself, your family, and your pets. Please review these safety precautions before starting:
• Personal Protective Equipment (PPE) & Safe Handling: Wear safety glasses when trimming vinyl with a craft knife or rotary cutter, and use a heat-resistant work surface when pressing vinyl or heat-setting paint. Use heat-resistant gloves if your pressing tool requires close handling. Wear nitrile gloves if textile paint or adhesive irritates your skin, and use a particle mask when sanding or handling powdered craft materials.
• Room Ventilation & Fume Safety: Work in a well-ventilated area with open windows, cross-ventilation, or active exhaust when using textile paints, adhesives, sealants, sprays, or heat-curing materials. Allow painted and pressed projects to cure and off-gas fully in an airy space away from everyday living areas.
• Child & Pet Safety (Choking & Swallowing Prevention): Small craft components, including needles, vinyl scraps, beads, safety eyes, split rings, clasps, jump rings, pins, and loose floss, can create choking or ingestion hazards. Keep supplies out of reach of children and pets. For handmade projects handled by young children, choose securely stitched details rather than detachable plastic findings.
• Sharp Tool Storage & Clean Work Area: Store rotary cutters, craft knives, embroidery needles, snips, scissors, and pliers in secure latching cases or high cabinets after use. Then sweep or vacuum the floor and work area to collect dropped needles, pins, and vinyl or wire clippings before children or pets enter the space.
• Certified, Quality & Non-Toxic Supplies: Choose ACMI AP-certified non-toxic paints and adhesives when available, and use quality materials intended for fabric applications. Follow every manufacturer instruction for cure times, temperatures, and disposal. Never reuse craft tools, pressing surfaces, or containers for food preparation.
For more detailed guidance on safe crafting practices, liability disclosures, and website usage, please review our Terms and Conditions.
“Which DIY tote bags design will you try first: a painted monogram, botanical stencil, vinyl name label, or embroidered initial? Share your color palette or personalization idea in the comments below!”